10 Built-In Storage Long Narrow Living Room Ideas

Spread the love

Long, narrow living rooms—often called “bowling alley” or “tunnel” spaces—present a common architectural dilemma: freestanding storage units (like deep bookcases, bulky credenzas, and media stands) protrude into narrow floor walkways, choking traffic flow and exaggerating the room’s linear tunnel effect.

The most effective interior architecture solution is custom built-in storage. By integrating cabinetry flush into walls, recessing shelving between wall studs, building up to the ceiling, and wrapping architectural alcoves, built-in joinery provides extensive concealed storage with a minimal floor footprint.

Mastering built-ins in elongated spaces requires balancing verticality, closed-versus-open storage ratios, and streamlined finishes. Whether designing a full-wall media library on a short end wall, wrapping an entryway radiator in seamless cabinetry, or floating a continuous low-profile credenza, custom storage turns awkward rectangular layouts into functional, visually balanced living spaces.
Why This Idea Is Trending & Flattering

  • Preserving Valuable Floor Clearance: Built-ins can be designed as shallow as 8 to 12 inches deep, keeping the central 36-inch walking corridor completely open.

  • Breaking the Linear “Tunnel” Illusion: Installing full-height built-ins on the short far wall brings the back wall visually forward, making the room feel more square and proportionate.

  • Concealing Everyday Clutter: Combining closed lower cabinets with open display shelving hides cables, board games, media hardware, and toys while curating decor at eye level.

  • Maximizing Vertical Real Estate: Extending joinery to the ceiling draws the eye upward, highlighting ceiling height and adding architectural character.

  • Seamless Architectural Camouflage: Painting built-in cabinetry the exact same color as adjacent walls allows massive storage banks to blend invisibly into the background.

Dimensions, Clearance & Material Planning Guide

Essential Measurements & Layout Standards

  • Optimal Shelf Depth: Keep open display shelving between 10 and 12 inches deep. For books, decor, and glassware, deeper shelves waste space and protrude into walkways.

  • Closed Base Cabinet Depth: Keep base cabinets between 14 and 16 inches deep—just enough for AV receivers, storage baskets, and electronics without impeding foot traffic.

  • Maintain the 36-Inch Walkway: Ensure at least 30 to 36 inches of clear walking space between the outer face of built-in cabinets and floating sofas or coffee tables.

  • The 60/40 Closed-to-Open Ratio: Design built-in walls with roughly 60% closed cabinetry (at the bottom) and 40% open shelving (at the top) to maintain visual breathing room.

Material & Hardware Palette

  • Cabinetry Carcass: Furniture-grade birch plywood or moisture-resistant MDF painted in matte, scrubbable lacquer.

  • Countertops & Bench Tops: Solid white oak, walnut, or durable quartz slabs to cap base units with tactile warmth.

  • Hardware: Push-to-open touch latches or integrated J-pull edge profiles to eliminate protruding knobs in narrow walkways.

  • Integrated Lighting: Warm-white (2700 K) LED strip channels routed flush into the underside of shelves for indirect ambient glow.

10 Built-In Storage Ideas for Long, Narrow Living Rooms

101

1. Full-Height Library Wall on the Short Far Wall

Concept Overview & Aesthetic Appeal

Placing a dramatic, floor-to-ceiling built-in bookcase on the narrow end wall of the room draws the eye straight to the back, anchoring the space and visually shortening the long tunnel perspective.

Step-by-Step Execution Guide

  • Construct a full-wall grid bookcase spanning wall-to-wall and floor-to-ceiling across the narrow end wall.

  • Build closed base cabinets (16 inches deep) along the bottom third, topped with open shelving (10 inches deep).

  • Paint the entire unit in a deep, grounding tone (like navy, forest green, or charcoal) or match the wall color.

  • Add vertical LED strip channels in routed grooves behind the face frame to softly illuminate book spines.

  • Place a comfortable reading armchair and a small side table in front to complete the destination zone.

Pro Styling Tip

Leave 20% of shelf cubbies open or styled with sculptural ceramics rather than packing every shelf full of books.

2. Continuous Floating Low-Profile Credenza

2

Concept Overview & Aesthetic Appeal

A long, wall-mounted floating cabinet running along one long wall provides extensive concealed storage while keeping the floor beneath completely visible, making the room feel wider.

Step-by-Step Execution Guide

  • Mount a series of minimalist, handleless cabinets 10 to 12 inches above the finished floor along the long wall.

  • Keep the depth shallow (12 to 14 inches maximum) with push-to-open doors.

  • Top the unit with a single, unbroken solid oak or quartz slab to create a clean horizontal line.

  • Install an LED light strip along the underside to cast a soft downward glow on the floor.

  • Use the surface for a framed TV, leaning art, and low ceramic bowls.

Pro Styling Tip

Continuous floating cabinetry prevents the choppy, cluttered look that comes from placing multiple separate furniture pieces along a long wall.

3. Built-In Window Bench with Deep Storage Drawers

3

Concept Overview & Aesthetic Appeal

Transforming the window wall at the end of the room into a custom storage bench provides a cozy reading nook while utilizing dead space for deep pull-out drawers.

Step-by-Step Execution Guide

  • Frame a custom bench beneath the window casing (18 inches high by 20 to 24 inches deep).

  • Install heavy-duty full-extension drawer slides fitted with deep drawers for extra blankets, pillows, and seasonal decor.

  • Top the bench with a custom 3-inch high-density foam cushion upholstered in durable performance linen.

  • Flank the bench with narrow vertical floor-to-ceiling shelving towers on both sides of the window.

  • Add a pair of dimmable swing-arm brass reading sconces inside the window casing.

Pro Styling Tip

Use pull-out drawers instead of a hinged flip-top lid so you can access items without moving the seat cushions.

4. Recessed Stud-Bay Niches with Flush Shelving

4

Concept Overview & Aesthetic Appeal

When floor space is too narrow for standard cabinetry, opening the drywall between interior 2×4 wall studs lets you build recessed shelving that sits flush with the wall plane, taking up zero floor space.

Step-by-Step Execution Guide

  • Identify non-load-bearing interior partition walls along the long living room wall.

  • Cut into the drywall between studs to create 3.5-inch-deep vertical cavities.

  • Frame the interior bays with finished oak or painted MDF boxes with drywall-beaded trim.

  • Install flush glass or wooden shelves inside the recessed niches.

  • Add micro puck lights or hidden LED tape at the top of each cavity to illuminate glassware and art objects.

Pro Styling Tip

Paint the back of the recessed niches a subtle accent shade (like warm terracotta or sage) to create a sense of depth.

5. Media Wall with Fluted Wood Slats & Hidden Storage

5

Concept Overview & Aesthetic Appeal

A modern media focal wall featuring vertical wood slat paneling that conceals flush cabinet doors, hiding the television, soundbar, gaming consoles, and wiring behind a textured wood facade.

Step-by-Step Execution Guide

  • Build out a shallow false wall (6 inches deep) along the long wall to house recessed media conduits and flush cabinets.

  • Install push-latch cabinet doors clad in vertical natural oak or walnut acoustic slats.

  • Mount a flush-mount Frame TV in the center, routing all cables internally through the false wall.

  • Include ventilated lower cabinet bays with infrared-repeater hardware for gaming consoles and streaming boxes.

  • Balance the wood slats with a smooth lime-wash plaster surround.

Pro Styling Tip

Vertical wood slats draw the eye upward, counteracting the low, horizontal proportions of long, narrow rooms.

6. Integrated Drop-Zone & Radiator Cover Enclosure

6

Concept Overview & Aesthetic Appeal

In older apartments and narrow homes, awkward cast-iron radiators along the main walkway interrupt furniture placement. Wrapping the radiator in custom cabinetry creates a cohesive drop zone and functional console.

Step-by-Step Execution Guide

  • Build a custom shallow cabinet unit enclosing the radiator, using decorative brass woven mesh or slatted wood panels for heat airflow.

  • Extend the cabinetry horizontally past the radiator to add narrow shoe drawers, mail drop slots, and key hooks.

  • Top the entire unit with a continuous heat-resistant stone or hardwood shelf.

  • Ensure the top surface is insulated with heat-deflector foil on the underside.

  • Hang a large minimalist mirror directly above to bounce light across the entryway path.

Pro Styling Tip

Ensure at least 30% of the radiator cabinet face consists of open mesh or slats to maintain home heating efficiency.

7. Dual-Sided Open Room Divider Bookcase

7

Concept Overview & Aesthetic Appeal

In extra-long living rooms that serve multiple functions, an open-backed floor-to-ceiling shelving unit placed perpendicular to the wall defines two distinct zones (e.g., lounge and dining) without blocking light.

Step-by-Step Execution Guide

  • Secure a semi-open shelving unit (12 inches deep) perpendicular to the long wall, extending 4 to 6 feet into the room.

  • Anchor the unit firmly to ceiling joists and floor plates for structural rigidity.

  • Use a mix of open display cubbies and double-sided push-latch cabinets in the lower section.

  • Style the upper shelves with translucent glass objects, trailing plants, and open book arrangements that let light pass through.

  • Maintain a minimum 36-inch walk-through opening between the end of the divider and the opposite wall.

Pro Styling Tip

An open-backed room divider provides two-sided storage while maintaining sightlines from one end of the room to the other.

8. Architectural Fireplace Inset Storage Columns

8

Concept Overview & Aesthetic Appeal

Flanking a central bump-out fireplace with custom floor-to-ceiling built-ins turns natural wall alcoves into balanced, symmetrical storage features.

Step-by-Step Execution Guide

  • Measure the recessed alcoves on either side of a protruding chimney breast or central fireplace.

  • Build custom base cabinets flush with the face of the fireplace hearth.

  • Install floating open display shelves above the base cabinets up to the ceiling molding.

  • Add back-panel beadboard or vertical tongue-and-groove paneling inside the alcoves for subtle texture.

  • Mount matching picture lights above the top shelves to highlight curated art and ceramics.

Pro Styling Tip

Keep the shelving depth 2 inches shallower than the fireplace projection so the fireplace remains the primary architectural focal point.

9. Concealed Pull-Out “Pocket” Home Office Desk

9

Concept Overview & Aesthetic Appeal

A dedicated work-from-home station hidden inside a standard-looking tall cabinet. When open, it reveals a full desk, monitor, and organizers; when closed, all work clutter disappears.

Step-by-Step Execution Guide

  • Integrate a double-door tall cabinet section (30 to 36 inches wide, 16 inches deep) into your built-in wall.

  • Install bi-fold pocket door hardware that allows doors to slide back inside the cabinet carcass when open.

  • Fit the interior with a sturdy pull-out desk shelf on heavy-duty slides for keyboard and laptop space.

  • Add an upper shelf with an integrated monitor mount, task lighting, and cable routing grommets.

  • Fit lower compartments with filing drawers and printer pull-outs on full-extension slides.

Pro Styling Tip

Equip the cabinet with an automatic switch that turns off interior task lighting when the pocket doors are closed.

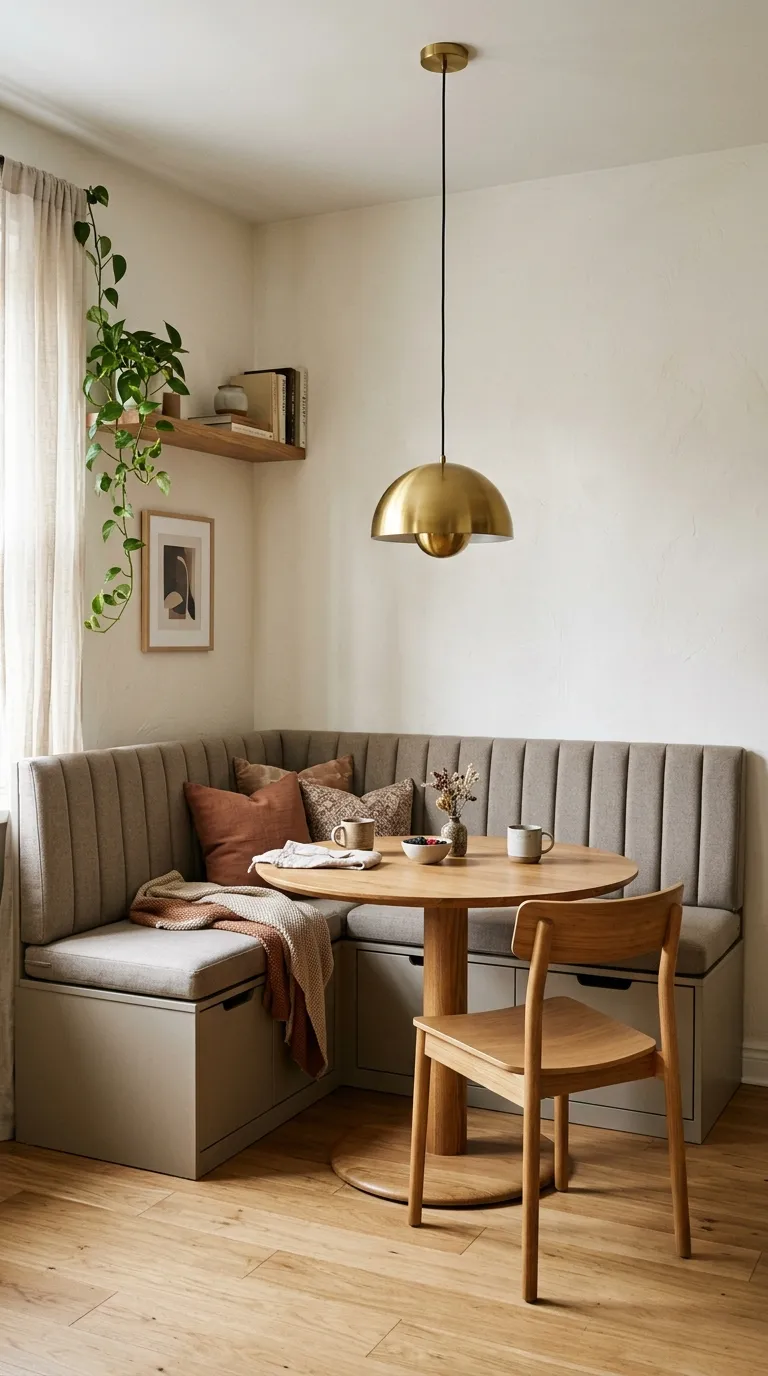
10. Wrap-Around Corner Banquette with Under-Seat Storage

Concept Overview & Aesthetic Appeal

Maximizing the far corner of a long room by building an L-shaped corner banquette that provides compact dining or game-table seating with hidden under-seat storage chests.

Step-by-Step Execution Guide

  • Frame an L-shaped bench unit anchored securely into the corner walls (18 inches seat height, 20 inches seat depth).

  • Install soft-close piano hinges on top-opening seat lids or build pull-out rolling storage bins underneath.

  • Line the back walls with vertical fluted wall cushions or custom upholstered backrest panels.

  • Pair with a pedestal-base round or oval table to allow easy sliding in and out of the banquette.

  • Complete the corner with an overhead pendant light hung 30 inches above the table surface.

Pro Styling Tip

A pedestal table base eliminates corner table legs, making it easy to slide in and out of tight banquette seating.

Comparison & Design Overview

Built-In Storage Concept Typical Depth Primary Function Best Room Zone
Short-Wall Library 10″ – 14″ Book collection & visual grounding Short far end wall
Floating Low Credenza 12″ – 14″ Media storage & floor clearance Long perimeter wall
Window Storage Bench 20″ – 24″ Seating & bulky textile storage End window niche
Recessed Stud Niches 3.5″ – 4″ Zero-footprint display & bar niche Non-load-bearing walls
Slat Media Wall 6″ – 16″ TV concealment & electronics Long central wall
Radiator Cover Unit 10″ – 12″ Entry drop zone & heating camouflage Walkway / Entry zone
Open Room Divider 12″ – 14″ Spatial zoning & 2-sided display Room mid-section
Fireplace Alcoves 12″ – 16″ Symmetrical balance & audio storage Fireplace surround
Pocket Office Desk 16″ – 18″ WFH workstation concealment Cabinet bank corner
Corner Banquette 20″ – 22″ Dining/games & deep storage Far room corner

Common Beginner Mistakes & How to Avoid Them

  • Building Cabinets Too Deep: Making living room built-ins standard kitchen depth (24 inches) swallows narrow floor space and restricts walkways. Solution: Keep base cabinets between 14 and 16 inches deep, and upper shelves between 10 and 12 inches deep.

  • Skipping Concealed Storage: Designing all-open shelving forces you to keep every item display-ready. Solution: Maintain at least 50% to 60% closed lower cabinetry to hide everyday items, cords, and electronics.

  • Using Bulky, Protruding Hardware: Heavy decorative handles on narrow-walkway cabinets catch on clothing and bags. Solution: Use push-to-open latches, J-pull channels, or low-profile edge pulls.

  • Stopping Joinery Short of the Ceiling: Leaving an 8- to 12-inch gap between the top of the built-in and the ceiling creates an awkward dust trap and makes ceilings feel lower. Solution: Take built-in cabinetry all the way to the ceiling and finish with matching crown molding.

Similar Posts

Leave a Reply

Your email address will not be published. Required fields are marked *