10 DIY Wedding Centerpiece Ideas

Spread the love

Designing your own wedding centerpieces is one of the most effective ways to personalize your reception tables while significantly trimming your overall floral budget. Florist-designed arrangements often carry high labor, delivery, and setup fees. By taking a do-it-yourself approach, couples can reallocate funds toward catering, photography, or live music without sacrificing visual elegance.

The secret to a successful DIY centerpiece lies in reproducibility and prep efficiency: choosing designs that can be assembled a day or two in advance using accessible vessels, hearty greenery, floating candles, or structured risers. This comprehensive guide details 10 creative, budget-conscious DIY centerpiece ideas across various aesthetic themes—complete with material lists, step-by-step assembly methods, and practical prep tips.

Key Planning & Assembly Principles

To keep your wedding week stress-free and your reception tables looking professional, follow these foundational rules:

  • Test a Prototype First: Always build a single complete centerpiece sample 3 to 4 weeks before the wedding. Time yourself during assembly and calculate the exact cost per table.
  • Keep Sightlines Open: Ensure arrangements are either under 12 inches tall so seated guests can talk across tables effortlessly, or elevated above 24 inches on slender risers.
  • Prioritize Floral Longevity: If using real cut flowers, choose sturdy varieties (such as roses, carnations, spray roses, chrysanthemums, and eucalyptus) that hold up well in water 24 to 48 hours after arranging.
  • Check Venue Flame Rules: Many reception venues prohibit open flame pillar candles. Confirm whether your venue requires floating candles enclosed in glass or LED battery-operated pillar options.

Idea 1: Submerged Blooms with Floating Candles

Concept and Design Overview

Submerged floral arrangements deliver a clean, modern look with maximum visual impact for minimal cost. Single flower stems (such as orchids, calla lilies, or long-stemmed roses) are anchored at the bottom of clear glass cylinder vases filled with water, topped with a floating disk candle.

The glass water cylinder acts as a magnifying lens, accentuating the delicate shape and color of the flower while reflecting ambient candlelight across the tabletop. Grouping three cylinder vases of varying heights (e.g., 6, 9, and 12 inches) creates an elegant architectural focal point. The color palette pairs crystal clear water, vivid floral accents, and warm golden candlelight.

+-------------------------------------------------------------+
|                 CYLINDER VASE TRIO SETUP                    |
|                                                             |
|         [ Floating Candle ]        [ Floating Candle ]      |
|       +---------------------+    +-------------------+      |
|       | ~ ~ Water Line ~ ~  |    | ~ ~ Water Line ~ ~|      |
|       |   [ Submerged ]     |    |   [ Submerged ]   |      |
|       |   [ Orchid Stem ]   |    |   [ Rose Stem ]   |      |
|       |   [ Submerged Weight]    |   [ Nut Anchor ]  |      |
|       +---------------------+    +-------------------+      |
|        (Tall 12" Cylinder)        (Medium 9" Cylinder)      |
|                                                             |
|           [ Round Mirror Base / Candle Ring ]               |
+-------------------------------------------------------------+

Step-by-Step DIY Assembly

  1. Prep the Stems: Trim fresh orchid or calla lily stems to fit inside each cylinder vase height, leaving 2 inches of water space above the bloom top.
  2. Attach Stem Weights: Fasten a small stainless steel nut or clear glass floral weight to the bottom base of each stem using clear waterproof tape to keep blooms submerged.
  3. Position Flowers in Dry Vases: Place the weighted stem straight down into the bottom of clean glass cylinder vases.
  4. Fill with Distilled Water: Gently pour distilled water down the inner glass wall of each vase until the stem is fully submerged, stopping 1.5 inches from the top rim.
  5. Top with Floating Candles: Place a 3-inch white or ivory floating disk candle onto the water surface, lighting right before reception doors open.

Idea 2: Fresh Eucalyptus & Pillar Candle Runner

Concept and Design Overview

A continuous greenery garland laid down the center of long banquet or harvest tables creates a cozy, organic atmosphere. Mixing silver dollar and seeded eucalyptus branches with warm pillar candles delivers a lush, garden-inspired feel without needing complex floral foam arrangements.

The grey-green tones of eucalyptus provide a soft texture that pairs beautifully with wood tables or crisp white table linens. Interspersing pillar candles housed inside glass hurricane chimneys ensures flame safety while adding varied vertical height. The color palette focuses on muted sage green, creamy ivory candles, and natural wood or glass.

Step-by-Step DIY Assembly

  1. Prep Greenery Branches: Trim fresh silver dollar and seeded eucalyptus branches into 12- to 15-inch workable lengths two days before the event, storing stems in water buckets.
  2. Lay Base Center Line: On the wedding day, lay eucalyptus stems flat down the table center, overlapping branch ends in opposite directions to hide cut stems.
  3. Tuck in Seeded Accents: Weave smaller seeded eucalyptus sprays into gaps to add delicate berry-like texture and volume.
  4. Position Hurricane Chimneys: Set 3 to 5 glass hurricane sleeves holding ivory pillar candles at staggered intervals along the greenery line.
  5. Add Final Sprigs: Tuck remaining eucalyptus leaves around candle bases to conceal glass rims and anchor the runner visually.

Idea 3: Rustic Wooden Box with Mason Jar Hydrangeas

Concept and Design Overview

Perfect for rustic, barn, or country-chic weddings, this arrangement features a handmade or pre-assembled stained wooden trough box holding three glass mason jars filled with fluffy white or blue hydrangeas and baby’s breath.

Hydrangeas offer immense volume per stem, meaning just 3 to 4 large stems fill a centerpiece completely—keeping your stem count and total costs low. The warm wood grain of the planter box anchors the table, while mason jars provide simple water reservoirs. The color scheme pairs dark walnut or pine wood, crisp white/blue hydrangeas, and clear glass.

       +-------------------------------------------------+
       |           STAINED WOODEN PLANTER BOX            |
       |                                                 |
       |   +-----------------------------------------+   |
       |   |  [Jar 1]       [Jar 2]       [Jar 3]    |   |
       |   | (Hydrangea)   (Hydrangea)   (Hydrangea) |   |
       |   +-----------------------------------------+   |
       |                                                 |
       |            [ Wood Grain Finish ]                |
       +-------------------------------------------------+

Step-by-Step DIY Assembly

  1. Build or Source Trough Boxes: Build simple 16-inch wooden trough boxes using cedar/pine boards, or buy pre-finished rustic planter boxes.
  2. Prepare Mason Jars: Fill three standard quart-sized glass mason jars two-thirds full with fresh water mixed with flower food.
  3. Hydrate & Cut Hydrangeas: Cut fresh hydrangea stems at a steep 45-degree angle under water, dipping stem tips into alum powder to prevent premature wilting.
  4. Arrange Floral Jars: Place 1 large hydrangea bloom and a few sprigs of baby’s breath or ruscus into each mason jar.
  5. Nestle Jars into Box: Set the three arranged mason jars inside the wooden trough box, adjusting blooms so they touch and form a continuous flower bed.

Idea 4: Terracotta Pots with Potted Herbs & Succulents

Concept and Design Overview

An eco-friendly and living centerpiece option, potted herbs (such as rosemary, lavender, thyme, and mint) or succulents in aged terracotta pots offer a charming, Mediterranean garden aesthetic. Unlike cut flowers, live potted plants won’t wilt during long summer receptions and can double as guest favors or home garden additions after the wedding.

Grouping 3 to 5 small terracotta pots of varying sizes on a wood slice or brass tray creates an organic texture. The soothing herb aromas fill the reception space, enhancing the dining experience. The color palette features warm terracotta rust, sage green, lavender purple, and natural wood.

Step-by-Step DIY Assembly

  1. Age Terracotta Pots (Optional): Rub white lime wash or buttermilk onto terracotta pots a week before the wedding to give them an antique, mossy patina.
  2. Pot Live Herbs/Succulents: Repot 4-inch nursery herbs or succulents into the prepared terracotta pots using well-draining potting soil 3 to 5 days early.
  3. Cover Soil Base: Top soil surfaces with smooth pea gravel or preserved sheet moss for a clean, finished appearance.
  4. Stage on Table Center: Set a round wood slice or vintage brass tray in the table center, grouping three potted herbs together.
  5. Add Calligraphy Plant Stakes: Insert small wooden plant markers featuring table numbers or handwritten herb names into each pot.

Idea 5: Geometric Metallic Terrarium with Air Plants & Fairy Lights

Concept and Design Overview

Ideal for modern, bohemian, or industrial reception styling, glass geometric terrariums framed in brass, copper, or matte black metal make eye-catching centerpieces. Filled with air plants (Tillandsia), preserved moss, dried botanicals, and warm LED fairy lights, this non-floral setup requires zero water.

Because there are no live cut flowers to keep hydrated, these centerpieces can be assembled weeks in advance, eliminating morning-of wedding stress. The delicate geometric metal lines reflect micro-LED lights, casting a cozy glow across the table. The color scheme pairs polished brass, forest moss green, pale sage, and warm amber light.

       +-------------------------------------------------+
       |           GEOMETRIC BRASS TERRARIUM             |
       |                                                 |
       |   +-----------------------------------------+   |
       |   |        / \    BRASS METAL FRAME         |   |
       |   |       /   \                             |   |
       |   |      / [Tillandsia] \                   |   |
       |   |     /  [Preserved Moss] \               |   |
       |   |    +---------------------+              |   |
       |   |    | [LED Fairy Lights]  |              |   |
       |   +-----------------------------------------+   |
       |                                                 |
       +-------------------------------------------------+

Step-by-Step DIY Assembly

  1. Clean Glass Panels: Wipe down geometric glass terrarium vessels with glass cleaner to remove fingerprints and dust.
  2. Layer Preserved Moss: Place a generous bed of green preserved reindeer moss or sheet moss at the bottom of each terrarium.
  3. Position Air Plants: Nestled two to three air plants (Tillandsia) and dried bunny tails onto the moss bed.
  4. Weave LED Micro Lights: Weave a copper-wire strand of 20 battery-operated LED micro fairy lights through the moss and around the plants.
  5. Hide Battery Pack: Tuck the small battery pack beneath the moss layer at the back of the vessel, turning lights on right before dinner.

Idea 6: Vintage Book Stack with Antique Brass Lanterns

Concept and Design Overview

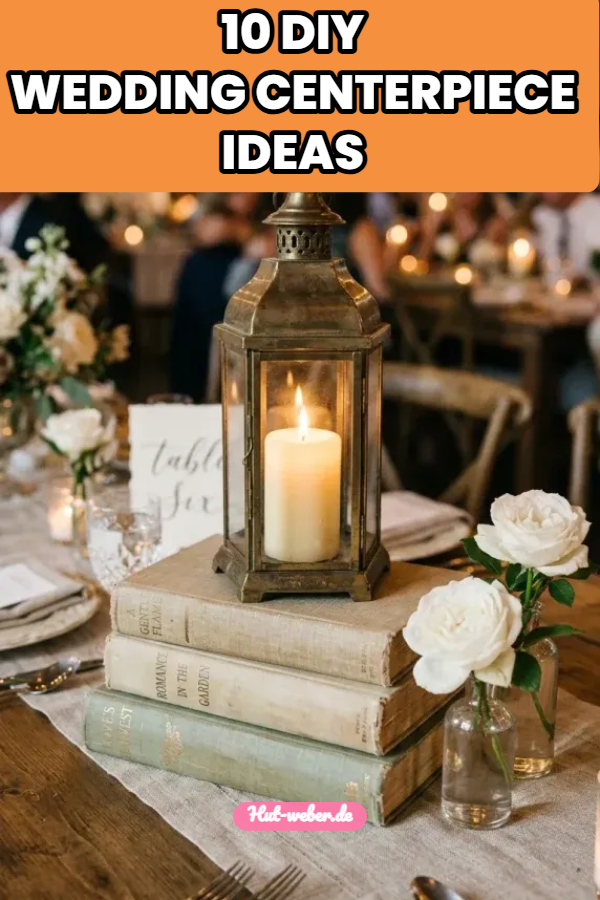
Perfect for literary-themed, vintage, or classic romantic weddings, this centerpiece uses stacks of antique hardback books topped with vintage brass lanterns and flickering candles. The varying book spine colors and aged paper edges add height and historical warmth to round tables.

Couples can source vintage hardback books in their wedding palette from thrift stores or estate sales. Adding small bud vases holding single garden roses or sprigs of dried lavender beside the book stack introduces soft floral touches. The color palette highlights warm leather/cloth book covers, aged brass, ivory wax, and soft cream florals.

Step-by-Step DIY Assembly

  1. Source & Group Books: Gather antique hardback books with neutral, cloth, or gold-embossed covers, removing plastic dust jackets. Group books in stacks of 2 or 3 by matching color tones.
  2. Stack Centrally: Lay book stacks flat in table centers, alternating spine directions for stability.
  3. Place Brass Lantern: Set an antique brass metal lantern holding a pillar candle or LED flickering candle on top of each book stack.
  4. Add Flanking Bud Vases: Place two small glass or brass bud vases holding single roses or sprigs of baby’s breath beside the book base.
  5. Scatter Vintage Accents: Scatter a few loose dried rose petals or vintage brass keys around the book stack perimeter.

Idea 7: Monochromatic Cluster of Glass Bud Vases

Concept and Design Overview

The bud vase cluster is one of the most trendy, flexible, and forgiving DIY centerpiece concepts. Instead of creating one large, complex floral arrangement, 5 to 7 small clear or tinted glass bud vases of mismatched shapes and heights are grouped in the table center, holding just 1 to 2 stems each.

This approach lets individual bloom shapes shine while keeping total floral quantities low. Using a single flower color family (such as all blush pinks, whites, or deep burgundies) creates cohesive impact across reception tables. The color palette focuses on clear/amber glass, crisp floral tones (white, blush, or terracotta), and delicate green stems.

+-------------------------------------------------------------+
|              BUD VASE CLUSTER (5 to 7 VASES)                |
|                                                             |
|     [Rose]      [Ranunculus]     [Spray Rose]   [Eucalyptus]|
|      ( | )          ( | )           ( | )          ( | )    |
|     +-----+        +-----+         +-----+        +-----+   |
|     |Vase1|        |Vase2|         |Vase3|        |Vase4|   |
|     +-----+        +-----+         +-----+        +-----+   |
|    (Tall 7")      (Medium 5")     (Short 4")     (Ribbed 6")|
|                                                             |
|           [ Scattered Votive Candle Holders ]               |
+-------------------------------------------------------------+

Step-by-Step DIY Assembly

  1. Source Mismatched Vases: Collect 5 to 7 small glass bud vases per table (combining ribbed, smooth, tall, and squat shapes).
  2. Fill with Flower Water: Fill each bud vase two-thirds full with fresh water and flower preservative.
  3. Trim Stem Lengths: Trim flower stems (such as Ranunculus, Roses, Spray Roses, and Sweet Peas) so heads sit 2 to 4 inches above vase rims.
  4. Drop Stems In: Place 1 focus flower stem and 1 sprig of greenery (like Italian Ruscus or Olive leaf) into each bud vase.
  5. Cluster with Votives: Group the vases centrally on the table, interspersing 3 to 4 clear glass tea light votive candles around them.

Idea 8: Citrus & Fruit Garden Display

Concept and Design Overview

Adding fresh fruit—such as whole and sliced lemons, limes, oranges, clementines, or pomegranates—brings vibrant color, organic texture, and Mediterranean charm to wedding reception tables. Combined with simple greenery garlands or low bowls, fruit acts as a natural filler that lowers floral costs.

This design is well-suited for summer outdoor weddings, Tuscan-inspired receptions, or tropical themes. The bold natural pigment of fresh citrus pops against white linens and pairs effortlessly with blue-and-white porcelain pattern accents. The color scheme highlights bright yellow/orange citrus, vibrant leaf green, and crisp white porcelain.

Step-by-Step DIY Assembly

  1. Source Fresh Produce: Buy firm, unblemished lemons, oranges, or pomegranates 1 to 2 days before the wedding.
  2. Lay Greenery Base: Arrange a simple base ring or runner of Italian Ruscus or lemon leaf greenery in the table center.
  3. Nestle Whole Fruit: Place 5 to 7 whole lemons and clementines along the greenery bed, allowing them to spill naturally.
  4. Add Sliced Accents (Optional): Slice a few oranges or lemons in half shortly before setup, setting them cut-side-up on small glass plates to release fresh scent.
  5. Incorporate Taper Candles: Place tall brass candle holders with white taper candles among the fruit for warm vertical illumination.

Idea 9: Elevated Floating Floral Hoop

Concept and Design Overview

For couples wanting tall, dramatic centerpieces without high floral costs, an elevated gold or black metal hoop stand provides structural scale. Greenery vines (such as ivy, ruscus, or eucalyptus) and a few focal flowers are wrapped around portions of a 24-inch metal wreath hoop raised above the table.

Because the central ring is open, sightlines across the table remain 100% unobstructed. The elevated circular frame creates a striking modern silhouette that draws eyes upward toward high reception venue ceilings. The color palette pairs metallic gold or matte black iron, deep green vines, and focal blush/white roses.

       +-------------------------------------------------+
       |           ELEVATED METAL HOOP STAND             |
       |                                                 |
       |   +-----------------------------------------+   |
       |   |       /--- FULL 24" HOOP ---\           |   |
       |   |      /                       \          |   |
       |   |     |   [ Ruscus Vines ]      |         |   |
       |   |     |   [ Focal Roses ]       |         |   |
       |   |      \                       /          |   |
       |   |       \--- ELEVATED RISER ---/          |   |
       |   +-----------------------------------------+   |
       |         [ Heavy Metal Table Base ]              |
       +-------------------------------------------------+

Step-by-Step DIY Assembly

  1. Secure Hoop Risers: Anchor a 24-inch metal hoop onto a heavy tabletop metal base or riser stand to ensure stability.
  2. Attach Floral Wire: Wrap flexible 22-gauge green paddle wire around one section of the metal hoop (typically the lower left crescent arc).
  3. Bind Greenery Vines: Bind sprigs of Italian Ruscus or Eucalyptus along 1/3 of the hoop’s circumference, concealing metal with leaves.
  4. Attach Water Tubes: Wire 3 to 5 water picks (filled with water) onto the hoop base, inserting focal roses or dahlias into the tubes.
  5. Cover Wiring: Conceal water picks and exposed wire using small sprigs of greenery fastened with floral tape.

Idea 10: Floating Candle & Water Pearl Cylinder Cluster

Concept and Design Overview

This budget-friendly, high-glow concept relies entirely on water reflection, clear water pearls (gel beads), and floating candles rather than expensive flowers. Clear glass water beads expand in water to hold submerged LED lights or faux pearls suspended in mid-air inside glass cylinder vases.

Topped with floating candles, this all-candle design casts an ethereal glow across the reception space. It is exceptionally fast to assemble, completely water-contained, and works in any reception venue regardless of season. The color palette focuses on crystal clear glass, glowing warm candlelight, and silver or pearl accents.

+--------------------------------------------------------------------------+
|                     TRIPLE CYLINDER GLOW CENTERPIECE                     |
|                                                                          |
|       Floating Candle  |  Clear Water Pearl Fill  |  Submerged LED       |
+--------------------------------------------------------------------------+
                                     |
                                 FEATURED:
                                     v
+------------------+------------------+------------------+-----------------+
| 12" CYLINDER     | 9" CYLINDER      | 6" CYLINDER      | MIRROR BASE     |
| Tall Floating    | Medium Floating  | Short Floating   | Reflects Light  |
| Disk Candle      | Disk Candle      | Disk Candle      | Doubles Glow    |
+------------------+------------------+------------------+-----------------+

Step-by-Step DIY Assembly

  1. Hydrate Water Beads: Soak clear water pearls in distilled water for 6 hours until they expand into clear gel spheres.
  2. Fill Vases with Beads: Fill glass cylinder vases two-thirds full with hydrated clear water beads.
  3. Insert Faux Pearls or LED Base: Push faux pearl strands or a waterproof LED puck light down into the gel bead matrix.
  4. Add Water to Create Illusion: Pour water over the beads until full—the water causes the gel beads to become invisible, making suspended items appear to float.
  5. Top with Floating Candles: Place a 3-inch white floating candle on top of the water level in each cylinder.

Common Beginner Mistakes and How to Avoid Them

  • Assembling Too Far in Advance: Assembling real cut flower arrangements 3 to 4 days early leads to wilted, brown blooms on your wedding day. Assemble live floral arrangements no more than 24 to 36 hours before the event, keeping them in a cool room out of direct sunlight.
  • Blocking Sightlines Across Tables: Creating arrangements that sit between 14 and 22 inches tall blocks seated guests from talking across the table. Keep centerpieces under 12 inches tall or elevate them above 24 inches.
  • Skipping Floral Food & Water Prep: Placing cut stems in plain tap water without floral preservative causes rapid bacterial growth and premature wilting. Always use flower food packets and clean water.
  • Neglecting Transport Safety: Assembling arrangements at home without planning how to move them to the venue results in spilled water and crushed flowers. Transport vases in sturdy plastic totes lined with folded towels or cell dividers.
  • Forgetting Lighter / Matches: Showing up to the venue without long reach lighters or matches delays candle lighting. Pack a dedicated setup kit containing lighters, floral scissors, extra tape, and paper towels.

Practical Tips for Better Results

  • Assign a Dedicated Setup Captain: Don’t try to place every centerpiece yourself on your wedding morning. Assign a trusted friend, family member, or day-of coordinator to follow your prototype photos.
  • Use Water Pick Tubes for Tall Hoops: When adding live flowers to elevated metal hoops or arches, always insert stem ends into water-filled plastic floral picks so blooms stay hydrated.
  • Shop Wholesale or Bulk: Source bulk greenery, roses, and hydrangeas from wholesale floral clubs (like Costco, FiftyFlowers, or local flower markets) to cut costs by 50–70%.
  • Keep Vessels Consistent: Keep vase styles consistent across all tables (e.g., all clear glass or all brass) so reception tables look cohesive even if flower shapes vary slightly.
  • Test Candle Burn Times: Burn a sample candle at home prior to the wedding to verify it lasts at least 6 to 8 hours without smoking or melting down prematurely.

Similar Posts

  • 10 Decoration Ideas Room

    Spread the love

    Spread the loveTransforming any room—whether a bedroom, living space, or home office—into a sanctuary requires a thoughtful balance of spatial planning, tactile texture layering, and intentional lighting design. Instead of relying on temporary trends or cluttering surfaces with excessive trinkets, timeless room decoration focuses on architectural features, rich natural materials, and cohesive color schemes. Here…

  • 10 Kids Room Design Boys Ideas

    Spread the love

    Spread the loveMaximizing a limited architectural footprint while creating an imaginative, functional, and clutter-free sanctuary for a young boy requires a strategic fusion of multi-purpose furniture, smart vertical storage, and intentional color theory. Far from relying on overwhelming commercial cartoon motifs or single-note primary colors, a contemporary boy’s bedroom balances playful energy with a serene,…

  • 10 Plants For Home Decor Ideas

    Spread the love

    Spread the loveIntegrating real botanical varieties into your living space is the most effective method for establishing a true biophilic sanctuary, allowing nature-inspired greenery to climb into the mid- and upper-levels of your home architecture. Far from being simple decorative novelties, specialized indoor plants serve as vital functional accents that optimize internal light levels, purify…

  • 10 Long Narrow Living Room Ideas

    Spread the love

    Spread the loveDesigning a long, narrow living room—often referred to as a “tunnel” or “shoebox” layout—requires strategic spatial engineering, deliberate furniture positioning, and clever visual trickery. Without a thoughtful floor plan, these proportions can feel awkward, restricted, and cave-like. The secret to mastering a narrow layout lies in breaking up the long linear stretch into…

  • 10 Home Decoration Design Ideas

    Spread the love

    Spread the loveTransforming an entire residential property into a fluid, highly functional masterwork requires an intimate understanding of spatial composition, tactile balancing, and lighting architecture. Home decoration design is a comprehensive discipline that harmonizes individual rooms into a singular, cohesive narrative, directly impacting the well-being and daily productivity of its inhabitants. This comprehensive guide outlines…

  • 10 Decoration On Table Ideas

    Spread the love

    Spread the loveDesigning a captivating tabletop display is one of the most effective ways to elevate everyday dining spaces, seasonal gatherings, and formal celebrations. Table decorations serve as the visual centerpiece of a room, bridging the gap between functional furniture and thoughtful interior styling. This comprehensive guide explores foundational arrangement techniques, practical step-by-step methods, and…

Leave a Reply

Your email address will not be published. Required fields are marked *