10 Rustic Wood Slat Crafts DIY Projects Ideas
Rustic wood slat crafts provide one of the most versatile, budget-friendly entry points into woodworking and home decor. Using reclaimed pallet wood, rough-sawn cedar pickets, pine 1×2 strips, or weathered lath boards, these projects embrace natural wood grain, saw marks, knots, and warm patinas to bring authentic farmhouse character into living spaces.
The appeal of wood slat crafting lies in modular construction. Uniform wooden slats can be joined edge-to-edge for flat signs, spaced apart for slatted ventilation crates and plant screens, or arranged in geometric chevron and herringbone patterns for wall art. With basic tools like a hand saw, miter box, cordless drill, wood glue, and brad nails, you can build durable, functional accent pieces in an afternoon.
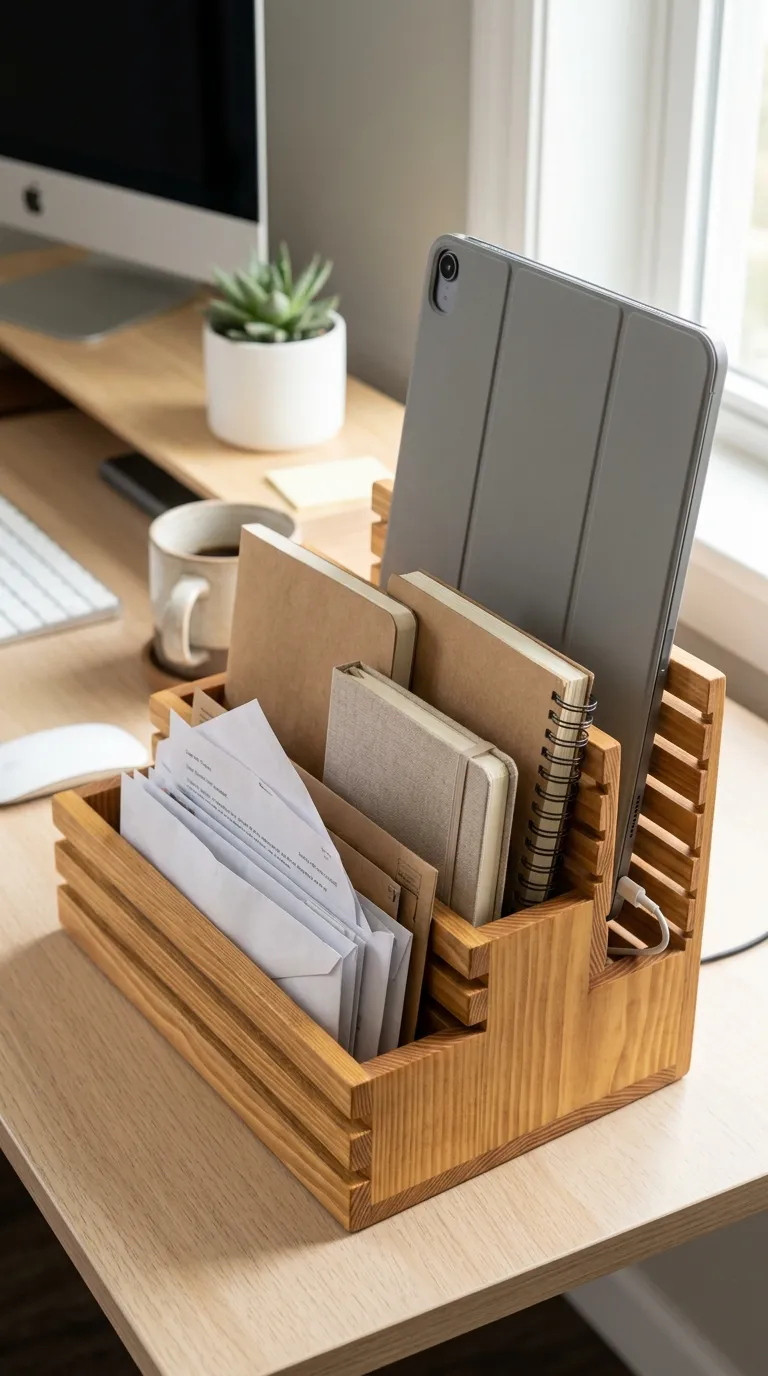
Whether you want to organize your entryway, build indoor botanical planters, or craft textured feature wall panels, these ten DIY wood slat projects provide step-by-step assembly instructions, finishing techniques, and production-ready visual prompts.
Why This Idea Is Trending & Flattering
-
Accessible & Low-Cost Materials: Repurposed shipping pallets, cedar fence pickets, and pine furring strips cost very little while offering authentic rustic textures.
-
Warm, Natural Texture: Exposed wood grain, distressed milk-paint finishes, and dark walnut stains soften modern drywall and balance industrial elements.
-
Beginner-Friendly Joinery: Most slat crafts rely on face-nailing, edge-gluing, and pocket-hole or batten backing, eliminating the need for complex mortise-and-tenon joints.
-
Customizable Dimensions: Slatted construction scales easily to fit awkward alcoves, entryway drop zones, and compact patio corners.
-
High Utility & Organization: Wood slats provide sturdy foundations for coat hooks, hanging mason jars, mail sorters, and vertical herb gardens.
Materials, Wood Selection & Tool Guide
Selecting the right timber species, fasteners, and distressing methods ensures your projects remain structurally sound and splinter-free.
Recommended Wood Species
-
Reclaimed Pallet Slats: Naturally weathered and oxidized with rustic saw marks. Safety note: Only use pallets heat-treated and stamped “HT” (avoid chemical-treated “MB” pallets).
-
Cedar Fence Pickets (Rough-Sawn): Naturally rot- and insect-resistant, making them ideal for outdoor planters, bathroom decor, and herb walls.
-
Kiln-Dried Pine 1×2 & 1×3 Furring Strips: Smooth, straight, and lightweight for geometric wall art, lanterns, and indoor storage caddies.
Essential DIY Tools & Supplies
-
Cutting & Shaping: Miter saw (or hand saw with miter box), cordless jigsaw for curved silhouettes, and a carpenter’s speed square.
-
Fasteners & Adhesives: Exterior/interior wood glue (Titebond II/III), 1-inch to 1.25-inch brad nails (or cordless 18-gauge brad nailer), and 1.25-inch wood screws.
-
Sanding & Prep: Random orbital sander with 80-grit (coarse distressing), 120-grit (smoothing), and 220-grit (finishing) sanding discs.
-
Stains & Paints: Dark walnut oil-based stain, weathered gray wood wash, white chalk paint, and matte clear polyurethane sealer.
-
Hardware Accents: Forged matte-black iron coat hooks, heavy-duty D-ring wall hangers, and braided jute rope.
10 Rustic Wood Slat DIY Craft Projects


1. The Farmhouse Slat Welcome Sign with Mason Jar Sconce
Project Overview & Aesthetic Design
A vertical entryway sign crafted from joined wood slats, featuring painted stencil lettering and an integrated hose-clamped mason jar holding fresh seasonal florals or a battery-operated LED fairy light.
Step-by-Step DIY Execution Guide
-
Cut four pine or pallet slats ($1times4$-inch) to 28 inches in length.
-
Lay slats face-down side by side. Fasten two 12-inch horizontal support battens across the back using wood glue and 1-inch wood screws.
-
Sand the front surface with 120-grit sandpaper, then apply a rich dark walnut wood stain. Let dry.
-
Stencil the word “WELCOME” vertically down the left side using white chalk paint. Lightly distress the paint with 220-grit sandpaper once dry.
-
Secure a 3-inch stainless steel hose clamp to the top-right face of the board using a short pan-head screw.
-
Slip a 16-oz clear glass mason jar into the clamp, tighten the screw, and fill with faux white hydrangeas or copper fairy lights.
-
Attach a heavy-duty sawtooth hanger to the back batten.
Pro Crafter Tip
Place painter’s tape along the slat edges before painting stencils to prevent wet acrylic paint from bleeding into the wood grain crevices.
2. Herringbone Slat Mosaic Framed Wall Art

Project Overview & Aesthetic Design
A multi-tonal geometric art panel created by arranging short wood slats cut at 45-degree angles into a classic herringbone chevron pattern, finished with a contrasting stained frame.
Step-by-Step DIY Execution Guide
-
Cut a 0.5-inch plywood backing sheet to $18times24$ inches.
-
Cut 30 to 40 wood slat pieces ($1times2$-inch pine) to 6-inch lengths, cutting both ends at parallel 45-degree angles using a miter saw.
-
Pre-stain the slat segments in three coordinating finishes: natural oak, weathered gray, and dark walnut.
-
Draw a vertical center line down the plywood backer. Apply wood glue to the back of each slat and press them down in an alternating herringbone pattern starting along the center line.
-
Secure each piece with 5/8-inch brad nails through the back or face.
-
Trim overhang along the plywood edges using a circular saw or track saw.
-
Frame the perimeter with $1times2$-inch dark-stained pine strips mitered at 45 degrees.
Pro Crafter Tip
Dry-fit the entire herringbone layout before applying glue to balance your color distribution evenly across the board.
3. Vertical Wall-Mounted Herb Planter Ladder

Project Overview & Aesthetic Design
A space-saving vertical garden featuring spaced horizontal cedar slats holding angled planter troughs, designed for kitchens, balconies, or sunny dining room walls.
Step-by-Step DIY Execution Guide
-
Cut two $1times3$-inch cedar boards to 36 inches for the side vertical rails.
-
Cut six $1times3$-inch cedar slats to 20 inches for the horizontal rungs.
-
Space the slats 3 inches apart across the vertical rails, securing each joint with wood glue and two 1.25-inch exterior-grade screws.
-
Build three small trough planter boxes ($18times4times4$ inches) using cedar slats, drilling 0.25-inch drainage holes in the bottoms.
-
Mount the planter boxes to the front of the rungs using angled pocket-hole screws.
-
Line troughs with landscape fabric, fill with potting mix, and plant fresh basil, mint, and thyme.
Pro Crafter Tip
Use rough-sawn cedar pickets; cedar contains natural oils that resist moisture, mold, and rot without needing chemical sealers.
4. Slatted Wooden Candle Lantern with Rope Handle

Project Overview & Aesthetic Design
A hollow, open-slat square lantern with airy vertical openings, encasing a glass hurricane and pillar candle, topped with a rustic braided jute rope carrying handle.
Step-by-Step DIY Execution Guide
-
Cut two $6times6$-inch square pine blocks (0.75-inch thick) for the top and bottom plates.
-
Cut eight $1times1.5$-inch wood slats to 12 inches for the corner and side vertical pillars.
-
Secure two slats along each corner of the base plate using wood glue and pin nails, leaving a 1-inch gap between center slats.
-
Fasten the top $6times6$-inch plate over the vertical pillars to lock the cage.
-
Drill two 0.5-inch holes through opposite sides of the top plate. Thread a 12-inch length of 0.5-inch braided jute rope through, tying thick overhand stopper knots underneath.
-
Stain the wood in weathered driftwood gray and insert a glass hurricane cylinder with a battery-operated LED wax pillar candle.
Pro Crafter Tip
Drill pilot holes for all brad nails near the ends of thin $1times1.5$-inch slats to prevent the timber from splitting along the grain.
5. Slatted Entryway Coat & Key Drop Board

Project Overview & Aesthetic Design
A practical mudroom organizer featuring horizontal tongue-and-groove or spaced slats equipped with forged black iron double coat hooks, a shallow mail shelf, and key hooks.
Step-by-Step DIY Execution Guide
-
Cut five $1times4$-inch pallet or pine slats to 32 inches.
-
Join the slats edge-to-edge horizontally by screwing two vertical rear battens across the back.
-
Cut a small $12times3$-inch shelf board and mount it to the lower-right section using small metal L-brackets.
-
Fasten four heavy-duty matte-black iron coat hooks spaced 6 inches apart along the central slat.
-
Install three small brass cup hooks beneath the mini shelf for car keys.
-
Apply a two-tone distressed finish: base coat of dark stain, covered with white chalk paint, then sanded back along the slat edges to reveal the dark grain underneath.
-
Mount securely into wall studs using heavy-duty flush-mount keyhole brackets.
Pro Crafter Tip
Rub a wax candle along the edges of the dark-stained wood before painting white; the chalk paint over the waxed spots will scrape away cleanly for a weathered look.
6. Geometric Slat Sunburst Round Mirror Frame

Project Overview & Aesthetic Design
A round accent mirror framed by radiating, tapered wood slats of varied lengths, creating a dynamic sunburst silhouette with mid-century modern rustic charm.
Step-by-Step DIY Execution Guide
-
Cut an 18-inch circular base ring from 0.5-inch plywood, cutting an 8-inch hole in the center.
-
Cut 48 wood slat strips ($1times1.5$-inch) in alternating lengths: 6 inches, 8 inches, and 10 inches.
-
Cut the inner tips of the slats at slight angles so they pack tightly around the center circle.
-
Stain the slats in a natural golden oak finish.
-
Fasten the slats around the plywood ring using wood glue and 3/4-inch brad nails, alternating short, medium, and long pieces in a sunburst pattern.
-
Glue a 10-inch round glass mirror securely to the back center of the frame using mirror-safe construction adhesive.
-
Attach a heavy-duty picture wire across the back plywood ring.
Pro Crafter Tip
Use specialized mirror mastic rather than standard silicone glue; standard construction adhesives can eat through the reflective silver backing of glass mirrors over time.
7. Slatted Wooden Bath Caddy & Wine Tray

Project Overview & Aesthetic Design
A spa-inspired slatted tray designed to span the width of a bathtub, featuring drainage gaps between slats, routed wine-glass holding slots, and a flip-up tablet/book rest.
Step-by-Step DIY Execution Guide
-
Measure the outer width of your bathtub (standard tubs run 30 to 32 inches wide).
-
Cut three $1times3$-inch teak, cedar, or moisture-resistant pine slats to the tub width plus 2 inches.
-
Join the slats with a 0.25-inch gap between them by screwing two bottom cross-cleats positioned to sit just inside the inner tub rim (preventing the tray from sliding off).
-
Cut a 0.5-inch slot with a 1.25-inch hole at the end of one slat using a spade bit and jigsaw to serve as a slide-in wine glass stem holder.
-
Sand thoroughly up to 220-grit to make all edges smooth to the touch.
-
Finish with three coats of water-resistant marine spar varnish or natural tung oil to seal against steam and water splashes.
Pro Crafter Tip
Tung oil or teak oil provides a velvety, water-repellent satin finish that highlights wood grain without leaving a thick plastic film.
8. Spaced Slat Window Box Planter Caddy

Project Overview & Aesthetic Design
A rectangular tabletop or windowsill planter box constructed from spaced horizontal slats, designed to conceal plastic plant nursery pots with rustic charm.
Step-by-Step DIY Execution Guide
-
Cut four $2times2$-inch pine posts to 6 inches for the internal corner uprights.
-
Cut six $1times2$-inch wood slats to 18 inches (for the long front/back sides) and six slats to 6 inches (for the short ends).
-
Fasten the horizontal slats to the corner posts with 0.5-inch vertical gaps between them using wood glue and 1-inch brad nails.
-
Cut a solid 0.5-inch plywood floor to fit inside the base, drilling four 0.5-inch drainage holes.
-
Sand the exterior and apply a coat of whitewash pickling stain.
-
Set three 4-inch potted succulents, ferns, or flowering plants inside the decorative wooden caddy.
Pro Crafter Tip
Insert a plastic drainage liner tray inside the wooden box to catch excess water runoff and protect interior wooden tables.
9. Distressed Multi-Panel Slat Bedside Headboard Art

Project Overview & Aesthetic Design
A triptych set of three vertical wood slat panels hung side-by-side above a bed or sofa, featuring an oversized botanical leaf or landscape stencil spanning across all three boards.
Step-by-Step DIY Execution Guide
-
Build three identical slatted panels ($14times36$ inches each) by joining four vertical $1times4$-inch slats with rear battens.
-
Lay the three panels flat side-by-side on your workbench with a 1-inch gap between them.
-
Sand and stain all three panels in a warm walnut finish.
-
Position a large continuous wall stencil (such as a split monstera leaf or mountain range) across all three panels.
-
Sponge matte black or creamy white paint over the stencil.
-
Once dry, seal the panels with matte clear lacquer and hang them with matching 1-inch wall gaps.
Pro Crafter Tip
Tape the three panels together on the back with painter’s tape while stenciling so they do not shift and break the continuity of your pattern.
10. Desktop Slat Mail Organizer & Charging Station
Project Overview & Aesthetic Design
A compact desk organizer featuring tiered vertical wood slats that create slots for incoming mail, notebooks, and tablets, with a hidden cable pass-through hole for phone charging.
Step-by-Step DIY Execution Guide
-
Cut a solid $10times6$-inch base board from $1times6$-inch pine.
-
Cut three $1times4$-inch slats to 10 inches for the dividing walls.
-
Using a router table or hand saw, cut three 0.25-inch-deep grooves into the top of the base board spaced 1.5 inches apart.
-
Slide the slats into the grooves with wood glue to form tiered vertical mail slots.
-
Drill a 0.5-inch hole through the bottom rear slot to route a USB charging cable cleanly through the back.
-
Sand all corners smooth and finish with natural beeswax paste.
Pro Crafter Tip
Line the bottom of the mail slots with adhesive-backed cork or felt strips to prevent tablet screens from scratching against the wood.
Comparison & Project Overview
| Wood Slat Project | Primary Wood Type | Key Fasteners & Joinery | Finish Style | Difficulty |
| Mason Jar Welcome Sign | Pallet / Pine $1times4$ | Rear battens + screws | Dark walnut + White paint | Beginner |
| Herringbone Mosaic Art | Pine $1times2$ slats | Glue + 45-degree miter cuts | Multi-tonal stain gradient | Intermediate |
| Vertical Herb Planter | Cedar pickets $1times3$ | Exterior screws + pocket holes | Raw natural cedar | Intermediate |
| Slatted Candle Lantern | Pine $1times1.5$ + base | Pin nails + glue | Weathered gray wash | Beginner |
| Entryway Coat & Key Board | Pallet / Pine $1times4$ | Rear battens + keyhole mounts | Distressed two-tone chalk | Beginner |
| Sunburst Mirror Frame | Pine $1times1.5$ strips | Radial face-nailing to ring | Golden oak stain | Intermediate |
| Slatted Bathtub Caddy | Cedar or Teak $1times3$ | Underside cleats + slot cuts | Waterproof spar varnish | Intermediate |
| Window Box Planter Caddy | Pine $1times2$ slats | Corner posts + brad nails | Whitewash pickling stain | Beginner |
| Triptych Headboard Panels | Pine $1times4$ slats | Rear battens + D-rings | Walnut + Stenciled art | Intermediate |
| Desktop Mail & Charge Station | Pine $1times4$ + base | Routed grooves + wood glue | Natural beeswax polish | Advanced |
Common Beginner Mistakes & How to Avoid Them
-
Skipping Safety Checks on Reclaimed Pallet Wood: Using chemical-treated pallets indoors exposes your home to harsh toxins. Solution: Always check pallet stamps for the “HT” (Heat Treated) mark and never use pallets stamped “MB” (Methyl Bromide).
-
Failing to Sand Between Adjacent Slats: Assembling slatted boxes before sanding leaves rough, splintered inner faces that are impossible to reach later. Solution: Pre-sand all four faces of your individual slats up to 120-grit before joining them together.
-
Over-Tightening Screws in Thin Slats: Driving screws directly into $0.5$-inch or $0.75$-inch slats without pre-drilling splits the wood. Solution: Always pre-drill countersink pilot holes using a drill bit slightly smaller than your screw core.
-
Using Interior Wood Glue for Outdoor/Bathroom Crafts: Standard PVA glue breaks down when exposed to steam, rain, or wet soil. Solution: Use waterproof Type II or Type III exterior PVA wood glue (like Titebond III) for planters and bath caddies.
Care & Maintenance for Rustic Wood Slat Crafts
| Maintenance Routine | Frequency | Recommended Method |
| Dusting Slatted Grooves | Monthly | Use a microfiber duster or vacuum brush attachment |
| Wood Conditioning | Semi-Annually | Buff dry wood with natural beeswax paste or orange oil |
| Water-Repellent Re-Coat | Annually | Re-apply a thin coat of clear spar urethane or teak oil on bath caddies |
| Wall Fastener Inspection | Annually | Check wall anchors and D-rings on coat racks to ensure screws remain tight |
