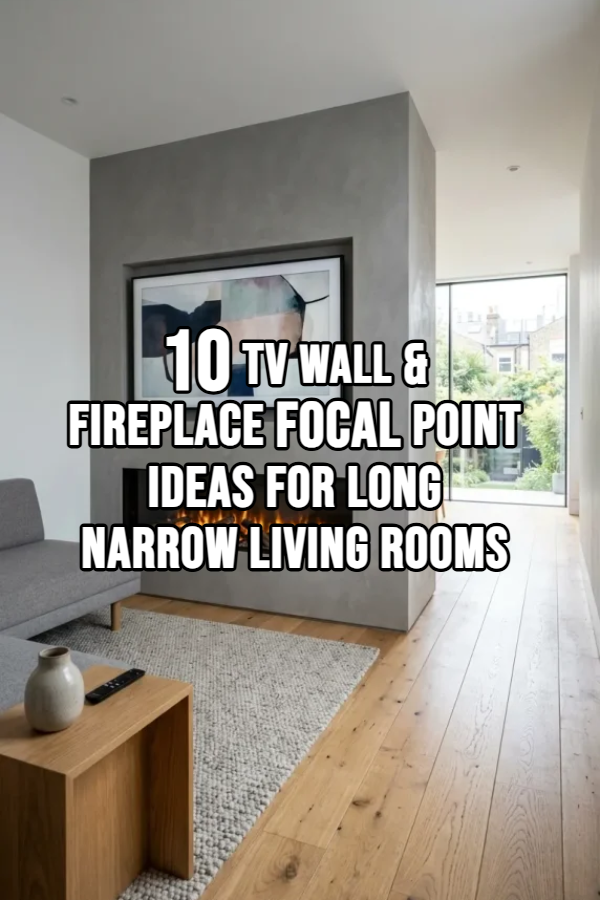
10 Tv Wall & Fireplace Focal Point Ideas for Long Narrow Living Rooms

Designing a living room that is both long and narrow presents a significant layout challenge: how to arrange furniture without creating a “bowling alley” or “tennis court” effect. The challenge doubles when you must integrate two powerful, distinct functional focal points—a television and a fireplace—into that limited footprint.
The success of a narrow room design relies on abandoning the default approach of lining all large furniture flat against the longest walls. Instead, you must prioritize spatial zoning, unifying focal points, and preserving clear circulation corridors. When a TV and fireplace are integrated thoughtfully, they can transform a challenging space into a highly functional, welcoming destination. This comprehensive guide details 10 creative ways to arrange a TV and fireplace specifically tailored to long, narrow footprints across varied design styles, budgets, and architectural constraints.
The Critical Rules for Long Narrow Rooms with Two Focal Points
Before placing furniture, keep these foundational rules of narrow room design with integrated technology in mind:
- Rule 1: Never Put Them on Opposite Short Walls. Putting the TV on one narrow end wall and the fireplace on the other is the single biggest layout mistake. It forces your eyes to constantly “play tennis” back and forth across the entire room length, preventing relaxation. This arrangement separates your seating zone instead of uniting it.
- Rule 2: Unify Them into a Single “Watch Zone.” To minimize visual clutter in a tight space, the goal is to turn two distinct functional elements into one single, cohesive visual destination.
- Rule 3: Floating Seating is Mandatory. Do not allow your main seating area to be “heavy.” Floating a low-profile sofa 6 to 12 inches away from the long wall creates the perception of space behind the furniture, widening the room visually. Pushing a bulky sofa against the long wall makes the room feel narrower.
- Rule 4: Establish a Clear Traffic Pathway. Do not allow walkways to zig-zag between furniture. Dedicate 36 inches along one continuous long wall for unblocked traffic flow.
- Rule 5: Use Rugs to Define Thresholds. Rugs are architectural speed bumps. Every new zone (conversation, media, reading nook, entry) must be defined by its own rug. Crucially, in narrow rooms, use area rugs with horizontal stripes running across the narrow width, not along the length.
Idea 1: Centered Media Wall (Stacked TV Above Fireplace)
Concept and Design Overview

The classic “stacked” media wall is the most spatially efficient use of a single long wall. It creates one unified visual destination where the eye knows exactly where to rest.
Mounting a linear electric or inset gas fireplace lower on the wall, with the television stacked directly above it, simplifies the room’s composition. This approach centers the primary seating cluster (e.g., Layout 1, Layout 4) squarely with the combined focal point. The color palette focuses on warm greiges, natural wood accents, cream textured rugs, and polished brass.
+-------------------------------------------------------------+
| CENTERED MEDIA WALL (STACKED) |
| |
| +-----------------------------+ |
| | TELEVISION SCREEN | |
| | (Tilt Mount Angled Down) | |
| +-----------------------------+ |
| ~~~~~~~~~~~~~~~~~~ |
| LINEAR FIREPLACE |
| ~~~~~~~~~~~~~~~~~~ |
| |
| +-----------------------------------------------------+ |
| | CRISP GEOMETRIC SEATING CORE (Floating Sofa/Chairs) | |
| +-----------------------------------------------------+ |
+-------------------------------------------------------------+
Step-by-Step DIY Assembly
- Identify Center Point: Find the exact center of your primary seating zone’s long wall.
- Mount Linear Fireplace: Install a linear, horizontal fireplace (electric is simplest for DIY; gas requires professional venting) low on the wall, roughly 12 to 18 inches off the floor.
- Route Wiring Channel: Create an in-wall or surface-mounted cable raceway for hidden HDMI and power cords before closing the wall.
- Install TV Mount: Secure a heavy-duty, articulating tilt-mount bracket for the TV exactly centered above the fireplace.
- Set Seating: Arrange the floating sofa and rug cluster centered with the media wall.
Idea 2: Side-by-Side Floating Symmetrical Alcoves
Concept and Design Overview
When wall space is limited, or you prefer a traditional symmetrical layout, utilizing built-in or floating alcove shelving flanking a central feature wall creates a balanced, Tailored appearance.

A central linear fireplace (perhaps Low-slung) is the primary center point, while matching built-in shelving units (e.g., Layout 3) widen the perception of the seating core. This divides the long footprint into distinct functional end zones—Zone 1 Homework Nook, Central Zone Primary Seating, Zone 2 Bar/Reading Corner—bringing ordering chaos to narrow dimensions. The color scheme focuses on soft sage greens, cream linens, and warm light oak.
Step-by-Step DIY Assembly
- Select Central Zone: Dedicate the room’s architectural center for the combined focal points.
- Mount Linear Fireplace: Inset or mount a horizontal linear fireplace Low on the central wall section.
- Position the TV console: Place a Low, wide media console directly opposite the primary seating area, perhaps in one of the flanking alcoves, or mounted on the feature wall itself with an articulating bracket.
- Build Symmetrical Shelving: Line the alcoves with floor-to-ceiling built-in units or floating shelves to widen the seating cluster’s visual weight.
Idea 3: The Perpendicular “Speed-Bump” Island Divider
Concept and Design Overview
In open-plan narrow rooms that merge kitchen/dining and living spaces, building a partial-height stud wall or custom cabinet unit perpendicular to the long wall can create a functional “speed bump” divider.

Placing a double-sided electric fireplace within the base of this perpendicular island creates warmth accessible from both the dining/entry zone and the conversation core. Mounting the television on the wall above the fireplace anchors the watch zone (e.g., Layout 6). This layout demonstratates scientific principles like density and buoyancy in how the furniture groups naturally around a fixed spatial point without blocking sightlines. The color palette pairs charcoal grey lower cabinets, white quartz counters, natural light oak, and neutral textiles.
+-------------------------------------------------+
| PERPENDICULAR DIVIDER ISLAND |
| |
| +-----------------------------------------+ |
| | PARTIAL-HEIGHT STUD WALL / CABINET UNIT | |
|----> | | [TV on Wall Above] | |
| ZONE | | [Double-Sided Electric Fireplace Base] | |
| SPLIT| +-----------------------------------------+ |
|Threshold | |
|BOUNDARY| [ Walking Clearance on Opposite Side ] |
|----> | |
| [ Seating Core Cluster - Zone 2 ] |
| +-----------------------------------------+ |
| | FLOATING SOFA & RUG Cluster | |
| +-----------------------------------------+ |
+-------------------------------------------------+
Step-by-Step DIY Assembly
- Define Zone Threshold: Find the architectural center of your exceptionally long narrow room (e.g., 25+ feet long).
- Build Divider Frame: Construct a custom partial-height stud wall perpendicular to the long wall.
- Inset Double-Sided Fire: Place a modern double-sided electric linear fireplace into the base of the frame.
- Mount TV Above: Secure the TV mount on the wall face above the fireplace facing the seating zone.
- Route Wires and Seal: Run hidden power and HDMI through the frame before closing with drywall or cabinetry.
Idea 4: Tonal Color Drenching with Low-Slung Minimalist Seating
Concept and Design Overview
Color drenching—painting the entire feature wall, built-in shelving, TV frame, and fireplace surround in the exact same color (e.g., Layout 4)—dissolves architectural boundaries, visually expanding the perception of width.

Combining this with ultra-low-profile, minimalist Italian or Japandi-style furniture keeps the sightlines entirely open, preventing bulky furniture from “heavying” the narrow space. The color scheme highlights monochromatic matte charcoal greys, raw concrete, natural oak, and warm ambient light.
Step-by-Step DIY Assembly
- Select Rich Tonal Paint: Choose a sophisticated neutral like matte dusty charcoal grey, sage green, or creamy greige for color drenching.
- Drench the Feature Wall Zone: Paint the walls, ceiling, baseboards, door trim, and existing built-ins in this single hue, using matte for walls and satin for trim.
- Choose Low Furniture: Select a low-slung, minimal 2-seater sofa and low-slung oak frame armless chairs (e.g., floor poufs).
- Float the Seating: Arrange the low-profile pieces slightly off-center on a highly textured monochromatic rug.
- Define with Bias Lighting: Install warm LED strip lighting behind a low console or floating shelving, casting soft light upward to widen the walls visually.
Idea 5: Recessed TV Flush Mount over Low Inset Linear Fire
Concept and Design Overview
To maintain a high-end, uncluttered look, build a false stud wall and inset the TV completely flush so it looks like a large piece of art. Place a minimalist electric linear fire extremely Low on the same false wall, demonstrating high-efficiency vertical spatial zoning with near-zero floor space loss.

The color scheme focuses on monochromatic light greys, matte black accents, natural concrete, and warm ambient light.
+-------------------------------------------------------------+
| RECESSED FLUSH-MOUNT MEDIA WALL |
|=============================================================|
| [ FLUSH-MOUNTED TV (Inset into False Wall) ] |
|-------------------------------------------------------------|
| ~~~~~~~~~~~~~~~~~~ |
| LINEAR FIREPLACE (Inset Low) |
| ~~~~~~~~~~~~~~~~~~ |
| |
| [ 100% CLEAR FLOOR SURFACE BENEATH - Zero Bulk ] |
| +-----------------------------------------------------+ |
| | Continuous 36" Main Walkway Flow (Along Wall) | |
| +-----------------------------------------------------+ |
+-------------------------------------------------------------+
Step-by-Step DIY Assembly
- Inset Linear Fire: Create a tight horizontal recess for the linear fireplace Low in the wall (roughly 12 inches off the floor).
- Recess the TV Mounting: Build a perfectly sized recess for your specific TV, ensuring depth allows for a flush fit.
- Finish Wall: Drywall, paint to match color drenching (Idea 4), and install the flush-mounted TV and linear fire.
Idea 6: The L-Shape Fireplace Corner with Back Anchor Console
Concept and Design Overview
To prevent a floating L-shaped sectional from looking adrift when facing a diagonal corner fireplace, place a sturdy console table tightly against the exposed short end. This console acts as a visual threshold boundary, physically defining the end of the seating lounge.

Orienting the sectional’s short end into the room toward a corner fireplace bridges the diagonal focal point, while the main body faces a side-wall-mounted TV screen. The color palette features dark navy velvet upholstery, natural stacked stone, walnut wood, and warm amber lighting.
Step-by-Step DIY Assembly
- Place Sectional: Align the long back of the L-sectional against the wall opposite the traffic aisle, facing the TV.
- Anchor the Exposed Back: Set a console table or low bookshelf flush against the exposed short end of the sectional.
- Orient Toward Fireplace: Position armchairs or angle the chaise section toward the corner fireplace to bridge the two focal zones.
- Define with Lighting: Add an articulating wall sconce above the fireplace and an overhead floor lamp for the seating core.
Idea 7: Parallel Galley Living Station with Integrated Media Wall
Concept and Design Overview
For long narrow open-plan rooms that run parallel to a kitchen corridor, creating a parallel media station along the living wall preserves a clear walking aisle.
The TV and linear fireplace are mounted flush or low along one continuous long wall, mirroring the parallel island or counter line of the adjacent kitchen. This layout prioritizes continuous traffic flow along polished concrete or light wood floors while keeping sightlines open across zones.

Step-by-Step DIY Assembly
- Map the Parallel Aisle: Reserve a straight, unblocked 36-inch aisle running parallel between the kitchen counters and living seating.
- Mount TV & Fireplace: Align the media unit flush along the living room wall.
- Position Low-Profile Seating: Place a floating sofa parallel to the media wall, anchored by a low coffee table and horizontal area rug.
- Integrate Storage: Use low, linear wall-hung cabinetry beneath the TV to hold electronics without intruding into the walkway.
Idea 8: The Library Lounge (Sofa Facing Continuous Long Wall Library & TV)
Concept and Design Overview
In this sophisticated layout, one entire long wall is lined with floor-to-ceiling built-in or floating bookshelves that incorporate an inset TV and a low linear hearth beneath.

Floating the primary sofa centrally facing this library media wall creates a cozy, retreat-like atmosphere. Integrated LED lighting beneath the shelves widens the walls visually and illuminates books and decor. The color scheme focuses on rich espresso-stained wood, cream boucle upholstery, brass hardware, and warm lighting.
Step-by-Step DIY Assembly
- Install Full-Length Bookshelves: Line one long wall with floor-to-ceiling shelving, leaving a central cavity for the TV and low fireplace.
- Integrate Lighting: Install warm LED strip lighting beneath individual shelf runs.
- Mount TV & Fireplace: Position the fireplace low in the central cavity and mount the TV screen directly above it.
- Float Seating: Set a comfortable sofa floating centrally on a large horizontal jute or patterned rug facing the shelving wall.
Idea 9: Back-to-Back Floating Dual Zone Anchors
Concept and Design Overview

When a room is exceptionally long (e.g., 25+ feet), attempting to bridge one seating area across that distance creates dead space. Instead, consolidate the room using a tight, intentional “back-to-back” speed-bump layout in the center.
A primary sofa floats centrally facing the TV and fireplace media wall (Zone 1). A sturdy console table is placed tightly against the back of that sofa, and a second smaller seating piece (like a daybed or two club chairs) rests against the opposite side of the console, facing 180 degrees away toward a secondary reading or fireplace hearth zone (Zone 2).
+-------------------------------------------------------------+
| BACK-TO-BACK FLOATING DUAL ANCHORS |
| |
| +-----------------------------------------------------+ |
| | ZONE 1 SEATING (Primary Watch Zone) | |
| | [TV & Fireplace Media Wall] | |
| +-----------------------------------------------------+ |
| | FLOATING SOFA 1 [ Console ] FLOATING DAYBED | |
| +-----------------------[ Anchor ]-------------------+ |
| | [ (Divider)] | |
| +-----------------------------------------------------+ |
| | ZONE 2 SEATING (Reading / Hearth Destination) | |
| | [Two Armchairs - facing opposite direction] | |
| +-----------------------------------------------------+ |
| |
+-------------------------------------------------------------+
Step-by-Step DIY Assembly
- Determine Room Center: Locate the precise architectural midpoint along the room’s length.
- Setup Zone 1 Seating: Float the primary sofa facing the main TV/fireplace media wall.
- Set Console Anchor: Place a sturdy, low console table flush against the back of the Zone 1 sofa.
- Setup Zone 2 Seating: Place a daybed, settee, or pair of armchairs directly against the opposite face of the console, facing the far end of the room.
- Define Thresholds: Place separate area rugs under each distinct seating cluster.
Idea 10: Sectional with Chaise End Defining Lounge Threshold

Concept and Design Overview
When a modern sectional is desired, the orientation of the chaise is critical for defining spatial thresholds. To maximize unblocked traffic flow along one long wall, push the main body of the sectional against the opposite long wall.
The chaise end extends outward toward the room’s center width, acting as a visual “speed bump” that explicitly marks the boundary of the media lounge without requiring a physical wall. The sectional faces a stacked TV and linear fireplace on the opposite wall. The color palette focuses on light grey upholstery, charcoal feature accents, concrete, and warm lighting.
Step-by-Step DIY Assembly
- Map Traffic Corridor: Reserve 36 inches of clear floor space along one long wall.
- Align Sectional Base: Place the main sofa length of the sectional against the wall opposite the traffic corridor.
- Orient Chaise Threshold: Ensure the chaise arm extends toward the room’s midpoint to define the edge of the seating zone.
- Position Media Unit: Mount the TV and linear fireplace centered with the sectional’s main seating run.
Common Beginner Mistakes and How to Avoid Them
- Using Traditional Fireplace Box Shapes in Narrow Rooms: Traditional square or boxy fireplaces consume valuable vertical visual space, making a narrow wall feel top-heavy. Use linear, horizontal electric or gas fireplaces that stretch visual width.
- Neglecting Vertical TV Angle: In stacked configurations, the TV often sits higher than ergonomic eye level. If you don’t use an articulating tilt mount to angle the screen down toward the sofa, it causes severe neck strain. Always install an articulating tilt-mount bracket.
- Allowing Visible Cords to Clutter Sightlines: In narrow, integrated setups, visible power cords and HDMI cables ruin the clean aesthetic. Always route hidden wiring channels in-wall or in dedicated raceways.
- Buying Bulky Furniture that Blocks Traffic: Large, thick-armed sofas or deep sectionals choke walkway clearances. Choose slender, low-profile furniture on raised legs.
Practical Maintenance and Zoning Tips
- Zoned Area Rug Textures: Differentiate zones (Conversation, Watch, Study) by varying rug textures. Horizontal striped rugs widen the room width; plush wool rugs define conversation clusters; durable jute defines high-traffic entry zones.
- The Nightly 5-Minute Reset: Spend 5 minutes every evening clearing the 36-inch continuous traffic walkway. Put away books, reset pillows, and clear coffee cups to ensure sightlines remain open for morning.
- Use Low-Temp Hot Glue for Tight Spaces: When routing delicate LED strip lighting, standard high-temperature hot glue can warp or melt plastic components. Always use low-temperature non-toxic glue sticks.
- Layer Zoned Lighting Clearances: Every zone needs its own light anchor.
- Conversation Zone: Large central pendant (28–32 inches above table).
- Study Nook: Dedicated task lamp.
- Media Wall: Integrated bias lighting behind TV/shelving.
