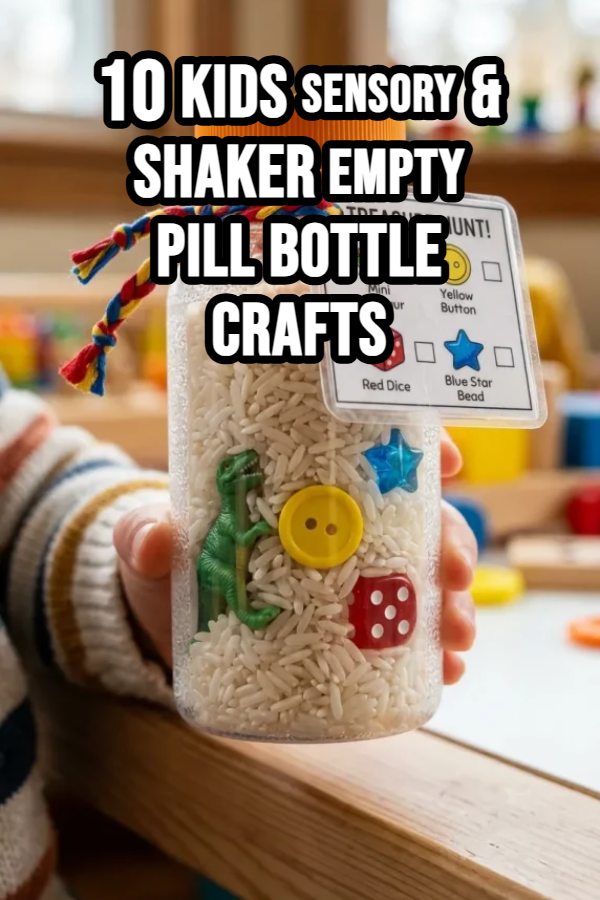
10 Kids Sensory & Shaker Empty Pill Bottle Crafts

Spread the love

Upcycling empty prescription or over-the-counter medicine bottles into sensory toys and musical shakers is a wonderful way to combine eco-friendly recycling with early childhood development. Because plastic pill bottles are durable, lightweight, waterproof, and portable, they make ideal mini containers for tactile exploration, visual tracking, and auditory rhythm play for toddlers and young children.

Sensory play helps develop fine motor skills, cause-and-effect reasoning, emotional self-regulation, and acoustic awareness. This guide presents 10 engaging, step-by-step DIY crafts using clean, empty pill bottles—ranging from soothing liquid glitter bottles to rhythmic musical shakers and interactive sound-matching games.

Crucial Safety & Preparation Guidelines

Before introducing upcycled pill bottles to children, you must follow these safety and preparation steps:

  1. Thorough Cleaning & Disinfection:
    • Wash the bottles and caps thoroughly in hot, soapy water to remove all medicine residue.
    • Soak in hot water for 10–15 minutes to loosen prescription paper labels.
    • Remove sticky label adhesive using rubbing alcohol, nail polish remover, or a dab of cooking oil.
  2. Permanent Cap Sealing (Mandatory):
    • Choking Hazard Warning: Small items inside (beads, rice, glitter, bells) pose severe choking hazards if the bottle opens.
    • Sealing Method: Always apply a generous ring of heavy-duty waterproof adhesive (such as E6000, hot glue, or super glue) inside the cap threads before screwing or snapping the lid shut permanently. Wrap colorful duct tape or electrical tape around the lid seam for extra safety.
  3. Child-Proof Lid Hack: If using push-and-turn safety caps, ensure they are securely locked or glued down so children cannot squeeze and twist them open.
  4. Supervision Required: Sensory bottles are meant for supervised play, especially with infants and toddlers under 3 years old. Check bottles regularly for cracks or leaking seams.

Idea 1: The “Glimmer & Glow” Liquid Galaxy Sensory Bottle

Concept and Design Overview

A mini calming bottle filled with viscous liquid, glitter, and tiny star sequins. When shaken, the glitter swirls into a mesmerizing cosmic vortex and slowly settles to the bottom, providing a visual focus tool that helps children self-regulate during tantrums or sensory overload.

Using clear or translucent pill bottles lets light pass through, making the glitter shine brightly when held up to a window or flashlight.

+-------------------------------------------------------------+
|          "GLIMMER & GLOW" LIQUID GALAXY BOTTLE              |
|                                                             |
|               [ PERMANENTLY SEALED & TAPED CAP ]            |
|               ==================================            |
|               | LIQUID MIX: Water + Clear Glue |            |
|               |                                |            |
|               |  * Fine Metallic Blue Glitter  |            |
|               |  * Silver Star Sequins         |            |
|               |  * Floating Foil Stars         |            |
|               |                                |            |
|               +--------------------------------+            |
+-------------------------------------------------------------+

Step-by-Step DIY Assembly

  1. Materials Needed: Clean pill bottle, warm water, clear PVA liquid school glue (or glycerin), fine metallic glitter, star sequins, and hot glue/E6000.
  2. Mix Viscous Liquid: Fill the pill bottle 1/3 full with clear PVA school glue. The glue increases liquid density, slowing down how fast the glitter falls.
  3. Add Glitter & Sequins: Drop in 1 teaspoon of fine blue/purple metallic glitter and a pinch of silver star sequins.
  4. Add Warm Water: Fill the remaining space with warm tap water, leaving a small 1/2-inch air gap at the top to allow liquid movement.
  5. Seal Cap Permanently: Apply hot glue or E6000 around the inner lid threads, screw the cap on tightly, and let dry. Wrap decorative tape around the lid base. Shake vigorously to mix!

Idea 2: Rainbow Rice Rattle Shaker

Concept and Design Overview

A vibrant, high-contrast visual and auditory shaker filled with colorful dyed rice. As children shake, roll, or flip the bottle, the dry rice grains make a gentle, soothing rain-like sound while displaying a bright rainbow swirl.

This toy helps babies and toddlers practice auditory tracking and hand-eye coordination.

Step-by-Step DIY Assembly

  1. Prepare Rainbow Rice: Divide uncooked white rice into small bags. Add a few drops of food coloring and 1 teaspoon of rubbing alcohol/vinegar to each bag, shake to coat, and spread on parchment paper to dry.
  2. Layer the Rice: Funnel alternating layers of red, orange, yellow, green, blue, and purple dried rice into the pill bottle until it is 2/3 full. Leaving 1/3 empty space allows the rice to slide and make noise.
  3. Add Visual Accents (Optional): Toss in 2–3 bright jingle bells or colorful pony beads for added sound variety.
  4. Seal the Lid: Glue the lid permanently onto the bottle opening using heavy-duty craft adhesive. Wrap colorful pattern tape around the cap.

Idea 3: “I-Spy” Hidden Object Search Bottle

Concept and Design Overview

An interactive cognitive game in a bottle! Filled with dry opaque fill (like white rice, poly-pellets, or sand) and a collection of tiny hidden plastic treasures (a mini dinosaur, a button, a letter bead, a safety pin, a star).

Children must shake, turn, and roll the bottle to discover and identify all the hidden items, building vocabulary, focus, and visual discrimination skills.

       +-------------------------------------------------+
       |           "I-SPY" HIDDEN OBJECT BOTTLE          |
       |                                                 |
       |               [ GLUED SAFETY CAP ]              |
       |               ====================              |
       |               | DRY RICE / SAND   |              |
       |               | (Opaque Filler)   |              |
       |               |                   |              |
       |               |  o Mini Button    |              |
       |               |  * Plastic Star   |              |
       |               |  A Letter Bead    |              |
       |               |  ~ Mini Toy Dino  |              |
       |               +-------------------+              |
       |               [ Attached Checklist Card ]        |
       +-------------------------------------------------+

Step-by-Step DIY Assembly

  1. Select Mini Treasures: Gather 5–8 tiny plastic objects that easily fit inside the bottle opening (e.g., a mini plastic animal, a bright button, a colored bead, a dice, a penny).
  2. Photograph or List Items: Draw or write a picture checklist card of the items on a piece of cardstock, laminating or covering it with clear tape.
  3. Fill the Bottle: Drop the mini treasures into the bottle and fill it 3/4 full with dry white rice or plastic poly-pellets.
  4. Attach Checklist: Punch a hole in the checklist card and attach it to the bottle neck using a sturdy ribbon or elastic string.
  5. Seal Securely: Apply E6000 glue to the lid threads and lock the bottle cap shut permanently.

Idea 4: Floating Ocean Discovery Pod

Concept and Design Overview

A dynamic two-phase density liquid bottle that simulates ocean waves. Blue-dyed water mixes with clear baby oil to create immiscible liquid bubbles that never combine. Small plastic ocean sea creatures or glitter float between the layers, demonstrating scientific principles like density and buoyancy.

Tilting the bottle horizontally creates smooth, rolling blue waves.

Step-by-Step DIY Assembly

  1. Fill Water Phase: Fill the bottle halfway with water mixed with 1 drop of blue liquid food coloring.
  2. Add Sea Elements: Drop in a few small plastic ocean confetti pieces, sea-themed sequins, or tiny plastic fish beads.
  3. Fill Oil Phase: Fill the remaining space nearly to the brim with clear baby oil or mineral oil.
  4. Observe Phase Separation: Notice how the clear oil sits on top of the blue water.
  5. Seal Permanently: Dry the bottle rim thoroughly, apply a thick bead of waterproof glue inside the cap, and screw shut tight. Tape the seam.

Idea 5: Sound-Matching Sensory Memory Game (Pair Sets)

Concept and Design Overview

A fun acoustic memory game for preschoolers! Craft matching pairs of opaque painted pill bottles filled with different materials (e.g., 2 bottles with pennies, 2 with cotton balls, 2 with dried beans, 2 with sand).

Children shake the bottles and use their hearing to match identical sounding pairs without looking inside, developing auditory processing and memory skills.

+--------------------------------------------------------------------------+
|                  SOUND-MATCHING SENSORY PAIR GAME                        |
|                                                                          |
|       Pair A: Dried Beans    |  Pair B: Uncooked Rice   | Pair C: Cotton |
+--------------------------------------------------------------------------+
                                     |
                                 FEATURED:
                                     v
+------------------+------------------+------------------+-----------------+
| OPAQUE PAINT     | NUMBER LABELS    | AUDITORY PROOF   | SELF-CHECK CODE |
| Hides Contents   | Underneath Base  | Sharp vs Soft    | Matching Color  |
| Visual Blindness | Easy Identification| Acoustic Tones | Dots on Bottom  |
+------------------+------------------+------------------+-----------------+

Step-by-Step DIY Assembly

  1. Gather 6–10 Identical Bottles: Collect an even number of identical pill bottles.
  2. Make Bottles Opaque: Spray-paint the outside of all bottles with solid matte paint (or wrap them in solid colored paper) so the interior contents are completely hidden.
  3. Fill Pairs Identically:
    • Bottle 1 & 2: Fill with 5 dried kidney beans (loud, heavy clack).
    • Bottle 3 & 4: Fill with 1 tablespoon of sand (soft, whisper rustle).
    • Bottle 5 & 6: Fill with 10 metal paperclips (metallic jingling).
    • Bottle 7 & 8: Fill with cotton balls (silent/muffled vibration).
  4. Mark Bottom Self-Check: Place matching color dots or numbers on the bottom bases of paired bottles so kids can check if their acoustic matches are correct.
  5. Seal All Lids: Permanently glue all caps shut with E6000 or hot glue.

Idea 6: Neon Water-Bead Tactile Squish Tube

Concept and Design Overview

A mesmerizing squishy tube filled with hydrated neon gel water beads (or cut-up gel window clings) suspended in clear hair gel or water. When kids press and squeeze the plastic bottle, the soft colorful gel beads squish and shift against the clear plastic, providing deep tactile and visual feedback.

The flexible plastic of thin-walled pill bottles offers a satisfying squishy sensation without breaking.

Step-by-Step DIY Assembly

  1. Hydrate Water Beads: Expand a pinch of tiny colorful water beads (or gel Orbeez) in water according to package instructions.
  2. Fill Gel Medium: Fill the pill bottle halfway with clear, inexpensive hair gel or liquid hand soap.
  3. Add Water Beads: Drop in 2–3 tablespoons of hydrated water beads. The thick hair gel keeps the beads suspended in space rather than sinking to the bottom.
  4. Top Off: Add a small splash of water to allow movement when squeezed.
  5. Double-Seal Lid: Glue the lid permanently with waterproof glue and wrap reinforced duct tape tightly around the entire cap rim.

Idea 7: Jingle Bell & Pom-Pom Rhythm Shaker

Concept and Design Overview

A festive, high-energy musical instrument designed for toddler music time! Combining metal jingle bells with soft acrylic pom-poms creates a bright, cheerful sound cushioned by soft colorful textures.

As the toddler shakes the bottle, the metal bells strike against the plastic walls and soft pom-poms, creating a pleasant rhythmic chime without being overly loud or harsh.

       +-------------------------------------------------+
       |           JINGLE BELL & POM-POM SHAKER          |
       |                                                 |
       |               [ TAPE-WRAPPED SEALED CAP ]       |
       |               ===========================       |
       |               | CLEAR / AMBER BOTTLE    |       |
       |               |                         |       |
       |               |  (O) Metal Jingle Bell  |       |
       |               |  * Soft Plush Pom-Pom   |       |
       |               |  (O) Metal Jingle Bell  |       |
       |               |  * Soft Plush Pom-Pom   |       |
       |               +-------------------------+       |
       +-------------------------------------------------+

Step-by-Step DIY Assembly

  1. Select Noise Makers: Gather 3–4 medium metal jingle bells and a handful of bright 1-inch plush acrylic pom-poms.
  2. Fill the Container: Alternate dropping a bell, a few pom-poms, another bell, and more pom-poms until the bottle is 3/4 full.
  3. Test Acoustic Sound: Shake the bottle to test the volume. Add more pom-poms to muffle the sound, or more bells to increase volume.
  4. Decorate Cap: Wrap ribbon, colorful tape, or felt around the bottle exterior.
  5. Glue Cap Shut: Permanently seal the lid threads with hot glue or E6000 adhesive.

Idea 8: Nature Explorer “Mini Bug & Leaf” Magnifying Pod

Concept and Design Overview

A outdoor STEM discovery tool! Many amber or clear pill bottles feature slightly curved or magnified plastic bottoms and sides. By placing dried leaves, flower petals, acorns, or faux plastic insects inside, children can inspect natural specimens up close like young scientists.

Adding a small magnifying sheet or gluing a cheap plastic magnifying lens over the cap or side turning portal turns the bottle into an outdoor field exploration kit.

Step-by-Step DIY Assembly

  1. Collect Nature Specimens: Gather dried nature items (like small pinecones, dried flower petals, colorful autumn leaves, or plastic toy bugs).
  2. Place Inside: Arrange the items neatly inside a clean, crystal-clear pill bottle.
  3. Attach Magnifier (Optional): Cut a small circle from a flexible plastic Fresnel magnifying sheet and glue it inside the cap or over a side cut-out window.
  4. Add Lanyard Handle: Tie a sturdy yarn or paracord lanyard loop securely around the cap neck so kids can wear it like a necklace during nature walks.
  5. Seal Cap: Snap or screw the cap shut permanently to preserve the nature specimens.

Idea 9: Glow-in-the-Dark Bedtime Calm Bottle

Concept and Design Overview

A comforting nighttime sensory tool designed to ease bedtime anxieties and fear of the dark. Filled with luminescent glow-in-the-dark stars, pony beads, and glow powder suspended in clear liquid, this bottle glows softly when exposed to room light before bedtime.

Holding the bottle under a bedside lamp for 1 minute activates a soothing green/blue glow that lasts through bedtime wind-down routines.

+--------------------------------------------------------------------------+
|                  GLOW-IN-THE-DARK BEDTIME CALM BOTTLE                    |
|                                                                          |
|       Glow-in-the-Dark Beads | Clear Suspended Liquid | Luminescent Stars|
+--------------------------------------------------------------------------+
                                     |
                                 FEATURED:
                                     v
+------------------+------------------+------------------+-----------------+
| CLEAR GLUE BASE  | GLOW PIGMENT     | NIGHTTIME CALM   | SAFE SEALED LID |
| Suspends Beads   | Non-Toxic Powder | Eases Fear of Dark| Permanent Hot Glue|
| Slow Movement    | Soothing Light   | Wind-Down Routine| Water-Tight     |
+------------------+------------------+------------------+-----------------+

Step-by-Step DIY Assembly

  1. Gather Luminescent Materials: Non-toxic glow-in-the-dark acrylic beads, glow stars, glow powder/pigment, clear school glue, and warm water.
  2. Mix Glow Liquid: In a cup, mix 1/3 bottle of clear school glue, warm water, and 1/2 teaspoon of non-toxic glow pigment powder.
  3. Pour & Add Beads: Pour the liquid into the pill bottle and drop in glow-in-the-dark plastic stars and pony beads.
  4. Charge under Light: Hold the open bottle under a bright light for 30 seconds to test the glow intensity.
  5. Permanently Seal: Apply strong waterproof glue inside the cap threads and seal shut tightly. Tape the seam.

Idea 10: Magnet Discovery & Iron Filing Wand Tube

Concept and Design Overview

An exciting intro-to-physics STEM craft! Fill a clear pill bottle with magnetic objects (like metal paperclips, pipe cleaner snips with wire cores, and iron filings) suspended in dry rice or liquid.

When children move a strong magnetic wand or magnetic bar along the outside of the plastic bottle, the hidden metal items dance, jump, and stick to the bottle walls following the invisible magnetic field.

Step-by-Step DIY Assembly

  1. Gather Magnetic Fillers: Cut colorful chenille pipe cleaners into 1/2-inch snips (the inner wire is magnetic), metal paperclips, and small iron washers.
  2. Drop into Bottle: Place the metal items inside the pill bottle and fill 2/3 full with dry white rice or clear baby oil.
  3. Permanently Glue Lid: Apply a generous layer of E6000 or hot glue around the cap threads and screw the lid on tightly.
  4. Pair with Magnet Wand: Provide a child-safe plastic magnetic wand or large horseshoe magnet.
  5. Play & Discover: Touch the magnet to the outside plastic wall and drag it upward to watch the metal pieces slide and dance along the sides!

Common Mistakes to Avoid in Sensory Bottle Crafting

  • Failure to Seal Lids Permanently: Never skip gluing lids shut. Unsealed caps present serious choking, drowning (liquid spills), and chemical risks for young kids. Always use heavy-duty glue and safety tape.
  • Overfilling Liquid Bottles: Filling liquid sensory bottles completely to the top leaves no air space, preventing liquids and glitter from moving freely when shaken. Leave a 1/2-inch air gap at the top.
  • Using Non-Waterproof Glues on Liquid Bottles: Standard craft glue or washable glue will dissolve over time when exposed to water leaks inside cap threads. Use waterproof silicone, E6000, or hot glue.
  • Using Heavy Sharp Objects: Placing sharp or heavy metal objects inside thin plastic bottles can crack the plastic when shaken hard. Select lightweight, smooth plastic or rounded wooden fillers.

Similar Posts

  • 10 Cozy Corner Apartment

    Spread the love

    Spread the loveCreating a cozy corner in your apartment can transform even the smallest space into a warm retreat. Whether you live in a studio, a city loft, or a small apartment, there is always room for a charming corner that feels like home. Cozy corners are not just design choices; they are emotional spaces…

  • 10 Peel and Stick Apartment Decor

    Spread the love

    Spread the loveDecorating an apartment can feel challenging, especially when you are renting and cannot drill holes, paint walls permanently, or make major changes. Many renters want a stylish and personalized home but worry about security deposits and landlord rules. This is where peel and stick apartment decor becomes a game changer. Peel and stick…

  • 10 Pottery Bowl Painting Ideas

    Spread the love

    Spread the lovePainting ceramic bowls transforms plain bisque clay into functional art pieces. Whether you are working with unglazed earthenware, bisque stoneware, or air-dry clay, hand-painting allows for endless creative expression. From geometric sgraffito and botanical motifs to dreamy watercolor washes and bold abstract splashes, a painted pottery bowl serves as a striking centerpiece, ring…

  • 10 Pink Crochet Ideas

    Spread the love

    Spread the lovePink crochet projects have a special kind of charm. They feel cozy, handmade, and full of personality, while still being stylish enough to fit into modern homes, wardrobes, and gift ideas. Whether you love soft blush tones, dusty rose, or bold hot pink, crochet allows you to explore texture and color in a…

  • 10 Cottagecore Decor Kitchen

    Spread the love

    Spread the loveIf you love the feeling of a warm countryside home, soft vintage textures, natural materials, and a slow living atmosphere, then a cottagecore kitchen is the perfect style for you. Cottagecore has quickly become one of the most loved interior aesthetics because it celebrates comfort, serenity, and the charm of simple living. A…

  • 10 Nook Ideas Small Spaces

    Spread the love

    Spread the loveLiving in a small home or apartment often means making the most out of every corner. While it can feel like a challenge, small spaces are actually full of hidden opportunities. Nooks are one of the most creative ways to maximize small areas. A nook is essentially a cozy, functional corner or tucked…

Leave a Reply

Your email address will not be published. Required fields are marked *