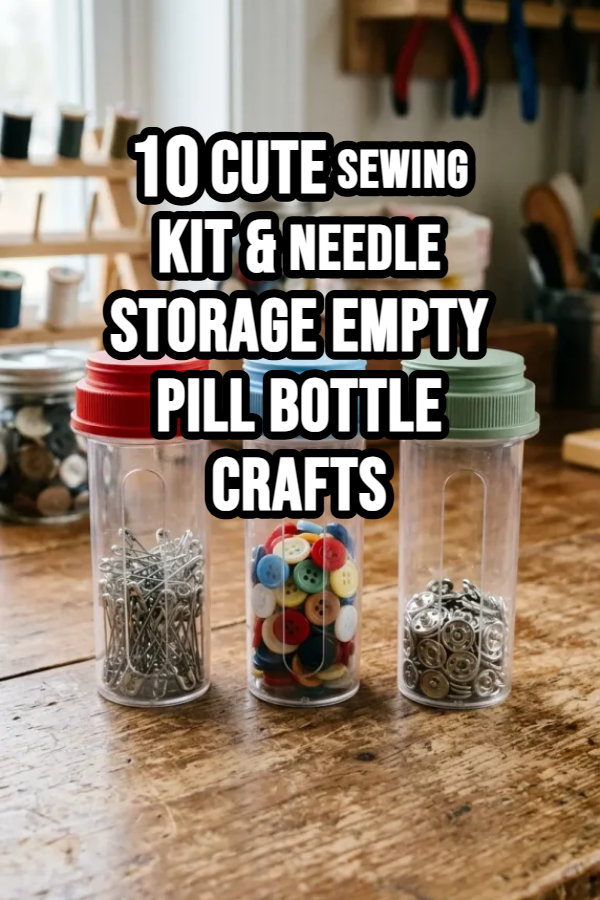
10 Cute Sewing Kit & Needle Storage Empty Pill Bottle Crafts

Upcycling empty prescription or medicine bottles is one of the easiest, most practical eco-friendly crafts. Because pill bottles are lightweight, moisture-resistant, durable, and feature secure snap or twist lids, they make ideal compact containers for small, easily lost sewing supplies like hand needles, pins, thread spools, thimbles, and measuring tapes.
Transforming plain amber or white plastic bottles into adorable, functional sewing accessories relies on clever lid cushion additions, fabric wraps, magnetic inserts, and clear label categorization. Whether you are building a pocket emergency travel sewing kit or organizing sharp hand-sewing needles by size, this guide details 10 creative, step-by-step DIY pill bottle crafts.
Safety & Prep Instructions
Before starting any craft using empty medicine containers, follow these preparation steps:
- Clean & Disinfect: Wash the interior and exterior thoroughly with warm, soapy water to remove all pharmaceutical residue and allow it to air-dry completely.
- Remove Adhesive & Labels:
- Peel off prescription paper labels (soak in hot water for 10–15 minutes if stubborn).
- Rub away sticky adhesive residue using rubbing alcohol, nail polish remover, or a drop of cooking oil/Goo Gone.
- Child-Proof Lid Hack: If using push-and-turn safety caps, many brands feature a reversible lid—flip the cap upside down and screw it back on to create a quick, non-locking screw cap.
Idea 1: The Pincushion Lid Travel Sewing Pod
Concept and Design Overview
This all-in-one pocket sewing kit turns the lid of a pill bottle into a functional stuffed fabric pincushion, while the bottle container holds thread spools, safety pins, buttons, and small folding scissors underneath.

Wrapping the plastic bottle barrel in floral cotton fabric or colorful washi tape transforms the container into a charming vintage-style sewing pod. The top pincushion keeps active needles accessible during stitching sessions.
+-------------------------------------------------------------+
| PINCUSHION LID TRAVEL SEWING POD |
| |
| /---------------------------\ |
| ( STUFFED FABRIC PINCUSHION ) |
| \---------------------------/ |
| [ PILL BOTTLE FLIP/SCREW CAP ] |
| =============================== |
| | FABRIC-WRAPPED BOTTLE BARREL| |
| | | |
| | [ Mini Thread Spools ] | |
| | [ Folding Scissors ] | |
| | [ Spare Buttons & Pins ] | |
| +-----------------------------+ |
+-------------------------------------------------------------+
Step-by-Step DIY Instructions
- Gather Materials: Clean pill bottle, fabric scrap, fiberfill stuffing, hot glue gun, small scissors, mini thread spools, and buttons.
- Make the Pincushion Top: Cut a 3-inch circle of cotton fabric. Place a small wad of fiberfill stuffing in the center, gather the edges into a tight pouch, and secure with a knot or rubber band.
- Attach Cushion to Lid: Hot glue the stuffed fabric pouch firmly onto the top surface of the pill bottle cap.
- Wrap the Bottle: Apply a strip of double-sided tape orMod Podge to the bottle barrel, wrapping it with matching floral fabric or decorative paper.
- Pack the Kit: Insert two mini spools of thread, a threader, folding scissors, and a few safety pins inside the bottle, sealing the pincushion cap on top.
Idea 2: Magnetic Needle Keeper Pod with Size Labels
Concept and Design Overview

Hand-sewing needles (embroidery, tapestry, quilting, darning) easily get mixed up or lost in drawer bottoms. This project uses small neodymium magnets glued inside the bottom and walls of a clear or translucent pill bottle to hold loose needles securely in place so they don’t rattle or dull their points.
Applying printed or hand-lettered labels (e.g., “Embroidery No. 7-9” or “Leather Needles”) onto the outside barrel makes finding the exact needle size effortless.
Step-by-Step DIY Instructions
- Prep the Interior: Glue two small, strong neodymium disc magnets to the inside bottom and inner back wall of a clean, dry pill bottle using E6000 or strong hot glue.
- Add a Felt Base Cushion: Cut a small circle of stiff felt and push it down over the bottom magnet to protect needle tips from hard plastic impact.
- Decorate the Exterior: Paint the bottle exterior with matte pastel acrylic paint (leaving a small clear vertical window to view needles inside) or wrap with cute washi tape.
- Label Categories: Write or stick labels indicating needle types (e.g., “Ballpoint”, “Sharps”, “Tapestry”) onto the bottle side.
- Insert Needles: Drop needles inside; the internal magnets will pull them flat against the sides, preventing spillages even if dropped.
Idea 3: Washi Tape “Bobbin & Thread Spool” Tower
Concept and Design Overview
When traveling or taking hand-sewing projects on the go, carrying full-sized thread spools takes up too much bag space. This project uses narrow wooden dowels or plastic drinking straws secured inside a tall pill bottle to hold stacked embroidery bobbins or pre-wound thread bobbins neatly in a vertical column.

Wrapping the exterior in alternating rows of pastel patterned washi tape gives the storage tower a cheerful, craft-room aesthetic.
+-------------------------------------------------+
| THREAD BOBBIN TOWER POD |
| |
| [ CAP WITH WAFER MAGNET ] |
| ========================= |
| | WASHI TAPE WRAPPED | |
| | EXTERIOR BARREL | |
| | | |
| | | [ Bobbin 3 ] | | |
| | | [ Bobbin 2 ] | | |
| | | [ Bobbin 1 ] | | |
| | +-Central Dowel-+ | |
| +-----------------------+ |
+-------------------------------------------------+
Step-by-Step DIY Instructions
- Prepare Dowel Support: Cut a thin wooden dowel or plastic straw slightly shorter than the internal height of the bottle.
- Glue Center Guide: Anchor the bottom of the dowel to the inner center base of the pill bottle using a dab of hot glue.
- Decorate Barrel: Wrap the outside of the bottle with 3 to 4 coordinating patterns of washi tape, sealing with a coat of clear Mod Podge for durability.
- Load Thread Bobbins: Slide pre-wound plastic or cardboard thread bobbins down over the center dowel.
- Cap & Seal: Snap the lid on to keep thread ends clean and tangle-free inside your sewing bag.
Idea 4: Miniature Tape Measure & Thimble Dispenser
Concept and Design Overview
Small flexible tape measures and thimbles often vanish into larger sewing basket cavities. This craft turns a squat, wide pill bottle into a dedicated measuring and thimble pod with a slotted side opening for feeding out retractable tape measures.
Cutting a narrow vertical slit in the side of the bottle allows a flexible soft tape measure to pull out easily while remaining contained inside the bottle housing. The top cap space holds a metal thimble and needle threader.
Step-by-Step DIY Instructions

- Cut Side Slit: Using a sharp craft knife, cut a clean 0.5-inch vertical slit down one side of the pill bottle.
- Sand Sharp Edges: Smooth the plastic slit edges with fine-grit sandpaper so flexible tape glides smoothly without snagging.
- Paint & Decorate: Paint the bottle with chalk paint, decorating with vintage sewing stamps or stickers.
- Insert Tape Measure: Roll up a soft vinyl measuring tape, feeding the tab end outward through the side slit.
- Top with Thimble: Place a metal thimble and threader in the remaining top space, securing the cap.
Idea 5: Felt “Monster” or “Animal” Needle Case for Kids
Concept and Design Overview
Encouraging kids or young beginners to learn sewing requires fun, friendly tools. Transforming a standard pill bottle into a cute felt “monster,” “cat,” or “owl” needle case makes needle safety fun and approachable.
The bottle body is wrapped in bright felt with googly eyes, felt ears, and stitched mouth details. Inside, a felt accordion strip holds child-safe blunt tapestry needles and colorful embroidery floss.

+-------------------------------------------------+
| FELT MONSTER SEWING BOTTLE |
| |
| (oo) <-- Googly Eyes |
| [ FELT MONSTER HEAD CAP ] |
| ========================= |
| | BRIGHT FELT BODY | |
| | (Zig-Zag Felt Teeth) | |
| | | |
| | [ Accordion Needle ] | |
| | [ Floss Organizer ] | |
| +-----------------------+ |
+-------------------------------------------------+
Step-by-Step DIY Instructions
- Cover with Felt: Cut a strip of bright felt (like turquoise or magenta) and glue it around the bottle barrel.
- Add Creature Details: Glue googly eyes, felt ears, horn cutouts, and zig-zag white felt “teeth” onto the cap and bottle face.
- Create Needle Organizer: Cut a 1.5-inch wide strip of stiff felt, fold it accordion-style, and pierce child-safe embroidery needles into the folds.
- Pack & Store: Slide the needle felt strip and mini embroidery floss skeins inside the monster container.
Idea 6: Vintage Mod Podge Floral Decoupage Needle Cylinder

Concept and Design Overview
If you love cottagecore, shabby chic, or vintage craft room organization, this project uses floral paper napkins, vintage pattern illustrations, or scrapbook paper to decoupage the plastic bottle surface into an antique-style needle cylinder.
Finished with a coat of satin Mod Podge and a ribbon trim around the lid, the plastic bottle mimics vintage wooden or bone needle cases from the 19th century.
Step-by-Step DIY Instructions
- Base Coat Painting: Lightly sand the bottle and paint it with light ivory or white acrylic paint to create a clean background base.
- Prepare Decoupage Paper: Separate the printed top layer of a floral paper napkin or cut thin vintage paper scraps.
- Apply Mod Podge: Brush a thin layer of Mod Podge onto the bottle, smoothing the paper gently over the surface to avoid wrinkles.
- Seal Surface: Coat the decoupage surface with 2 additional coats of matte or satin Mod Podge, allowing to dry completely.
- Add Ribbon Trim: Glue a thin velvet or lace ribbon strip around the base of the cap rim.
Idea 7: Clear “Quick-View” Safety Pin & Button Organizer Tubes
Concept and Design Overview

Loose safety pins, snaps, and spare coat buttons tend to end up scattered loose in sewing drawers. This system uses transparent or translucent pill bottles with color-coded lids to create a modular, stackable “quick-view” sorting tower.
Leaving a clear vertical stripe unpainted or using transparent amber bottles allows you to identify contents at a glance without opening lids.
+--------------------------------------------------------------------------+
| CLEAR "QUICK-VIEW" ORGANIZER TUBES |
| |
| Bottle 1: Safety Pins | Bottle 2: Spare Buttons | Bottle 3: Snaps|
+--------------------------------------------------------------------------+
|
FEATURED:
v
+------------------+------------------+------------------+-----------------+
| COLOR LID: RED | COLOR LID: BLUE | COLOR LID: GREEN | CLEAR WINDOW |
| Safety Pins | Shirt Buttons | Metal Snaps | Instant Content |
| (Small & Large) | (2-Hole & 4-Hole)| & Hook-and-Eyes | Identification |
+------------------+------------------+------------------+-----------------+
Step-by-Step DIY Instructions
- Mask Visual Window: Place a strip of painter’s tape vertically down the front of a clean transparent pill bottle.
- Paint Cap & Body: Spray-paint the cap a bright color (e.g., bright red for safety pins, sky blue for buttons) and paint the back/sides of the bottle.
- Peel Tape: Remove painter’s tape to reveal a clean, clear vertical viewing window.
- Sort Notions: Fill separate bottles with specific notions—small safety pins, metal snaps, hooks-and-eyes, or shirt buttons.
- Label Lid Top: Write category names on lid tops with a metallic permanent marker for easy top-down drawer viewing.
Idea 8: Chalkboard Label Seam Ripper & Blade Vault
Concept and Design Overview

Used rotary cutter blades, bent pins, and dull hand needles should never be tossed loose into household trash where they could cut someone or pierce garbage bags. This safety-first project turns a dark pill bottle into a dedicated “Sharps Disposal Vault” alongside seam ripper storage.
Covered in chalkboard paint or a chalkboard vinyl sticker, you can write active warnings (e.g., “USED SHARPS – DULL BLADES”) while storing seam rippers and thread snips safely.
Step-by-Step DIY Instructions
- Apply Chalkboard Finish: Coat the bottle barrel with 2 layers of black chalkboard paint or wrap with a self-adhesive chalkboard label.
- Cut Top Disposal Slot (Optional): If using purely for dull blade disposal, cut a thin 1-inch slot in the lid top using a utility knife.
- Write Label: Use a chalkboard marker to write “Sharps Vault / Seam Rippers” on the front.
- Fill Safely: Store active seam rippers and small thread snips inside; or use as a secure disposal container for dull rotary blades and broken needles.
Idea 9: Upcycled Twine & Thread Dispenser Lid
Concept and Design Overview

Unspooling baker’s twine, embroidery thread, or heavy button thread can quickly turn into a tangled knot inside craft totes. This dispenser project punches a smooth grommeted hole in the top of the pill bottle cap, allowing thread or twine to pull out smoothly while the spool remains protected inside.
Wrapping the exterior in rustic jute twine, baker’s twine, or kraft paper adds a cozy handmade aesthetic.
+-------------------------------------------------+
| GROMMETED THREAD DISPENSER |
| |
| ( Grommet Exit Hole ) |
| [ PILL BOTTLE TOP CAP ] |
| ========================= |
| | JUTE / KRAFT WRAPPED | |
| | EXTERIOR BARREL | |
| | | |
| | ( Thread Spool ) | |
| | \ | |
| | \--> Feeds Up | |
| +-----------------------+ |
+-------------------------------------------------+
Step-by-Step DIY Instructions
- Drill Lid Hole: Drill a 1/4-inch hole in the center of the pill bottle cap using a hand drill or heated metal craft punch.
- Insert Small Grommet: Press a small metal or rubber eyelet/grommet into the hole to prevent plastic edges from fraying thread.
- Wrap Exterior: Wrap the exterior barrel in spiral rows of natural jute twine using hot glue to secure the ends.
- Load Spool: Place a thread spool or ball of twine inside the bottle, feeding the lead thread end upward through the cap grommet.
- Pull & Cut: Snap the lid shut and pull thread smoothly on demand.
Idea 10: Glitzy Rhinestone & Glitter Emergency Pocket Kit
Concept and Design Overview

Glamorous, eye-catching, and compact, this sparkly pocket sewing kit is coated in fine glitter or coated with flatback rhinestones, making it a stylish emergency kit to toss into a purse, backpack, or luggage for weddings, travel, or work events.
The sparkling exterior makes it easy to spot inside dark purse pockets. Inside, it holds pre-threaded needles, safety pins, garment tape strips, and a mini folding scissors.
Step-by-Step DIY Instructions
- Apply Glue & Glitter: Coat the bottle barrel with Mod Podge, sprinkle generously with fine craft glitter (or glue rows of flatback acrylic rhinestones using gem glue), and seal with a clear topcoat.
- Prepare Pre-Threaded Needles: Wrap 3 to 4 colors of common thread (black, white, navy, beige) around a small piece of cardstock, threading hand needles ahead of time and sticking them into the cardstock.
- Include Emergency Fixes: Insert two strips of double-sided fashion tape, 4 safety pins, and 2 neutral replacement buttons.
- Cap & Travel: Seal the sparkling kit and keep it in your handbag, glove box, or travel luggage for wardrobe emergencies.
Common Beginner Mistakes and How to Avoid Them
- Skipping the Sanding Step Before Painting: Acrylic paint easily peels off smooth plastic pill bottles. Lightly sand the exterior with fine-grit sandpaper first so paint adheres smoothly.
- Forgetting Needle Cushioning: Dropping sharp hand needles directly onto hard plastic bottom floors can dull or bend fine needle tips. Always place a felt disk or magnet at the bottom.
- Using Too Much Hot Glue on Thin Plastic: High-temperature hot glue guns can warp or melt thin plastic pill bottle walls. Use low-temp glue guns, E6000, or double-sided craft tape.
- Ignoring Child Safety in Multi-Kid Homes: Storing sharp needles in bright, toy-like “monster” containers around toddlers requires caution. Store sharp craft containers out of reach on high shelves.
