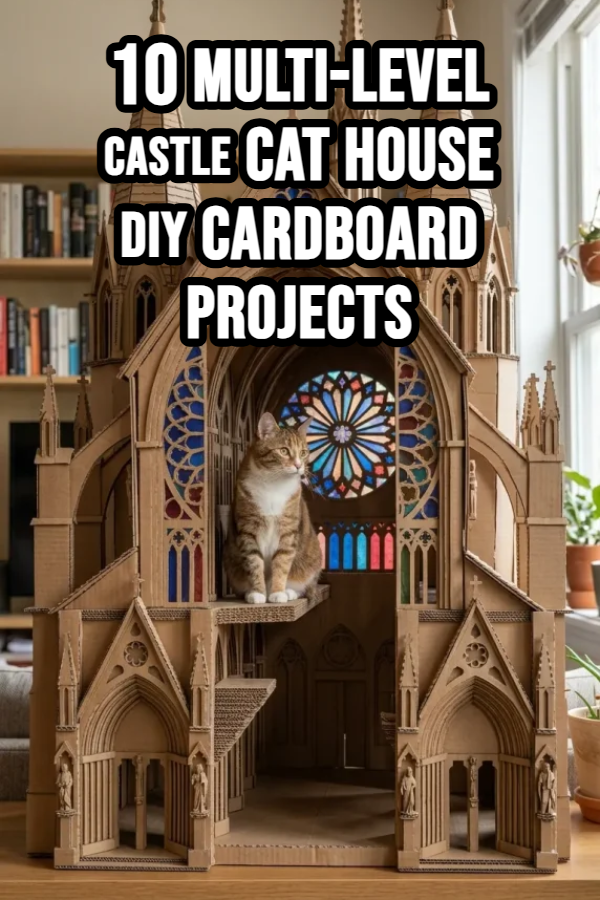
10 Multi-Level Castle Cat House DIY Cardboard Projects

Spread the love

Introduction

Cardboard is one of the most accessible, versatile, and cat-beloved materials for DIY pet furniture. Cats are naturally drawn to cardboard due to its insulating warmth, texture for scent-marking, and the security provided by enclosed spaces. Building a multi-level cardboard cat castle turns everyday shipping boxes into an interactive fortress featuring climbing tiers, lookout turrets, scratching zones, and cozy sleeping dens.

Constructing a safe and durable cardboard cat castle requires structural weight distribution, non-toxic joining methods, and feline ergonomics. By reinforcing vertical pillars, double-layering floor panels, cutting wide entryways to prevent whisker fatigue, and adding internal climbing platforms, you can build a multi-story cat playhouse that withstands jumping, pouncing, and scratching. This comprehensive guide details 10 creative multi-level cardboard castle projects across varied skill levels, box counts, and architectural styles.

Essential Safety & Structural Rules for Cardboard Cat DIYs

Before cutting cardboard or assembling tiers, follow these safety and construction guidelines:

  • Use Non-Toxic Adhesives Only: Cats groom themselves constantly and may chew on cardboard edges. Use non-toxic PVA wood glue, cornstarch-based glue, or hot glue applied to interior seams only. Avoid industrial solvent glues, toxic contact cements, or exposed duct tape edges that cats might ingest.
  • Double-Layer Floor Support Panels: Single-wall cardboard sags when a 10–15 lb cat jumps onto upper levels. Always double-layer upper floor panels by gluing two pieces of heavy-duty corrugated cardboard together with grain lines running perpendicular (90 degrees) to each other for cross-grain structural rigidity.
  • Sizing Access Portals for Cat Ergonomic Clearance: Ensure all internal climbing holes, door arches, and escape hatches are at least 7 to 8 inches in diameter so adult cats can move between levels without getting stuck or compressing their whiskers.
  • Remove Staples, Tape, and Chemical Labels: Thoroughly inspect every cardboard box prior to assembly. Remove all heavy metal shipping staples, plastic packing tape, and chemical adhesive shipping labels that could pose choking or toxicity hazards.

Idea 1: Classic Medieval Fortress with Square Turrets & Drawbridge Ramp

Concept and Design Overview

Emulating a traditional medieval fortress, this 3-tier cardboard castle features four corner square towers, crenellated battlements (square cut-out castle wall tops), and a working fold-down cardboard drawbridge entry.

The central keep serves as a multi-story climbing tower with staggered internal floor platforms allowing cats to leap from the ground level up to the roof lookout deck. The exterior can be finished with hand-drawn stone brick textures using cat-safe non-toxic markers. The color scheme pairs natural kraft cardboard brown with black ink brick detailing.

+-------------------------------------------------------------+
|              3-TIER MEDIEVAL CARDBOARD FORTRESS             |
|                                                             |
|   +----+  +-------------------------------------+  +----+   |
|   | T1 |  | BATTLEMENTS & ROOF LOOKOUT DECK     |  | T2 |   |
|   |    |  +-------------------------------------+  |    |   |
|   +----+  | SECOND STORY SLEEPING CHAMBER       |  +----+   |
|   |    |  +-------------------------------------+  |    |   |
|   | T3 |  | GROUND LEVEL LOUNGE & DRAWBRIDGE    |  | T4 |   |
|   +----+  +=====================================+  +----+   |
|                 \  Fold-Down Drawbridge Ramp /              |
+-------------------------------------------------------------+

Step-by-Step DIY Assembly

  1. Prepare the Base Keep: Join two large heavy-duty wardrobe or appliance boxes vertically, cutting a 8-inch circular portal in the middle floor panel for internal leaping.
  2. Attach Corner Turrets: Glue four tall, narrow shipping boxes vertically to the four outer corners of the central keep using non-toxic hot glue along interior seams.
  3. Cut Crenellated Battlements: Cut 2×2 inch square notches along the top edges of the roof panels to form classic medieval castle battlements.
  4. Install Drawbridge Entry: Cut an arched door on the front wall, leaving the bottom edge attached to form a fold-down drawbridge ramp anchored with natural jute twine.
  5. Insert Scratching Pad Floor: Glue a corrugated cat scratching insert onto the ground floor entry level.

Idea 2: Modular Stacking Cube Castle (Expandable Layout)

Concept and Design Overview

Perfect for multi-cat households, the modular stacking cube castle uses identical square cardboard boxes (such as 16x16x16 inch shipping boxes) connected together in an interlocking grid.

This design functions like modular cat apartment blocks, allowing you to reconfigure the castle layout whenever your cat needs a new challenge. Cutting offset portals between adjoining box walls creates a maze of tunnels, sleeping nooks, and elevated perches. The natural cardboard finish can be accented with colorful cat-safe paper trims.

Step-by-Step DIY Assembly

  1. Gather Uniform Boxes: Collect 6 to 9 heavy-duty cubic cardboard boxes of identical dimensions.
  2. Cut Offset Transit Portals: Cut 8-inch diameter circular holes on alternating top, side, and floor faces of each cube to form a continuous climbing maze.
  3. Reinforce Connecting Walls: Join cubes together using heavy-duty plastic bolt-and-nut fasteners or non-toxic hot glue applied along full contact faces.
  4. Create Roof Deck Perches: Leave the top surfaces of the highest cubes open as recessed perches lined with washable fleece cat cushions.

Idea 3: French Gothic Cathedral with Arch Windows & Spire Towers

Concept and Design Overview

Elaborate, dramatic, and tall, this French Gothic cathedral design features pointed arch doorways, tall triangular spire towers, and faux stained-glass windows made from colorful, cat-safe tissue paper that filters ambient room light.

A central soaring atrium allows cats to climb staggered internal corner shelves to reach a high lookout spire. The pointed arches and delicate cut-out details create an elegant piece of DIY cat furniture that looks artistic in living rooms. The color palette pairs natural kraft cardboard with translucent rainbow tissue paper window accents.

       +-------------------------------------------------+
       |           GOTHIC CATHEDRAL TOWER                |
       |                                                 |
       |                    /\                           |
       |                   /  \  <-- Spire Tower Top     |
       |                  /    \                         |
       |                 +------+                        |
       |                 | GOTHIC                        |
       |                 | POINTED                       |
       |                 | ARCH                          |
       |                 | WINDOW                        |
       |                 +------+                        |
       |                 | MAIN                          |
       |                 | ENTRY                         |
       |                 +------+                        |
       |                                                 |
       +-------------------------------------------------+

Step-by-Step DIY Assembly

  1. Construct High Atrium: Tape two tall wardrobe boxes vertically together, securing internal structural corner braces.
  2. Cut Gothic Pointed Arches: Trace and cut tall, pointed Gothic arches for main doorways and side window openings using a sharp utility knife.
  3. Add Faux Stained-Glass: Glue colorful non-toxic tissue paper over the interior faces of window cutouts to filter light inside the cat chamber.
  4. Build Triangular Spire Caps: Fold four triangular cardboard panels into tall pyramid cones, gluing them onto top corner towers.
  5. Install Staggered Climbing Steps: Glue heavy double-walled cardboard corner ledges inside the cathedral atrium for step-by-step climbing.

Idea 4: Fairy Tale Princess Castle with Conical Roof Turrets

Concept and Design Overview

Charming, whimsical, and bright, this fairy-tale-inspired cat castle features round cylindrical cardboard towers (repurposed from heavy-duty concrete form tubes or rolled cardboard sheets) capped with colorful conical roofs and scalloped wall trims.

A multi-tiered central courtyard connects to flanking cylindrical towers via elevated cardboard suspension bridges. Painted in soft pastel shades using zero-VOC, non-toxic pet-safe acrylic paints, this project turns cardboard into an enchanting fantasy playhouse. The color scheme features pastel pink, lavender, sky blue, and crisp white.

Step-by-Step DIY Assembly

  1. Source Heavy Cylindrical Tubes: Obtain 8- to 10-inch diameter heavy cardboard concrete form tubes (Sonotubes) or roll thick corrugated cardboard into cylinders.
  2. Build Central Courtyard: Join two rectangular boxes into a central 2-story palace, cutting side entry arches that align with the round turrets.
  3. Craft Conical Roofs: Cut large cardboard circles, slit them to the center point, overlap edges into a cone shape, and glue atop the round turrets.
  4. Connect Skyway Bridges: Build open U-shaped cardboard walkways spanning between the central palace and outer turrets.
  5. Paint with Non-Toxic Paints: Coat the exterior with zero-VOC, non-toxic water-based acrylic paints, allowing 48 hours to dry completely before cat use.

Idea 5: Japanese Pagoda Castle with Tiered Flared Roofs

Concept and Design Overview

Inspired by traditional Asian architecture, the Japanese Pagoda cat castle features multiple stacked square tiers, each capped with wide, sweeping flared roof eaves.

Each pagoda tier steps inward slightly as the structure rises, providing wide exterior roof ledges for cats to lounge on while surveying their surroundings. Open slatted window cutouts ensure internal ventilation while providing playful paw-swatting holes. The color scheme highlights natural cardboard brown, deep cinnabar red roof trims, and black accents.

+-------------------------------------------------------------+
|              PAGODA TIERED CAT TOWER                        |
|                                                             |
|                    +----------+                             |
|                    | TIER 3   |  <-- Top Lookout Box        |
|               +====================+                        |
|               | FLARED ROOF EAVES 2|                        |
|               +--------------------+                        |
|               | TIER 2 MID LOUNGE  |                        |
|          +==============================+                   |
|          | FLARED ROOF EAVES 1          |                   |
|          +------------------------------+                   |
|          | TIER 1 LARGE BASE CHAMBER    |                   |
|          +==============================+                   |
+-------------------------------------------------------------+

Step-by-Step DIY Assembly

  1. Size Tier Boxes: Select three square boxes in decreasing sizes (e.g., 20-inch base, 16-inch middle, 12-inch top).
  2. Cut Sweeping Roof Eaves: Cut wide flat cardboard panels that extend 4 to 6 inches past each box edge, curving the four corners upward.
  3. Cut Internal Pass-Throughs: Cut centered 8-inch circular pass-through holes in the floors and ceilings of stacked tiers.
  4. Assemble Tier Stack: Glue tiers together sequentially with non-toxic hot glue, sandwiching the flared roof panels between box levels.
  5. Add Slatted Window Walls: Cut vertical slatted window bars on side walls to mimic traditional Japanese shoji screens.

Idea 6: Pirate Ship Fortress with Lookout Crow’s Nest

Concept and Design Overview

Setting sail for feline adventure, this pirate ship castle combines a long double-walled cardboard ship hull with a tall central mast tower supporting a high “crow’s nest” sleeping basket.

The ship hull features lower-deck portal openings (“portholes”) for hiding and playing, an elevated bow deck for sunbathing, and a tall cardboard shipping tube mast topped with a round cardboard crow’s nest basket lined with fleece. The color palette features natural dark wood-grain cardboard, black pirate flag accents, and cream jute rope.

Step-by-Step DIY Assembly

  1. Construct Ship Hull: Shape a long rectangular appliance box into a pointed bow front and squared stern back.
  2. Insert Deck Platforms: Glue horizontal double-layered cardboard decks inside the hull to create a lower cabin and upper main deck.
  3. Cut Circular Portholes: Cut 7-inch round porthole windows along both sides of the lower hull for ventilation and hide-and-seek play.
  4. Erect Mast & Crow’s Nest: Anchor a thick cardboard carpet tube vertically through the deck to the floor base, topping it with a reinforced round cardboard basket.
  5. Wrap Sisal Rope: Wrap the lower 2 feet of the mast tube tightly with 6mm natural jute or sisal rope to serve as a built-in scratching post.

Idea 7: Geometric Geodesic Dome Castle with Apex Perch

Concept and Design Overview

Futuristic, striking, and structurally rigid, a geodesic dome cat castle constructed from dozens of interlocking triangular cardboard panels creates a self-supporting dome fortress.

The interlocking triangular geometry distributes weight evenly, making geodesic domes incredibly strong for supporting multiple jumping cats despite using lightweight single-wall cardboard. Leaving the top apex open provides an elevated lookout perch. The color palette showcases raw kraft cardboard, black geometric edge tape, and metallic accents.

       +-------------------------------------------------+
       |           GEODESIC DOME CAT FORTRESS            |
       |                                                 |
       |                     /\                          |
       |                    /  \   <-- Top Apex Perch    |
       |                   /----\                        |
       |                  /\    /\                       |
       |                 /  \  /  \                      |
       |                /----\-----\                     |
       |               /\    /\    /\                    |
       |              /  \  /  \  /  \                   |
       |             /----\----/----\                    |
       |            [ Circular Entry Arch ]              |
       +-------------------------------------------------+

Step-by-Step DIY Assembly

  1. Cut Triangular Panels: Cut 30 isosceles and 20 equilateral cardboard triangles with 1.5-inch outer folding flange tabs using a precise template.
  2. Fold Connecting Flanges: Score and fold the flange tabs outward at precise angles.
  3. Fasten Triangles: Join adjacent triangle tabs together using non-toxic glue and heavy-duty paper fasteners (brads) or hot glue.
  4. Form Entry & Apex: Omit 3 bottom triangles to create an entry arch; leave the top 5 triangles open for a top lookout hatch.
  5. Line Interior Base: Insert a soft round washable cat bed inside the dome base.

Idea 8: Space-Saving Vertical Corner Cat Tower Castle

Concept and Design Overview

Designed specifically for small apartments, this vertical corner cat castle features a 90-degree right-angle rear frame that fits flush into any unused room corner, rising 4 to 5 feet high.

By utilizing corner walls for structural backing, the tower occupies minimal floor footprint while offering 4 vertical levels of climbing platforms, internal ramps, and lookout windows. The color palette features clean white-painted cardboard faces, natural kraft interior walls, and grey felt shelf lining.

Step-by-Step DIY Assembly

  1. Construct 90-Degree Corner Spine: Join two long cardboard panels at a strict 90-degree right angle to form the rear corner spine.
  2. Install Triangular Corner Shelves: Glue double-layered triangular cardboard shelves horizontally inside the spine at 12-inch vertical intervals.
  3. Cut Alternating Floor Steps: Cut offset circular climbing hatches into the corners of alternating shelf levels.
  4. Attach Curved Front Facade: Wrap a flexible corrugated cardboard sheet across the front face, cutting window arches on each level.
  5. Line Shelves with Felt: Glue self-adhesive non-toxic felt pads onto every shelf level for non-slip feline traction.

Idea 9: Modernist Architectural Villa with Cantilever Decks

Concept and Design Overview

Sleek, contemporary, and mid-century modern, this architectural cat villa features clean horizontal lines, dramatic overhanging cantilever decks, floor-to-ceiling slatted window walls, and integrated cardboard scratching pads.

The overhanging cantilevered roof decks provide floating loungers for cats, supported internally by hidden vertical cardboard pillar beams. The clean geometric aesthetic complements modern home decor. The color palette focuses on optic white, natural kraft cardboard, matte black framing, and warm oak accents.

+-------------------------------------------------------------+
|              MODERNIST CANTILEVER CAT VILLA                 |
|                                                             |
|   +------------------------------------+                    |
|   | UPPER CANTILEVER OVERHANG DECK     | <--- Floating Deck |
|   +------------------+-----------------+                    |
|   | SLATTED WINDOW   | INTERNAL PILLAR |                    |
|   | LIVING ROOM      | SUPPORT TOWER   |                    |
|   +------------------+-----------------+                    |
|   | GROUND LEVEL DEN & SCRATCHING PAD  |                    |
|   +====================================+                    |
+-------------------------------------------------------------+

Step-by-Step DIY Assembly

  1. Build Internal Support Core: Construct a central heavy-duty double-walled cardboard pillar to carry structural loads.
  2. Extend Cantilever Decks: Glue multi-layered cardboard floor panels that extend 6 to 8 inches past the base footprint, anchored firmly into the central core.
  3. Cut Horizontal Window Slats: Cut long, clean horizontal window slots across side walls for a modern architectural look.
  4. Embed Corrugated Scratchers: Inset thick horizontal corrugated cardboard scratching pads directly into the ground floor surface.
  5. Paint in Tonal Shades: Paint exterior walls in crisp white and matte black using zero-VOC, non-toxic pet-safe paints.

Idea 10: Multi-Level Fantasy Treehouse Castle

Concept and Design Overview

Combining organic nature shapes with castle turrets, this fantasy treehouse castle uses a central thick cardboard trunk (repurposed carpet roll or concrete Sonotube) supporting multi-tiered “branch” cardboard lookout platforms and leaf-trimmed playhouses.

Cats can climb the central trunk—wrapped in natural sisal rope—to reach elevated cardboard box treehouses surrounded by faux fabric ivy leaves. It provides a complete climbing, scratching, and lounging sanctuary. The color scheme features natural sisal tan, forest green foliage accents, and warm cardboard brown.

+--------------------------------------------------------------------------+
|                  FANTASY TREEHOUSE CAT FORTRESS                          |
|                                                                          |
|       Cardboard Treehouse 1  |  Sisal Rope Trunk  |  Lookout Deck 2      |
+--------------------------------------------------------------------------+
                                     |
                                 FEATURED:
                                     v
+------------------+------------------+------------------+-----------------+
| SISAL TRUNK      | BRANCH PLATFORMS | TREEHOUSE BOXES  | FAUX LEAF TRIMS |
| Heavy Rope Wrap  | Multi-Level Step | Enclosed Cabins  | Safe Fabric Ivy |
| Full Climbing    | Jumping Ledges   | Cozy Napping     | Natural Organic |
+------------------+------------------+------------------+-----------------+

Step-by-Step DIY Assembly

  1. Anchor Central Trunk Tube: Secure a heavy 4-inch diameter cardboard carpet roll tube vertically to a wide, heavy double-layered cardboard floor base.
  2. Wrap Trunk with Sisal: Glue 6mm natural sisal rope tightly around the entire length of the trunk tube using non-toxic hot glue.
  3. Mount Branch Platforms: Slot double-layered cardboard platform ledges through cutouts in the trunk tube, securing with underlying angle brackets.
  4. Attach Elevated Box Cabins: Mount small cardboard cabin boxes onto the outer edges of the branch platforms.
  5. Decorate with Non-Toxic Fabric Ivy: Wrap non-toxic fabric ivy vines around platform edges for a lush forest aesthetic.

Common DIY Mistakes and How to Avoid Them

  • Using Toxic Glues & Tapes: Using industrial solvent glues, toxic rubber cements, or loose duct tape creates chemical hazards for cats. Always use non-toxic PVA wood glue, hot glue applied on interior seams, or paper packing tape.
  • Single-Layering Heavy Floor Panels: Single-layer corrugated cardboard sags or collapses under the weight of an active jumping cat. Always double-layer upper floor panels with opposing grain direction.
  • Cutting Portals Too Small: Small entry holes restrict cat movement and can cause whisker stress. Ensure all doorways and climbing hatches are at least 7 to 8 inches in diameter.
  • Leaving Structural Bases Top-Heavy: Tall vertical towers with narrow bases can tip over when a cat leaps dynamically onto upper decks. Always build a wide, heavy base panel or weigh down the bottom box with clean heavy books/sandbags.
  • Leaving Exposed Metal Staples: Shipping boxes often contain heavy industrial wire staples that can scratch a cat’s nose or paws. Thoroughly remove all staples with pliers before construction.

Essential Tools & Materials Checklist

  • Heavy-Duty Corrugated Boxes: Double-wall shipping boxes, appliance boxes, and heavy cardboard carpet tubes.
  • Cutting Tools: Heavy-duty utility knife (with fresh sharp blades), metal safety ruler, and heavy craft scissors.
  • Non-Toxic Adhesives: Non-toxic hot glue gun with non-toxic glue sticks, PVA wood glue, and water-activated reinforced paper tape.
  • Measuring & Layout Tools: Steel measuring tape, pencil, circular tracing templates (bowls or plates 7–8 inches in diameter), and 90-degree carpenter square.
  • Finishing & Safety Supplies: 6mm natural sisal/jute rope, zero-VOC non-toxic acrylic paints, self-adhesive felt pads, and replacement corrugated scratcher inserts.

Similar Posts

  • 10 Hobby Lobby Craft Ideas

    Spread the love

    Spread the loveHobby Lobby is a treasure trove for crafters, DIY enthusiasts, and home decor lovers. Whether you are walking through the aisles of raw wood frames, floral supplies, yarn, or jewelry-making charms, the store offers endless raw materials waiting to be transformed into personalized projects. From cozy farmhouse home decor to budget-friendly seasonal gifts,…

  • 10 Cute Sewing Kit & Needle Storage Empty Pill Bottle Crafts

    Spread the love

    Spread the loveUpcycling empty prescription or medicine bottles is one of the easiest, most practical eco-friendly crafts. Because pill bottles are lightweight, moisture-resistant, durable, and feature secure snap or twist lids, they make ideal compact containers for small, easily lost sewing supplies like hand needles, pins, thread spools, thimbles, and measuring tapes. Transforming plain amber…

  • 10 Bathroom Decor Ideas Apartment Luxury

    Spread the love

    Spread the loveCreating a luxurious bathroom in an apartment is not just about spending a fortune on marble tiles or gold fixtures. It’s about blending sophistication with smart design, using textures, colors, lighting, and thoughtful details that elevate your everyday experience. Whether your apartment bathroom is small or spacious, you can make it feel like…

  • 10 Dark Sitting Room Aesthetic

    Spread the love

    Spread the loveDark sitting rooms have become one of the most powerful interior design trends in recent years. Once thought to make spaces feel small or gloomy, dark interiors are now celebrated for their depth, elegance, and emotional warmth. A dark sitting room can feel luxurious, dramatic, cozy, and incredibly stylish when done right. Whether…

  • 10 Halloween Nail Easy Designs

    Spread the love

    Spread the loveWhen Halloween arrives, it is not just about costumes, makeup, or decorations. Your nails can also become a small but stunning detail that completes your spooky look. The best part is, you do not need to be a professional nail artist to create impressive Halloween designs. With some polish, creativity, and a little…

Leave a Reply

Your email address will not be published. Required fields are marked *