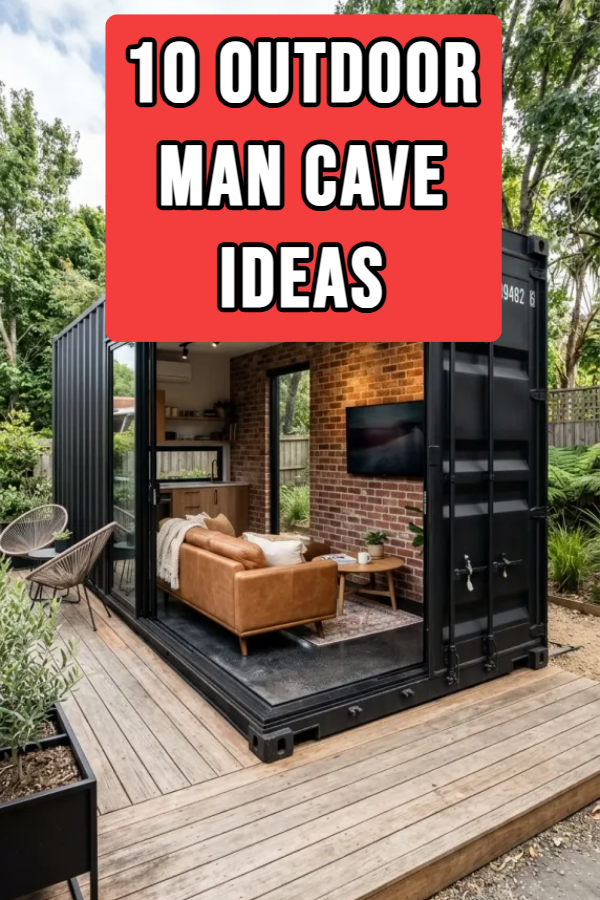
10 Outdoor Man Cave Ideas

An outdoor man cave extends your home’s living space into the backyard, transforming underutilized sheds, pavilions, covered patios, or detached structures into dedicated retreats for sports, gaming, lounge entertaining, or creative hobbies. Unlike indoor basements or spare rooms, an outdoor setup introduces fresh air, open sightlines, and natural ventilation while keeping noise away from the main residence.
The key to a successful outdoor man cave is weather resilience and spatial zoning. By pairing robust, climate-tested building materials (such as pressure-treated timber, powder-coated steel, composite decking, and weather-sealed cabinetry) with targeted entertainment zones, you can build a backyard sanctuary that handles heat, rain, and cold snaps effortlessly. This comprehensive guide details 10 creative outdoor man cave ideas across various budgets, structural footprints, and functional themes—complete with material recommendations, spatial layouts, and step-by-step styling strategies.
Why This Idea Is Trending or Useful
Outdoor living spaces have evolved far beyond basic patio furniture. Backyard structures—ranging from converted garden sheds to fully custom timber pavilions—are now outfitted as high-end lounge spaces, sports bars, and home theaters. Building an outdoor man cave offers several clear advantages:
- Noise Isolation: Moving large-screen TVs, audio subwoofers, gaming consoles, and social gatherings out into the yard prevents sound from disturbing family members inside the house.
- Property Value & Space Utilization: Upgrading a backyard corner or outbuilding increases your home’s usable square footage and overall resale appeal.
- Versatile Functionality: Weatherproof materials allow these spaces to transition seamlessly from afternoon game-day hosting to quiet evening relaxation.
- Adaptable Budget Scale: Projects range from straightforward DIY conversions (like transforming a pre-built shed or garage corner) to high-end architectural builds with outdoor kitchens and fireplaces.
Materials and Preparation
Building an outdoor retreat requires structural protection against rain, UV exposure, humidity, and temperature swings.
Recommended Materials & Hardware
- Framing & Decking: Pressure-treated lumber, cedar, redwood, powder-coated aluminum posts, and composite decking boards (like Trex or TimberTech).
- Weatherproof Enclosures: Outdoor-rated TV enclosures (or weatherproof sun-bright outdoor TVs), IP65-rated marine audio speakers, and clear vinyl drop-down patio curtains.
- Furniture & Fabrics: Solution-dyed acrylic upholstery (Sunbrella), teak or powder-coated aluminum frames, high-density quick-dry foam cushions, and concrete or quartz tabletops.
- Climate Control: Infrared electric patio heaters, propane fire tables, mini-split HVAC units (for enclosed sheds), and high-CFM outdoor ceiling fans.
Preparation & Safety Guidelines
- Check Permits & HOA Rules: Verify local setback requirements, height restrictions, and HOA guidelines before erecting permanent backyard structures or running electrical lines.
- Run Sub-Panels & Data: Hire a licensed electrician to install a dedicated outdoor sub-panel (50–100 amps) to support heaters, mini-split AC units, mini-fridges, and audio/video equipment safely. Run underground cat6 ethernet cables inside conduit for reliable streaming.
- Ensure Proper Drainage: Grade the surrounding soil away from the structure and install gravel trenches or French drains to prevent water pooling under floor structures during heavy rains.
Idea 1: The Sports Bar Pavilion with Flip-Up Serving Counter

Concept and Design Overview
This design converts an open-sided timber pavilion or covered patio into a backyard sports pub. The focal point is a heavy-duty bar counter with a flip-up passthrough window or open perimeter bar top, flanked by high-capacity bar stools and multiple weather-sealed TV screens angled for sports viewing.
The timber structure features exposed wooden roof trusses, industrial black iron brackets, built-in beverage fridges, and a draft beer kegerator under the counter. The color palette centers on rich dark wood stains, matte black steel, stainless steel appliances, and neon bar signage. This layout is tailored for hosting sports viewing parties and weekend gatherings.
+-------------------------------------------------------------+
| TIMBER PAVILION ROOF TRUSSES |
|=============================================================|
| [ Weatherproof Dual TV Setup ] [ Neon Sports Sign ] |
| |
|=============================================================|
| [ BAR COUNTERTOP ] | [ Built-in Kegerator / Fridge ] |
|------------------------+------------------------------------|
| [ Bar Stool ] [ Bar Stool ] [ Bar Stool ] |
| |
| [ Weather-Sealed Decking ] |
+-------------------------------------------------------------+
Step-by-Step Creation Method
- Build a Solid Pavilion Frame: Erect a 12×16 foot timber pavilion using 6×6 pressure-treated or cedar posts anchored into concrete footings.
- Install Bar Counter: Frame a L-shaped or straight bar counter (42 inches high) using treated 2x4s, capping it with sealed butcher block or poured concrete.
- Mount Weatherproof TVs: Mount two outdoor-rated TVs (or indoor TVs housed in IP54 weatherproof fan-cooled enclosures) side-by-side above the rear counter wall.
- Add Under-Counter Appliances: Slide an outdoor-rated stainless steel mini-fridge and a dual-tap kegerator beneath the main bar.
- Incorporate Pub Stools: Arrange four to six swivel bar stools with weather-resistant vinyl or leather-look cushions along the outer counter perimeter.
Idea 2: The Converted Shed Lounge (“Pub Shed”)
Concept and Design Overview

The pub shed transforms a standard prefabricated backyard shed (10×12 or 12×20 feet) into a fully finished, climate-controlled indoor/outdoor tavern. Insulation, drywall or shiplap wall panels, and electrical wiring convert the utilitarian shed into an all-weather den.
French doors or double barn doors open wide onto a small patio deck, blurring the line between inside and out. Inside, a rustic wooden bar, leather lounge chairs, a wall-mounted TV, and dartboard setup provide classic pub charm. The color scheme pairs dark navy or charcoal exterior paint with warm honey-wood interiors, brass lighting, and leather accents. This private, enclosed setup works well for year-round use in colder climates.
Step-by-Step Creation Method
- Insulate and Wire: Frame interior walls, install R-13 insulation batts, run electrical wiring for outlets/lighting, and cover walls with painted tongue-and-groove shiplap.
- Install Double Doors: Replace standard shed doors with full-glass French doors or a sliding barn door system to let in natural light.
- Add Climate Control: Install a ductless mini-split heat pump system to supply both cooling during summer and heating in winter.
- Build the Back Bar: Install floating wood shelves along the back wall for liquor bottle display, anchored above a base cabinet with a butcher block top.
- Finish Flooring: Lay waterproof, scratch-resistant rigid core luxury vinyl plank (LVP) flooring over the shed subfloor.
Idea 3: The Covered Fire Pit & Screening Lounge

Concept and Design Overview
Focusing on evening relaxation, this concept centers on a low-slung modern fireplace or smokeless propane fire pit sheltered under a wooden pergola or gazebo frame. Deep-seat sectional sofas surround the fire feature, creating a theater-style setup focused on a motorized drop-down projector screen.
During movie nights or game days, a weather-resistant projector lowers from an overhead beam. The ambient glow of the open fire and warm string lights delivers a cinema-like atmosphere in the open air. The color palette emphasizes charcoal stone, teak wood, warm amber firelight, and deep grey performance fabrics. This layout suits large yards and evening entertaining.
+-------------------------------------------------+
| PERGOLA / GAZEBO ROOF |
| |
| [ Motorized Drop-Down Screen ] |
| |
| +-----------------------------------------+ |
| | DEEP-SEAT OUTDOOR SECTIONAL SOFA | |
| +-----------------------------------------+ |
| |
| [ PROPANE FIRE TABLE ] |
+-------------------------------------------------+
Step-by-Step Creation Method
- Erect Pergola Frame: Build a open-slat wood pergola with a polycarbonate clear roof panel above to block rain while retaining overhead light.
- Center the Fire Feature: Position a modern concrete propane fire table in the center, running gas lines underground to a hidden tank access panel.
- Install Drop-Down Screen: Mount an outdoor motorized projection screen inside a protective overhead box attached to a structural crossbeam.
- Arrange Deep Seating: Surround three sides of the fire table with an L-shaped outdoor sectional featuring 6-inch thick quick-dry foam cushions.
- Add Outdoor Projector: Mount a high-lumen outdoor short-throw projector on the opposite beam, wired to outdoor Bluetooth speakers.
Idea 4: The Golf Simulator & Gaming Pavilion
Concept and Design Overview

Designed for active sports enthusiasts, this high-tech outdoor cave integrates an automated golf simulator bay or arcade setup inside a high-ceiling timber structure. A heavy-duty impact screen and projector allow year-round swing practice, gaming tournaments, and sports streaming.
The structure requires a minimum vertical clearance of 9 to 10 feet to allow full golf club swings safely. Side netting or retractable curtains keep golf balls contained within the bay. Adjacent to the hitting mat is a casual spectator bar with high-top seating and a fridge. The color scheme focuses on athletic green turf, matte black structural steel, dark charcoal walls, and cool LED lighting.
Step-by-Step Creation Method
- Verify Height Clearance: Build or select a high-clearance structure providing at least 9.5 to 10 feet of interior vertical ceiling clearance.
- Install Turf & Hitting Mat: Lay high-density artificial turf over a concrete slab base, embedding a replaceable commercial-grade hitting mat.
- Hang Impact Screen & Netting: Mount a heavy-duty golf impact screen against the back wall, hanging side protection netting on ceiling tracks.
- Set Up Simulator Hardware: Mount a high-lumen short-throw projector and a launch monitor (such as SkyTrak, Garmin R10, or Foresight) connected to an outdoor PC or tablet.
- Add Spectator High-Tops: Position a tall bar table and stools behind the hitting zone, safely out of the swing radius.
Idea 5: The Industrial Shipping Container Cave
Concept and Design Overview
Converting a 20-foot steel shipping container creates an indestructible, modern industrial man cave with high security and architectural style. Cutting out side panel sections allows for custom fold-down hydraulic deck doors, floor-to-ceiling glass panels, or sliding glass doors.

When closed and locked, the container provides total weatherproofing and security for high-value electronics, liquor collections, and gaming gear. When opened, the fold-down side panel becomes an extended wooden deck floor. The color scheme highlights matte black or corrugated rusty iron exteriors, industrial steel framing, raw concrete floors, and warm neon LED accents.
+-------------------------------------------------+
| CORRUGATED STEEL SHIPPING CONTAINER |
| |
| +-----------------------------------------+ |
| | SLIDING GLASS / FOLD-DOWN DECK DOOR | |
| +-----------------------------------------+ |
| [ Leather Couch ] [ TV / Media Center ] |
| |
| [ Extended Wood Decking Floor ] |
+-------------------------------------------------+
Step-by-Step Creation Method
- Prepare Concrete Pad: Pour a level concrete pad or set heavy concrete footings to support the container’s structural corner posts.
- Cut & Frame Openings: Cut out designated side wall sections using a plasma cutter or angle grinder, reinforcing openings with structural steel tubing.
- Insulate Interior: Apply closed-cell spray foam insulation to interior walls and ceiling, covering it with dark-stained wood paneling or corrugated metal accent sheets.
- Install Sliding Glass Doors: Mount a heavy-duty sliding glass door system inside the main side opening.
- Add Industrial Finishes: Seal the concrete floor with a clear epoxy coating and install industrial pipe shelving and leather furniture.
Idea 6: The Outdoor Cook & Smokehouse Den
Concept and Design Overview
Tailored for barbecue enthusiasts, this outdoor culinary den centers around high-end smoking, grilling, and outdoor dining. Protected beneath a heavy-duty vent-hooded canopy, the layout features built-in offset smokers, ceramic kamado grills (like Big Green Egg), gas flat-tops, and stainless steel prep counters.
Adjacent to the cooking zone is a solid butcher block dining counter and a lounge area with a TV mounted for catching games while monitoring long brisket smokes. The color scheme pairs dark slate grey, stainless steel, red brick, and heavy timber accents. This practical setup is ideal for outdoor cooks who host large cookouts.

Step-by-Step Creation Method
- Build a Heat-Safe Station: Construct an outdoor kitchen counter frame using non-combustible concrete steel studs and cement board, veneering exterior walls with stack stone or brick.
- Install Vent Hood: Mount a commercial-grade outdoor stainless steel vent hood above the smoker and grill station to handle smoke exhaust.
- Set Up Granite Counters: Install heat-resistant dark granite or poured concrete countertops for meat prep and plating.
- Add Sink & Refrigeration: Plumb an outdoor sink with a hot/cold water supply and install an under-counter outdoor refrigerator for marinating prep.
- Create Dining Bar: Extend the counter edge 15 inches on the non-cooking side to create a dining bar for guests to sit near the chef.
Idea 7: The Rustic Log Cabin Outpost
Concept and Design Overview
The log cabin outpost brings rugged wilderness vibes to the backyard using heavy timber, exposed log beams, stacked stone fireplaces, and warm hunting-lodge aesthetics. This detached structure serves as a quiet sanctuary for woodcraft, music, reading, or fireside drinks.

A large stone hearth with a wood-burning stove provides authentic heat and scent, while antler chandeliers, plaid textiles, and deep leather recliners enhance the rustic feel. The color palette centers on warm log brown, moss green, stone grey, dark red, and antique brass. This cozy design is well-suited for wooded properties and mountain retreats.
+-------------------------------------------------+
| NATURAL LOG CABIN WALLS |
| |
| [ Stacked Stone Wood Stove Hearth ] |
| |
| +-----------------------------------------+ |
| | DEEP LEATHER RECLINER / ARMCHAIRS | |
| +-----------------------------------------+ |
| |
| [ Antler Chandelier Overhead ] |
+-------------------------------------------------+
Step-by-Step Creation Method
- Erect Log Frame: Build a small cabin shell using D-log timber profiles or half-log siding over a insulated stud frame.
- Build Stone Hearth: Construct a heat-safe floor pad and wall backing using natural fieldstone, installing an EPA-certified wood-burning stove.
- Install Overhead Beams: Leave structural ceiling rafters exposed, staining wood beams in a deep walnut shade.
- Add Rustic Lighting: Hang an antler or wrought-iron ring chandelier fitted with warm 2700K LED Edison bulbs.
- Furnish with Leather: Add distressed leather club chairs, wool plaid throw blankets, and a vintage trunk coffee table.
Idea 8: The Modern Minimalist Pergola Pod
Concept and Design Overview

Focusing on clean lines, architectural geometry, and open space, the modern minimalist pod uses a black aluminum bioclimatic pergola with louvered roof slats. The motorized roof louvers open for full sunshine or close tight to create a 100% waterproof shelter during rainstorms.
The floor features large-format grey porcelain deck pavers or smooth composite decking. Sleek, low-profile modular furniture, a frameless outdoor TV enclosure, and integrated recessed LED strip lighting preserve clean visual lines. The color scheme focuses on matte black, graphite grey, bright white, and warm natural teak accents. This modern design works exceptionally well with contemporary architecture.
Step-by-Step Creation Method
- Install Louvered Pergola: Erect a freestanding aluminum louvered pergola featuring an integrated gutter system and motorized roof controls.
- Lay Porcelain Pavers: Install 24×24 inch outdoor porcelain deck pavers over an elevated pedestal system for smooth, level drainage.
- Add Retractable Zip Screens: Install motorized drop-down side zip screens integrated into the aluminum frame for instantaneous wind, sun, and insect protection.
- Mount Minimalist Media: Mount a ultra-thin weatherproof outdoor TV flat against a slat wall, concealing all wiring inside structural posts.
- Furnish with Low Profiles: Position a low-slung modern modular outdoor sectional sofa with dark charcoal weather-resistant cushions.

Idea 9: The Poolside Tiki & Arcade Lounge
Concept and Design Overview
Positioned next to a swimming pool or lawn area, this tropical tiki-meets-arcade lounge combines relaxed resort vibes with casual gaming entertainment. A natural thatched or bamboo-draped roof structure covers a tropical bar, classic arcade cabinet machines, and a retro pinball setup.
Commercial-grade marine stereo speakers deliver poolside music, while a outdoor pool table or foosball table sits on weather-sealed flooring nearby. The color palette pairs natural bamboo, vibrant turquoise, tropical palm leaf green, and neon arcade lighting. This fun style is tailored for active families, poolside entertaining, and warm climates.
+-------------------------------------------------------------+
| THATCHED TIKI ROOF / BAMBOO CEILING |
|=============================================================|
| [ Retro Arcade Cabinet ] [ Outdoor Pool Table ] |
| |
|=============================================================|
| [ TROPICAL BAMBOO BAR COUNTER ] |
|-------------------------------------------------------------|
| [ Woven Bar Stool ] [ Woven Bar Stool ] |
+-------------------------------------------------------------+
Step-by-Step Creation Method
- Erect Thatched Canopy: Build a wooden post gazebo structure topped with synthetic thatched roofing panels for authentic tropical look without short-term weathering.
- Wrap Counter in Bamboo: Clad an outdoor bar structure with split bamboo poles, topping it with a high-gloss epoxy sealed wood slab.
- Set Up Weather-Resistant Gaming: Position weather-sealed arcade cabinets or an outdoor-rated slate pool table under the center roof footprint.
- Install Marine Audio: Mount marine-grade coaxial speakers along roof support beams, connected to an outdoor amplifier system.
- Add Tropical Lighting: Hang woven bamboo pendant lights and install color-changing LED strip lights beneath the bar counter edge.
Idea 10: The Garage-Bay Flex Lounge
Concept and Design Overview

For homes with a detached garage or an unused garage bay, this flex lounge concept transforms auto storage into a high-end multi-use sanctuary. By replacing the traditional solid garage door with a full-glass roll-up glass garage door, the room floods with natural light and opens completely to the driveway or patio.
The interior floor is coated in a glossy, industrial-grade polyaspartic epoxy flake coating that handles both heavy lounge furniture and vehicle tires. One wall features a workshop/hobby bench, while the main space houses a large sectional sofa, wall-mounted display TV, and a mini bar. The color palette features metallic silver, racing red, matte black, and bright white overhead shop lighting. This option is ideal for car enthusiasts, hobbyists, and urban homes.
Step-by-Step Creation Method
- Coat the Subfloor: Apply a high-durability polyaspartic epoxy flake floor coating over the concrete slab for a chemical-resistant finish.
- Install Glass Garage Door: Replace the standard metal garage door with a black-framed aluminum glass overhead roll-up door featuring insulated frosted or tinted glass.
- Insulate & Drywall: Insulate exterior walls and ceiling, finishing with painted drywall and metal diamond-plate wall trim panels.
- Build Dual-Zone Layout: Dedicate one side of the bay to heavy modular metal workshop cabinetry, and the opposite side to a lounge sectional and media wall.
- Install High-Lumen Overhead Lighting: Mount sleek LED hex grid overhead ceiling lights to provide bright, modern task and ambient lighting.
Common Beginner Mistakes and How to Avoid Them
- Using Indoor Electronics Outdoors: Installing standard indoor TVs, speaker wire, or household extension cords outdoors leads to premature failure from humidity, dust, and temperature swings. Always use outdoor-rated electronics (IP54/IP65 ratings) or fan-cooled weatherproof enclosures.
- Under-budgeting Electrical Needs: Running a single 15-amp circuit line from the house quickly leads to tripped breakers when running space heaters, mini-fridges, sound systems, and TVs simultaneously. Install a dedicated 50- to 100-amp outdoor sub-panel.
- Neglecting Pest & Weather Sealing: Gaps in shed walls, open soffits, or elevated decks allow insects, mice, and cold drafts inside. Install tight wire mesh screens under deck boards, door sweeps, and expanding foam insulation.
- Poor Lighting Layering: Relying solely on bright floodlights or single overhead bulbs creates a harsh, sterile environment. Combine task lighting (bar lights), ambient lighting (string lights/sconces), and accent lighting (under-counter LEDs).
- Ignoring Seat Cushion Storage: Leaving standard foam cushions outside during heavy rains leads to mold growth. Choose quick-dry reticulated foam cushions covered in solution-dyed acrylic fabric (Sunbrella), or store cushions inside storage benches.
Practical Tips for Better Results
- Incorporate Smart Automation: Install smart outdoor plugs and Wi-Fi switches to control patio heaters, string lights, and audio systems from your phone or voice assistant.
- Plan Outdoor Wi-Fi Expansion: Thick exterior home walls and backyard distances drop Wi-Fi speeds. Install a weatherproof outdoor Wi-Fi mesh node or access point mounted on the structure to ensure smooth 4K TV streaming.
- Use Multi-Functional Furniture: Select outdoor coffee tables that double as propane fire pits, or bar units with built-in cooler drawers to maximize spatial efficiency.
- Install Roll-Down Weather Curtains: Attach clear, heavy-duty vinyl roll-down patio curtains along open pavilion sides to block wind and driving rain while keeping the space warm during winter months.
- Prioritize Footwear Access: Place high-durability outdoor entry mats at all structure entry points and install a small shoe/boot storage rack to keep dirt off indoor rugs and epoxy floors