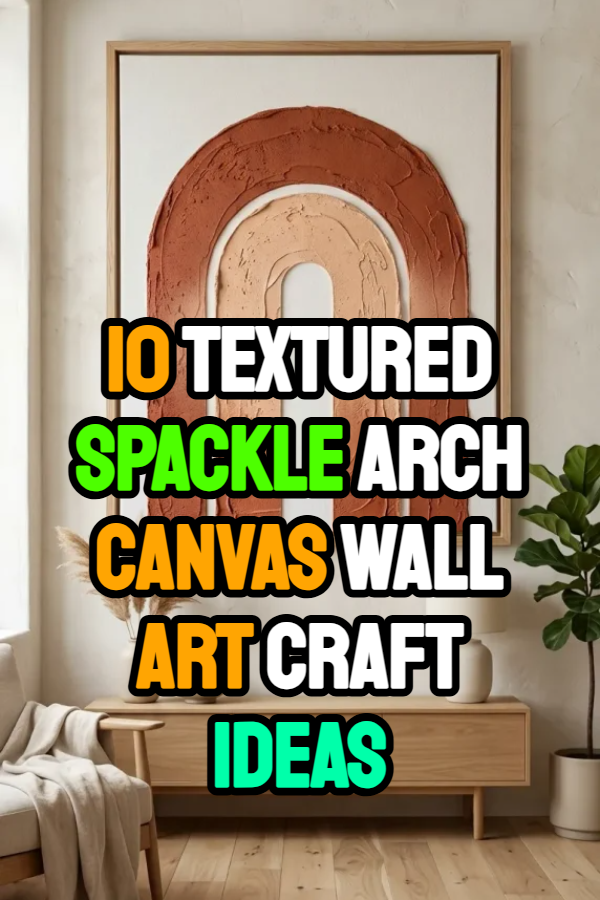
10 Textured Spackle Arch Canvas Wall Art Craft Ideas

Spread the love

Adding three-dimensional texture to minimal designs creates sophisticated, tactile wall art that shifts away from flat, single-color prints. Spackle, commonly used for drywall repair, transforms standard canvases into structural reliefs when applied with palette knives, notch trowels, and custom stencils. This durable, inexpensive, and matte material is the perfect medium for crafting contemporary abstract art, especially the popular arch motif. Whether leaning into a sleek monochromatic gallery look or blending earthy terracotta tones with raw linen, spackle allows you to sculpt, groove, and layer architectural shapes right onto the canvas. This guide presents ten textured spackle arch canvas wall art ideas, detailing the application techniques and stylistic pairings needed to elevate your home decor.

Why This Idea Is Trending or Useful

  • Tactile and Dimensional: Spackle adds physical depth and sculptural ridges that catch light and create shadows, giving simple designs a dynamic, architectural presence that flat paint cannot achieve.
  • Accessible and Inexpensive: The primary materials—standard drywall spackle, acrylic paint, and a canvas—are affordable and easily sourced at any hardware or craft store.
  • Minimalist & Modern Aesthetic: The clean lines of the arch shape provide a structured frame for the organic, imperfect texture of the plaster, fitting seamlessly into Scandinavian, Japandi, and contemporary interior design styles.
  • Customizable and Eco-Friendly: You control the color, height, and texture, allowing for infinite personalization. This DIY approach reduces waste associated with purchasing mass-produced art prints and frames.

Materials and Preparation

To begin your spackle art journey, gather clean canvases (stretcher frames or panels), a tub of lightweight drywall joint compound or spackle, palette knives (various sizes), notch trowels, high-quality acrylic paint, and painter’s tape. If working with stencils, use sturdy cardstock or acetate.

Preparation is key: Ensure your canvas is dry and taut. A thin layer of gesso or matte paint applied beforehand improves spackle adhesion. Lay out your tools and protect your workspace, as spackle application can be messy.

1. Minimalist White-on-White Ribbed Arch

How to Create

The white-on-white ribbed arch focuses entirely on texture and shadow. The design features a single, prominent arch sculpted purely from thick, white spackle. The distinguishing element is the precise vertical ribbing created by dragging a custom cardboard notch stencil or a coarse notch trowel upward from the base through the wet plaster. The contrast of smooth white canvas against the structured white plaster ridges creates dynamic shadows throughout the day.

To create this, apply a foundational oval shape of spackle to the canvas using a wide palette knife. While the compound is still wet, take your notch trowel and drag it with steady, consistent pressure upward from the bottom center of the oval, following the curve to define the ribbed arch. Let it cure completely, then apply a final coat of matte white paint to unify the sheen.

2. Earthy Terracotta Ombré Double Arches

How to Create

Double arches nested together add architectural depth, while the ombré blend of earthy terracotta introduces soft, sunset warmth. This design uses two contrasting colors of spackle: a deep, textured terracotta rust and a lighter, smoother sandy peach. The colors are blended seamlessly where they meet on the canvas, creating a soothing color gradient within the distinct arch shapes.

Apply painter’s tape to define two nested arch shapes in the center of the canvas. Mix deep terracotta acrylic paint into your spackle for the large outer arch, and a peach tint for the inner one. Apply the textured terracotta spackle first using a palette knife for the outer border. Apply the smoother, lighter peach compound to the inner arch, slightly overlapping the terracotta at the bottom junction. Use a clean palette knife to gently blend the interface, feathering the lighter color into the dark to achieve a seamless, textured ombré transition.

3. Sage Green Arched Relief and Floating Shelf

How to Create

Combine sculpture and function by incorporating a functional “floating” element within a spackle relief. This design features a wide, serene sage green spackle arch background, characterized by horizontal palette knife sweeps. The flat base of the arch provides the support line for a lightweight decorative element or a tiny functional wooden block “shelf,” making the art piece truly multi-dimensional.

Begin by painting the entire canvas a light neutral color. Apply the sage green tinted spackle in a broad arch formation, using a wide palette knife to create smooth horizontal textures that follow the curve. While the spackle is still wet, press a lightweight decorative balsa wood block (or pre-made minimal plaster shape) firmly into the center of the arch’s flat base. The wet spackle cures around the object, securely embedding it into the relief.

4. Black Textured Arc with Metallic Gold Accent

How to Create

For dramatic, urban sophistication, this concept uses a dark, highly textured spackle arc contrasted against gleaming metallic gold. The deep black spackle is applied in an expressive, almost concrete-like texture, utilizing heavy palette knife cross-hatching. The clean curve of the arch is defined by a slender, polished strip of metallic gold leaf or paint, framing the dark texture with high contrast.

Tape off the arch outline on a matte black or charcoal-painted canvas. Mix matte black acrylic paint thoroughly into the spackle compound. Apply this dark compound in heavy, cross-hatched strokes inside the arch outline, emphasizing rough, raw texture. Carefully remove the tape. Once cured, apply a very thin strip of metallic gold paint or apply delicate gold leaf just inside the inner edge of the black arch, creating a subtle, shimmering boundary.

5. Organic Sand and Plaster Mediterranean Arch

How to Create

This approach brings tactile, weathered Mediterranean texture to the arch form by incorporating natural elements directly into the spackle mixture. The design features several small, asymmetric arches with varying, grainy textures derived from mixing fine white play sand and coarse modeling paste into the plaster. The palette is kept raw and neutral (sand, oatmeal, raw canvas).

On a raw linen or neutral-painted canvas, mix fine sand, lightweight modeling paste, and white spackle into three distinct texture grades: fine sand, medium grain, and coarse aggregate. Use diverse palette knives to apply small, staggered, organic arches (some narrow, some wide) across the canvas. Leave some areas of raw canvas exposed between the arches to enhance the earthy, textural contrast.

6. Stenciled Trellis Arch with Spackle Blooms

How to Create

Combine the structured line work of a trellis pattern with organic, three-dimensional texture. This design uses standard black paint to define a clean treillage or garden arch framework. The internal sections of the trellis are then accented with “blooms”—small, dimensional dollops of pure white or soft pink spackle applied with a precision round palette knife, making the flowers pop forward from the background grid.

Paint a classic garden arch trellis grid onto the canvas using thin black paint. Once dry, load a tiny, teardrop-shaped palette knife with white (or soft pink) spackle. Press the tip of the knife directly into the intersections of the trellis lines, pulling away cleanly to create small, textured “blooms” that resemble hydrangeas or climbing roses, adding depth specifically to the floral accents.

7. Moody Navy Blue Arched Niche with Clay Beads

How to Create

Create depth and narrative by simulating an arched “niche” or alcove within a moody, dark background. A smooth, matte navy blue canvas frames a single, smooth recessed arch of a contrasting lighter color (like soft gray or creamy white). The base of this niche is accented with actual small, handmade clay beads or small pebbles embedded into a thick foundation of spackle.

Paint the perimeter of the canvas deep matte navy blue. Center your arch stencil and apply smooth, light gray tinted spackle inside the lines, keeping the surface completely flat and recessed relative to the dark background. At the base of this “niche,” apply a thick horizontal layer of raw white spackle. Before it dries, press several handmade terracotta clay beads and small smooth pebbles firmly into the compound, creating a “collection” resting in the textured alcove.

8. Sliced and Layered Arch Diptych

How to Create

Diptych art (two panels meant to hang together) uses the arch form to bridge the gap between canvases. One continuous large arch is “sliced” vertically down the center and applied across two adjacent canvases. This layout maximizes architectural impact, as the two halves create a cohesive, powerful single statement piece when hung side-by-side with minimal spacing.

Secure two canvases tightly together with clamps or strong tape on the back. Tape off one large, seamless arch shape that spans across both canvases. Mix your desired spackle color (perhaps moody charcoal or creamy white). Apply the textured compound thickly across both canvases, treating them as a single, large surface. While wet, remove the arch stencil tape. Once dry, carefully slice any dried spackle bridges between the canvases using a craft knife before separating the panels.

9. Gilded Edge Pink Ombré Spackle Clouds

How to Create

For a soft, dreamy aesthetic, blend textured “spackle clouds” within a gentle pink gradient arch. This design features a subtle pink ombré background applied with palette knife sweeps. The spackle is applied loosely within the arch boundaries in soft, fluffy, undefined “puff” motions that suggest texture rather than rigid structure. The defining feature is the delicate metallic gold trim applied only to the very outermost curve of the pink arch.

On a light neutral canvas, define your arch boundary with painter’s tape. Mix three shades of pink spackle: pale rose, dusty pink, and soft peach. Apply these in overlapping, feathered ombré horizontal bands across the arch, utilizing a clean palette knife to create soft, rounded horizontal cloud textures. Carefully peel off the tape. Once fully cured, apply a thin, precise border of metallic gold paint or gold leaf only along the outer perimeter of the pink arch.

10. Textured Spackle Arc and Linear Ink Drawing

How to Create

Contrast clean, graphic lines with raw, tactile texture in a harmonious composition. A simple, perfectly smooth arc of untextured white paint defines the foundational shape on a light background. Inside and around this smooth paint boundary, a raw, heavily textured, natural beige spackle is applied in cross-hatched patterns. Finally, delicate, thin black archival ink lines trace only certain portions of the texture, integrating the drawing directly into the plaster.

On a raw canvas, paint a large, smooth arc using flat white acrylic paint. Once dry, apply a raw, unpainted or light beige textured spackle using a notch trowel or palette knife inside the smooth painted boundary, emphasizing heavy, rough texture. Allow it to cure. Take a fine-liner black archival ink pen and delicately trace the edge of some spackle ridges and outline portions of the textured forms, creating a complex dialogue between precise lines and organic plaster.

Troubleshooting & Care

Prevention and Storage

  • Preventing Cracks: Spackle can shrink and crack if applied too thick too fast. Apply deep texture in thin layers, allowing each layer to dry completely before applying the next. For minimal minimal vertical ribbing, apply a foundational layer, then the design layer.
  • Adhesion Issues: Lightweight spackle adheres well to canvas, but unprimed canvases can pull moisture too quickly. Always gesso your canvas or apply a thin base layer of acrylic paint before starting the spackle work.
  • Longevity: Spackle is porous and brittle. When fully cured, apply 2-3 coats of matte acrylic varnish to seal the pores and protect the surface from moisture and dusting damage.
  • Cleaning: Dust gently with a soft, clean feather duster or compressed air. Never use water or household cleaners, which can soften the compound or discolor the paint.

Safety Tips

  • Spackle Dust: Sanding dried spackle releases very fine dust. Always wear a N95 respirator mask and safety glasses if you are sanding, and ensure proper ventilation. Avoid sanding if possible by achieving your final texture while the compound is wet.
  • Skin and Eye Irritation: Standard spackle is generally non-toxic but can dry out skin. Wear gloves and wash hands thoroughly after use. If it gets in your eyes, flush immediately with water.

Leave a Reply

Your email address will not be published. Required fields are marked *