10 Painted Ceramic Pot Crafts DIY Projects Ideas

Spread the love

Painted ceramic and terracotta pots are among the most versatile, budget-friendly DIY home decor projects, instantly transforming basic plant containers into custom works of art. Moving far beyond flat, single-color coats, modern pot-painting techniques embrace upscale ceramic aesthetics—such as textured Mediterranean limewash, bold geometric color-blocking, delicate pressed botanical decoupage, Moroccan tile stenciling, and speckled stone glazes.

The secret to durable, professional-quality painted planters lies in proper surface preparation, moisture sealing, and paint compatibility. Because raw terracotta and unglazed ceramics are naturally porous, unsealed pots absorb soil water from the inside out, causing exterior paint to bubble and peel within weeks. By sealing the interior with waterproof masonry primer and protecting the exterior with UV-resistant acrylic varnishes, your hand-painted planters will maintain their vibrant, chip-free finish for years.
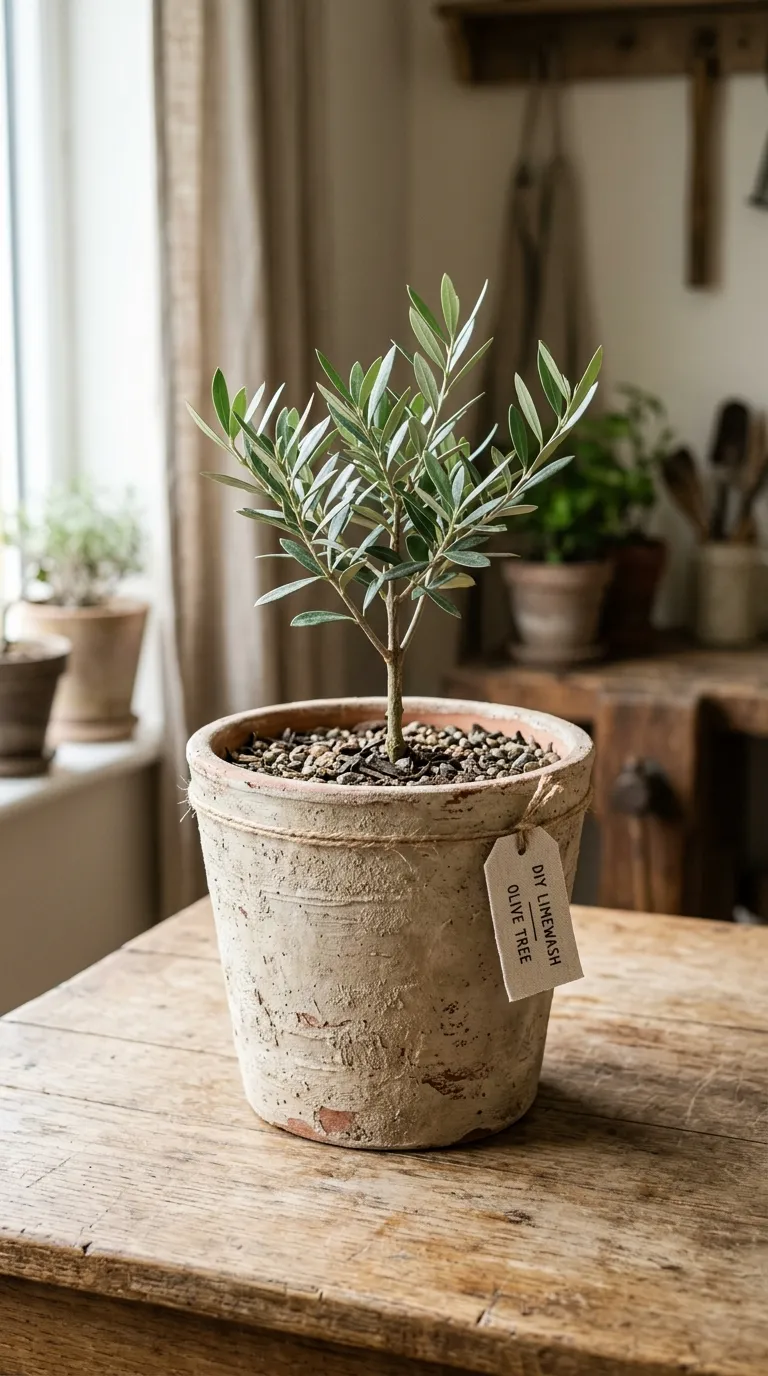
Whether styling an indoor plant shelf, curating a front-porch container garden, or crafting handmade gifts, these ten curated painted pot projects provide step-by-step painting formulas, sealing protocols, and production-ready visual prompts.

Why This Idea Is Trending & Flattering

  • Accessible, Low-Cost Home Elevation: Basic terracotta and unglazed ceramic pots cost very little, making custom-painted planters a high-impact, low-cost way to refresh living spaces.

  • Seamless Interior Style Integration: Custom palettes adapt to any decor aesthetic—from Japandi neutrals and Scandinavian pastels to vibrant bohemian motifs and modern minimalism.

  • Plant-Complementing Aesthetics: Neutral creams, earthy terracotta washes, and muted sage greens make vibrant green foliage and trailing vines pop in photography and room displays.

  • Indoor & Outdoor Versatility: With proper exterior-grade acrylic varnishes, painted ceramic pots withstand porch sunlight, patio rain, and indoor plant shelf humidity.

  • Relaxing, Creative Crafting: Painting curved pottery surfaces offers a tactile, therapeutic creative outlet with fast, gratifying results in just an afternoon.

Materials, Pot Prep & Sealing Foundation Guide

Achieving a clean, long-lasting painted finish that resists soil moisture requires proper cleaning, sealing, and exterior-grade acrylic products.

Essential Hardware & Painting Supplies

  • Ceramic / Terracotta Pots: Unglazed terracotta pots or smooth white ceramic planters with bottom drainage holes.

  • Interior Waterproof Sealer: Clear spray-on acrylic sealer (matte/gloss) or liquid masonry/terracotta sealer to waterproof the inside cavity.

  • Surface Primers: Water-based acrylic gesso or multi-surface bonding primer for smooth, non-porous glazed pots.

  • Paints & Pigments: Multi-surface outdoor acrylic craft paints, chalk-finish mineral paints, baking soda (for textured stone effects), and oil-based metallic liquid gold leaf.

  • Applicators & Brushes: Flat wash brushes (1-inch), fine-detail round brushes, natural sea sponges, and high-density foam roller brushes.

  • Precision Masking: Low-tack yellow or blue painter’s tape for razor-sharp geometric lines.

  • Exterior Topcoat / Varnish: Matte, satin, or high-gloss UV-resistant exterior acrylic varnish to seal the painted surface.

Step-by-Step Preparation & Moisture-Proofing Protocol

  • Deep Clean & Dry: Soak raw pots in warm water for 15 minutes, scrub away loose factory dust with a stiff brush, and let dry in the sun for 24 hours.

  • Seal the Interior First: Spray or brush 2 to 3 coats of clear waterproof acrylic sealer inside the pot and over the drainage hole. This creates a moisture barrier that prevents wet soil from seeping through to the exterior paint.

  • Apply Exterior Base Primer: Apply one coat of white acrylic gesso to the exterior; this creates a smooth, opaque foundation that prevents unglazed clay from drinking up paint.

  • Seal the Finished Paint: Once your design is dry, apply 2 light coats of exterior-grade satin or matte acrylic varnish to protect against water splashes, dirt, and UV fading.

1. The Faux Textured Limewash & Terracotta Pot

1

Project Overview & Aesthetic Design

An Old-World Mediterranean statement piece mimicking aged European limestone urns. Combining matte chalk paint with baking soda creates a gritty, stone-like plaster texture, finished with dry-brushed earthy washes.

Step-by-Step DIY Execution Guide

  • Mix 1 cup of beige or warm ivory chalk paint with 2 tablespoons of baking soda until it forms a thick, pancake-batter consistency.

  • Using a stiff, wide chip brush, apply the gritty paint mixture to the primed pot in short, multidirectional cross-hatch strokes to build textural ridges.

  • Let the base coat dry for 2 hours.

  • Dilute 1 teaspoon of raw umber or terracotta acrylic paint with 3 tablespoons of water to create a translucent watercolor wash.

  • Brush the wash over the textured surface, immediately dabbing the high ridges with a damp rag to leave dark pigment in the low crevices.

  • Seal with a completely matte clear protective spray.

Pro Crafter Tip

The baking soda reaction adds micro-air pockets that give standard smooth ceramic the authentic weight and feel of hand-troweled lime plaster.

2. Modern Matte Color-Block & Gold Rim Planter

2

Project Overview & Aesthetic Design

A crisp, Scandinavian-modern design featuring bold diagonal color-blocking in dusty sage green, soft cream, and charcoal, accented with a gleaming metallic liquid gold rim.

Step-by-Step DIY Execution Guide

  • Apply two coats of matte off-white chalk paint across the entire exterior of a primed pot.

  • Once completely dry, wrap low-tack painter’s tape diagonally across the body of the pot, pressing the tape edge firmly with your thumbnail.

  • Paint the lower section with two coats of matte dusty sage green acrylic paint.

  • Remove the tape while the second coat is still slightly tacky to reveal a razor-sharp, bleed-free line.

  • Paint the top rolled lip rim of the pot with metallic oil-based liquid gold leaf using a flat-edge detail brush.

  • Finish with two coats of satin acrylic varnish over the painted sections.

Pro Crafter Tip

Paint a quick, thin coat of your base cream paint over the painter’s tape edge before applying the sage green; any bleed will match the base, leaving the green line razor-sharp.

3. Moroccan Encaustic Tile Stencil Ceramic Pot

3

Project Overview & Aesthetic Design

An intricate bohemian planter inspired by Spanish and Moroccan encaustic tiles, featuring repeating geometric medallion motifs painted in deep cobalt blue and warm ivory.

Step-by-Step DIY Execution Guide

  • Paint the entire pot in two coats of matte warm ivory or soft sand acrylic paint.

  • Secure a flexible 4-inch geometric Moroccan tile stencil to the curved face of the pot using repositionable spray adhesive or painter’s tape.

  • Load a dense foam stencil dauber with deep cobalt blue or navy acrylic paint; dab excess paint onto a paper towel until the sponge is nearly dry.

  • Dab the paint gently over the stencil openings using an up-and-down stamping motion (avoid wiping, which causes paint bleed).

  • Carefully lift the stencil, let the pattern dry for 10 minutes, and repeat around the perimeter of the pot.

  • Seal with an exterior gloss varnish for a glazed ceramic tile sheen.

Pro Crafter Tip

Use an ultra-dry sponge technique; applying wet, runny paint over curved stencils is the main cause of messy edge bleeding.

4. Pressed Wildflower Botanical Decoupage Planter

4

Project Overview & Aesthetic Design

A delicate, romantic cottagecore craft pairing smooth white painted ceramic with real pressed garden flowers, sealed seamlessly beneath a protective glaze.

Step-by-Step DIY Execution Guide

  • Paint an unglazed pot with two solid coats of crisp white acrylic paint and let dry completely.

  • Press small garden blossoms (pansies, violas, verbena, and fern fronds) in a wooden flower press until completely flat and dry.

  • Plan your floral layout around the pot using precision tweezers.

  • Brush a thin, even layer of matte Mod Podge onto the target section of the pot.

  • Place the pressed flower onto the wet Mod Podge, pressing gently from the center outward with a soft brush to remove air bubbles.

  • Brush a second thin coat of Mod Podge directly over the flower petals to seal them flat.

  • Allow to dry for 24 hours, then spray with 2 coats of UV-resistant clear acrylic sealer.

Pro Crafter Tip

Choose naturally flat blooms like violas and pansies; thick rosebuds or sunflower centers will not lay flush against the curved surface of the pot.

5. Playful Pastel Checkered Grid Pot

5

Project Overview & Aesthetic Design

A cheerful, modern aesthetic featuring a hand-painted checkered grid in pastel buttercup yellow and lavender, framed with a scalloped bottom edge.

Step-by-Step DIY Execution Guide

  • Base-coat a smooth ceramic pot in soft buttercup-yellow acrylic paint.

  • Using a soft pencil and a flexible sewing tape measure, mark vertical and horizontal guidelines spaced 0.75 inches apart to form a grid across the pot.

  • Using a flat square shader paintbrush ($1/2$-inch wide), fill in alternating checkerboard squares with pastel lavender or lilac paint.

  • Keep your brushstrokes steady and consistent to maintain crisp square corners.

  • Outline the top rim with a continuous line of matching lilac paint.

  • Coat with high-gloss acrylic glaze to replicate high-end checkered ceramic boutique ware.

Pro Crafter Tip

Use a flexible vinyl measuring tape rather than a stiff wooden ruler so your grid lines follow the tapering curvature of the pot evenly.

6. Desert Sunset Ombré Dip Gradient Planter

6

Project Overview & Aesthetic Design

A warm, radiating gradient transitioning seamlessly from sun-drenched mustard yellow at the rim down through terracotta rust to deep desert berry at the base.

Step-by-Step Execution Guide

  • Squeeze small puddles of yellow, warm orange, terracotta, and deep burgundy acrylic paint onto a disposable palette.

  • Paint the top third of the primed pot in bright yellow using a damp 2-inch synthetic wash brush.

  • While the yellow paint is still wet, paint the middle third in terracotta, blending the two wet colors together where they meet using horizontal back-and-forth brush sweeps.

  • Blend deep burgundy into the bottom third while the middle terracotta layer remains wet.

  • Use a damp natural sea sponge to gently dab the color transition seams for a soft, seamless airbrushed gradient.

  • Once dry, seal with an exterior satin varnish.

Pro Crafter Tip

Work quickly while the acrylic paint is wet; adding a drop of acrylic blending retarder extends paint dry-time, giving you more time to blend the gradient smoothly.

7. Black & White Abstract Line Art Face Planter

7

Project Overview & Aesthetic Design

A sophisticated, modern gallery piece featuring a matte chalk-white pot painted with a continuous, minimalist one-line human face profile using fine black ink lines.

Step-by-Step DIY Execution Guide

  • Paint the pot in three coats of ultra-matte white chalk paint to create a velvety, porcelain-like surface.

  • Lightly sketch a continuous, abstract single-line face profile (eyes, nose, lips, and brow) onto the pot using a 2H pencil.

  • Trace over the pencil lines using a fine-point oil-based black paint pen or a #0 detail round brush dipped in black acrylic enamel.

  • Keep the line weight smooth and continuous without lifting the pen from the surface.

  • Add small, subtle terracotta-colored circles on the cheeks to act as abstract blush accents.

  • Protect the artwork with a non-yellowing matte spray varnish.

Pro Crafter Tip

Oil-based paint pens offer far superior control and line precision on curved pottery surfaces compared to traditional paintbrushes.

8. Earthy Speckled Sandstone & Sage Striped Pot

8

Project Overview & Aesthetic Design

A calm, Japandi-inspired planter crafted with textured sandstone-colored paint, fine dark mineral speckles, and wide, earthy sage-green horizontal bands.

Step-by-Step DIY Execution Guide

  • Paint the pot with two coats of warm oatmeal or almond-beige acrylic paint mixed with a pinch of fine craft sand.

  • Dip an old stiff-bristle toothbrush into watered-down dark brown acrylic paint.

  • Hold the toothbrush 6 inches from the pot and flick your thumb across the bristles to spray a fine mist of mineral speckles across the surface.

  • Once dry, tape off two 1-inch wide horizontal bands around the lower body of the pot.

  • Paint the bands in a muted, earthy sage green.

  • Remove tape and finish with a completely flat matte sealer for a raw ceramic stoneware look.

Pro Crafter Tip

Practice your toothbrush speckle technique on a piece of cardboard first to ensure the spray droplets remain micro-fine rather than heavy blotches.

9. Hand-Painted Blue Willow Chinoiserie Pot

9

Project Overview & Aesthetic Design

A timeless, heritage-inspired piece replicating classic blue-and-white Delft or Chinoiserie porcelain, featuring hand-painted botanical vines, birds, and blooming peonies.

Step-by-Step Execution Guide

  • Coat a smooth ceramic pot with three coats of high-gloss porcelain-white acrylic paint or white spray enamel.

  • Mix three varied dilutions of royal blue acrylic paint on your palette (dark navy, cobalt blue, and watery sky blue) to create depth.

  • Using a fine-detail liner brush, paint climbing botanical leafy vines wrapping around the pot body.

  • Fill in stylized peony petals using watery blue washes, outlining the petal edges with concentrated dark cobalt blue.

  • Add decorative dotted floral bands along the upper rolled rim.

  • Apply two coats of high-gloss polyurethane glaze or UV craft resin to give the pot a glass-like fired porcelain shine.

Pro Crafter Tip

Layering watery blue washes beneath crisp dark blue outlines mimics the hand-painted brushwork of authentic antique Chinoiserie ceramics.

10. Terrazzo Mosaic Pattern Ceramic Catchall Pot

10

Project Overview & Aesthetic Design

A mid-century modern aesthetic featuring a clean alabaster background hand-painted with multi-colored geometric terrazzo chips in rust, mustard, sage, and black.

Step-by-Step Execution Guide

  • Base-coat a primed ceramic planter in two solid coats of warm alabaster white paint.

  • Select four complementary acrylic colors: terracotta rust, golden mustard, soft sage, and charcoal black.

  • Using a small flat craft brush, paint small, random angular geometric polygons (triangles, trapezoids, and irregular shards) scattered across the pot.

  • Rotate the orientation of the shapes so the pattern looks organic and evenly distributed.

  • Add tiny speckles between the larger shapes with a fine-point paintbrush.

  • Seal with a satin exterior varnish.

Pro Crafter Tip

Keep geometric chips spaced roughly $0.5$ inches apart to maintain negative white space and prevent the pattern from looking overcrowded.

Comparison & Craft Project Overview

DIY Pot Project Base Finish Signature Painting Technique Glaze / Sealer Style Difficulty Best Suited Plant
Textured Limewash Beige chalk + soda Gritty cross-hatch + tea wash Flat Matte Beginner Olive sapling / Fiddle-leaf
Color-Block & Gold Rim Off-white matte Tape masking + Liquid gold leaf Satin + Gloss Rim Beginner Snake plant / ZZ plant
Moroccan Tile Stencil Ivory chalk paint Dry-sponge stencil stamping High Gloss Intermediate Trailing English ivy
Pressed Wildflower Pure white acrylic Mod Podge botanical decoupage Satin UV Sealer Intermediate String of pearls / Fern
Pastel Checkered Grid Yellow acrylic Tape grid + Square shader fill High-Gloss Tile Intermediate Potted lavender / Pilea
Sunset Ombré Gradient Wet acrylic blend Wet-on-wet horizontal sponge melt Exterior Satin Advanced Golden pothos / Cactus
Abstract Line Art Face Matte white chalk Continuous oil paint pen line Ultra-Matte Beginner Trailing String of hearts
Speckled Sandstone Sand-textured beige Toothbrush splatter + Tape stripe Natural Flat Matte Beginner Monstera deliciosa
Blue Chinoiserie High-gloss white Detail line-work + Blue washes Glass High-Gloss Advanced White orchid / Peace lily
Terrazzo Mosaic Alabaster white Random geometric polygon dabbing Satin Polyurethane Beginner Rubber tree / Calathea

Common Beginner Mistakes & How to Avoid Them

  • Skipping the Interior Sealant: Leaving the inside of a terracotta pot raw allows damp soil water to permeate the clay, causing exterior paint to bubble, blister, and peel within weeks. Solution: Always spray or brush 2 coats of waterproof acrylic or masonry sealer inside the pot before painting the exterior.

  • Painting Directly Over Dirty, Dusty Pots: Raw terracotta comes coated in fine factory clay dust that prevents paint from adhering. Solution: Wash pots thoroughly in warm water, scrub with a brush, and let dry for 24 hours before applying primer.

  • Applying Heavy, Wet Paint Over Stencils: Excess wet paint seeps under stencil edges, leaving smeared lines. Solution: Use a dense foam dauber loaded with nearly dry paint, tapping gently in an up-and-down motion.

  • Blocking the Bottom Drainage Hole with Paint: Allowing thick paint and varnish to clog the drainage hole causes water to pool around plant roots, leading to root rot. Solution: Insert a rolled piece of paper towel into the drainage hole while painting and sealing.

Care & Maintenance for Painted Ceramic Pots

Maintenance Practice Target Frequency Recommended Method
Exterior Dusting & Cleaning Monthly Wipe gently with a soft microfiber cloth dampened with cool water (no harsh chemicals)
Watering Protocol Regular Plant Care Water plants at the soil base; avoid letting standing water sit on painted outer rims
Winter Frost Protection Annually (Outdoor Pots) Bring painted terracotta pots indoors before freezing temperatures to prevent clay cracking
Topcoat Re-Application Every 1–2 Years Apply a fresh light mist of exterior UV-resistant clear acrylic spray

Similar Posts

  • 10 Nail Inspo Trendy Pink

    Spread the love

    Spread the lovePink nails never go out of style. They evolve, transform, and return every season with a fresh twist. From soft blush tones to bold neon shades, pink nail designs continue to dominate Pinterest boards across the world. Trendy pink nails are loved because they are versatile, flattering, and suitable for every age and…

  • 10 Showcasing Ceramic Vases

    Spread the love

    Spread the loveCeramic vases have always been more than just containers for flowers. They are timeless works of art that can transform a room, define a mood, and express personal style. From hand-thrown pottery to sleek, modern pieces, ceramic vases bring both texture and elegance to any home decor. Whether you display them solo or…

  • 10 Fall Outfits 2025 Trends Casual

    Spread the love

    Spread the loveAs the leaves turn golden and the air becomes crisp, fall fashion takes center stage once again. The 2025 fall season brings an exciting mix of comfort, texture, and creativity to casual dressing. This year, style enthusiasts are leaning into effortlessly chic pieces that blend practicality with personality. Whether you’re walking through the…

  • 10 Cowboy Birthday Party

    Spread the love

    Spread the loveIf you are looking for a fun and unique birthday party theme that everyone will remember, a cowboy birthday party is a perfect choice. Whether it is for kids, teens, or adults, the western theme brings together rustic decor, outdoor fun, and country charm. From hay bales and bandanas to cowboy hats and…

  • 10 Cute Easy Drawings Ideas

    Spread the love

    Spread the loveCute drawings have a unique charm that appeals to artists of all ages. Whether you are a beginner just starting to explore your creative side or someone who loves making simple adorable illustrations, cute drawing ideas are the perfect way to build confidence and enjoy the process. Easy drawings do not require advanced…

  • 10 Keychain From Clay

    Spread the love

    Spread the loveClay crafts have a special charm that makes them timeless, fun, and incredibly personal. When you work with clay, you get to create something from scratch that reflects your personality, creativity, and style. Among the many things you can craft with clay, keychains stand out as one of the easiest and most enjoyable…

Leave a Reply

Your email address will not be published. Required fields are marked *