10 Air Clay Crafts for Kids
Air dry clay is one of the most versatile and kid friendly crafting materials you can bring into your home. It is soft, easy to shape, and dries without the need for an oven or kiln. This makes it a perfect choice for creative afternoons, classroom activities, weekend projects, and even birthday craft stations. With a little imagination, kids can turn a simple block of air dry clay into colorful decorations, playful figurines, or useful little keepsakes.
In this guide, we will explore ten wonderful air clay crafts for kids. Each idea is entertaining, simple to execute, and beginner friendly. Whether your child loves animals, nature, shapes, or pretend play, you will find plenty of inspiration here. This post provides step by step details, tips for better results, and suggestions for customization. By the end, you will have everything you need to create memorable crafting experiences with air dry clay.
Let us dive into these creative and fun projects.
1. Clay Animal Figurines
Air dry clay animal figurines are one of the best introductory projects for kids. Children love shaping their favorite animals, whether it is a cute bunny, a tiny elephant, or a playful puppy. This craft encourages fine motor skill development as kids roll, pinch, and sculpt different parts.
Start by choosing a simple animal shape. Round bodies, small ears, and basic facial features work best for beginners. Create the body, then add details such as ears, legs, and a little nose. Use a toothpick or wooden stick to make eyes or texture lines. Once dry, kids can paint the figurines with acrylic paint and add patterns like stripes, dots, or patches.
To make the activity more engaging, set a theme. For example, create a mini jungle scene with lions and monkeys, or a farm set with cows and chickens. You can also encourage kids to invent imaginary animals. The freedom of clay allows them to explore creativity without any limits.

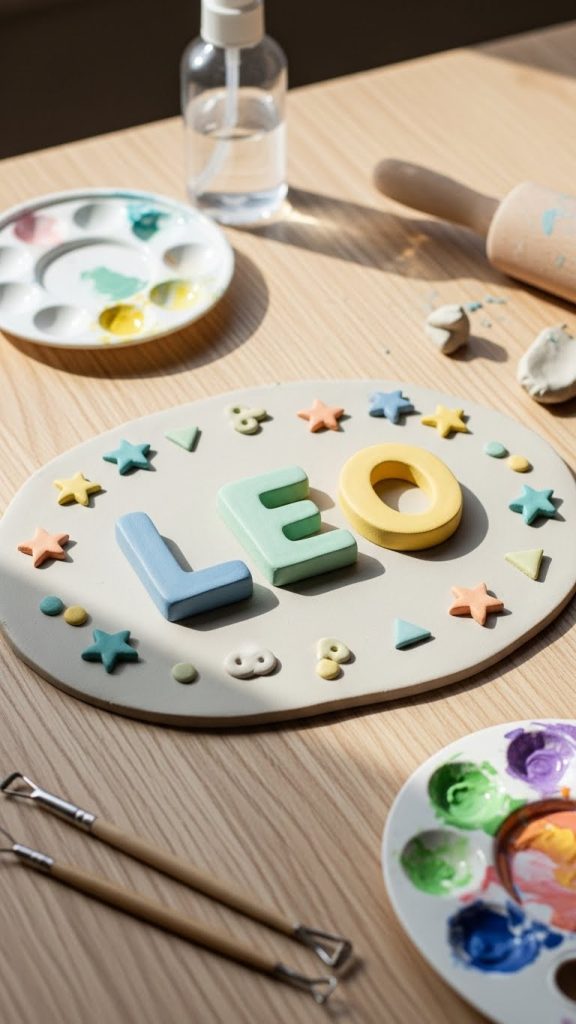
2. Personalized Name Plaques
Kids love seeing their name displayed in their room, and air clay name plaques are a fun way to create personalized decor. Begin by rolling out a flat slab of clay. Then use letter cutters, or have kids shape letters by hand. These letters can be placed on a rectangular or circular clay base.
Add small decorations around the letters such as stars, hearts, leaves, or tiny animal shapes. Create a small hole on each side of the plaque if you want to hang it with string later. After drying, paint the plaque in bright colors that match the child’s room.
This craft makes a great gift for friends and family. Kids can personalize the colors, shapes, and themes to make each plaque unique. It also teaches children how to work with layers and textures in clay.
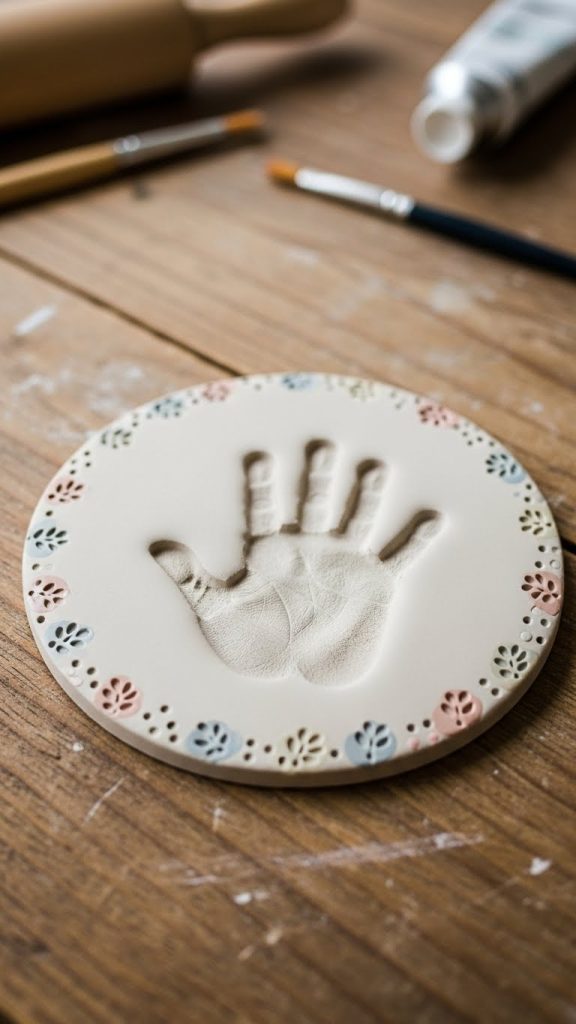
3. Handprint or Footprint Keepsakes
Air dry clay is perfect for creating lasting keepsakes that capture a moment in time. Handprint or footprint plaques are simple enough for younger children, but older kids also enjoy making these memory crafts.
Roll out a smooth, even slab of clay. Press the hand or foot gently into the clay to create a clear impression. Decorate the edges with small clay shapes like flowers, stars, or simple patterns. You can also write the child’s name or date into the clay using a pointed tool.
Once dry, paint the background and impression in contrasting colors. These keepsakes make thoughtful gifts for parents, grandparents, or teachers. They also create meaningful memories that children will look back on years later.
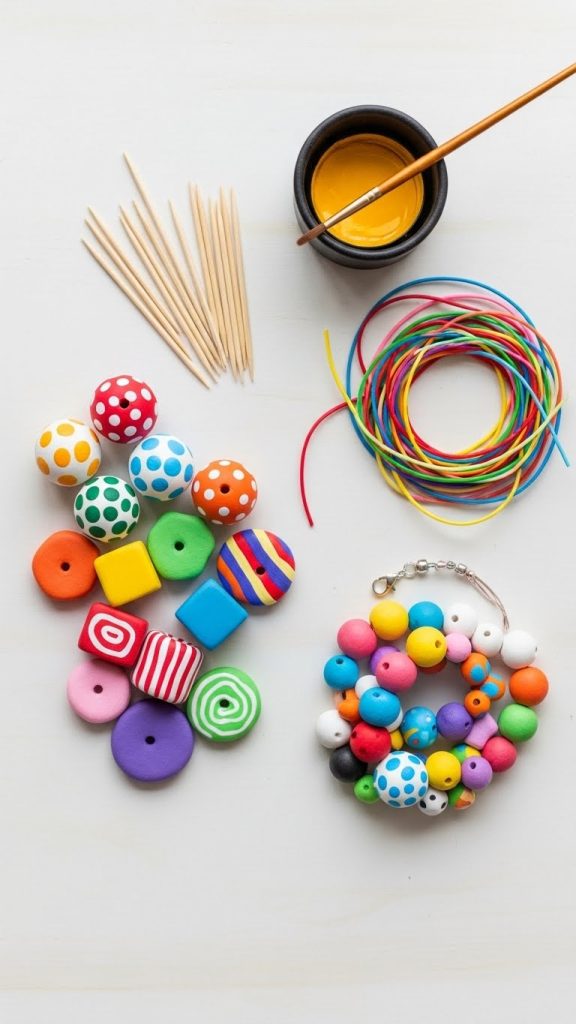
4. Clay Bead Bracelets and Necklaces
Making beads out of air dry clay allows kids to create their own wearable art. This project is great for both fine motor skills and creative expression. Start by rolling small pieces of clay into balls, squares, or cylindrical shapes. Use a toothpick to poke holes through the center for stringing.
Encourage kids to experiment with bead designs. They can add texture by pressing lace, leaves, or patterned objects onto the surface. They can also combine bead shapes to create interesting patterns. Once the beads are dry, paint them in bright colors and seal with a non toxic varnish.
Finally, string the beads together to create bracelets or necklaces. This craft is ideal for parties, homeschooling projects, or rainy afternoons where children want to make something functional.
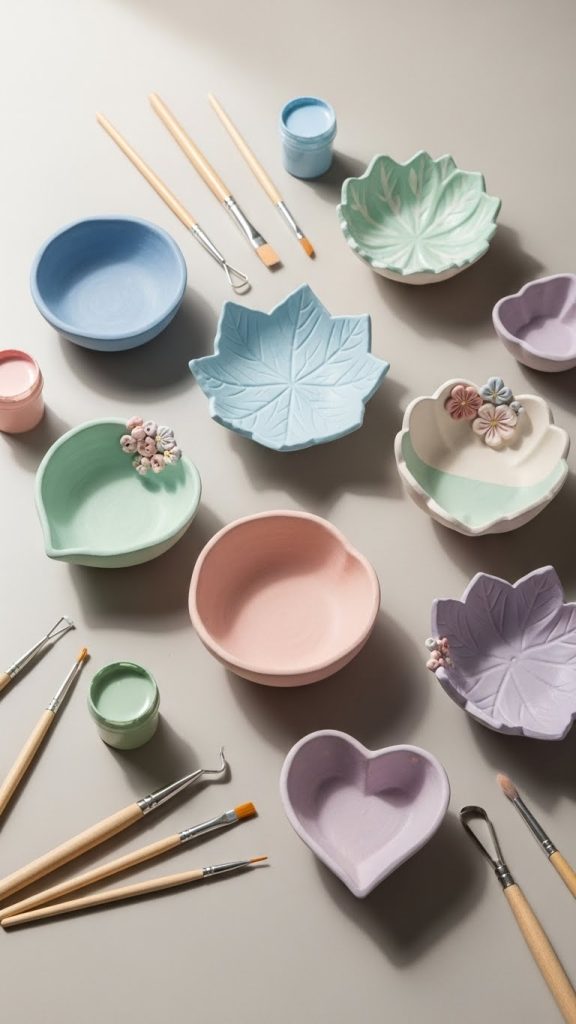
5. Mini Clay Bowls
Mini air clay bowls are beautiful, practical, and easy for kids to craft. Start by rolling out a ball of clay and pressing it into a small dish or mold. Smooth the edges with slightly damp fingers. You can leave the surface plain or add decorative textures.
Once dry, kids can paint the bowls using soft pastels or bright colors. These mini bowls can hold small items such as beads, coins, jewelry, or desk supplies. They make great gifts and teach kids basic shaping techniques.
Try theme variations such as fruit shaped bowls, leaf inspired bowls, or animal themed dishes. These imaginative twists keep the craft exciting every time you try it.
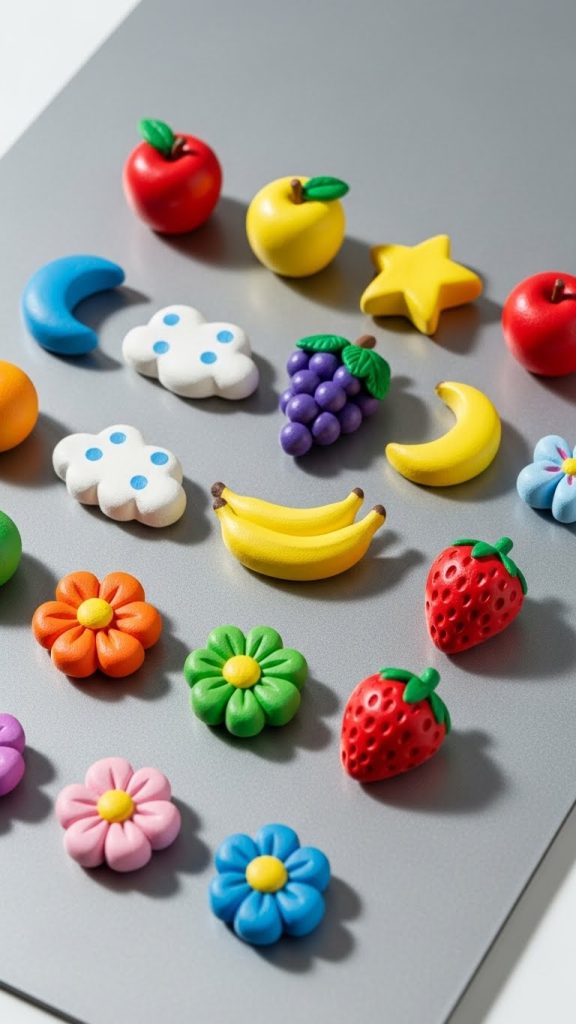
6. Clay Magnets
Air dry clay magnets combine creativity with functionality and are perfect for decorating refrigerators or magnetic boards. Start by creating small shapes such as fruit, stars, flowers, clouds, or miniature food items. Flatten the backs so magnets can adhere evenly.
After the shapes dry, paint them with acrylic paint. Attach small magnets using strong glue. Kids enjoy choosing themes like food magnets, ocean magnets, or holiday themed magnet sets. This project is an excellent way to introduce children to making sets, collections, and themed designs.
Clay magnets are simple, adorable, and great for gifting.
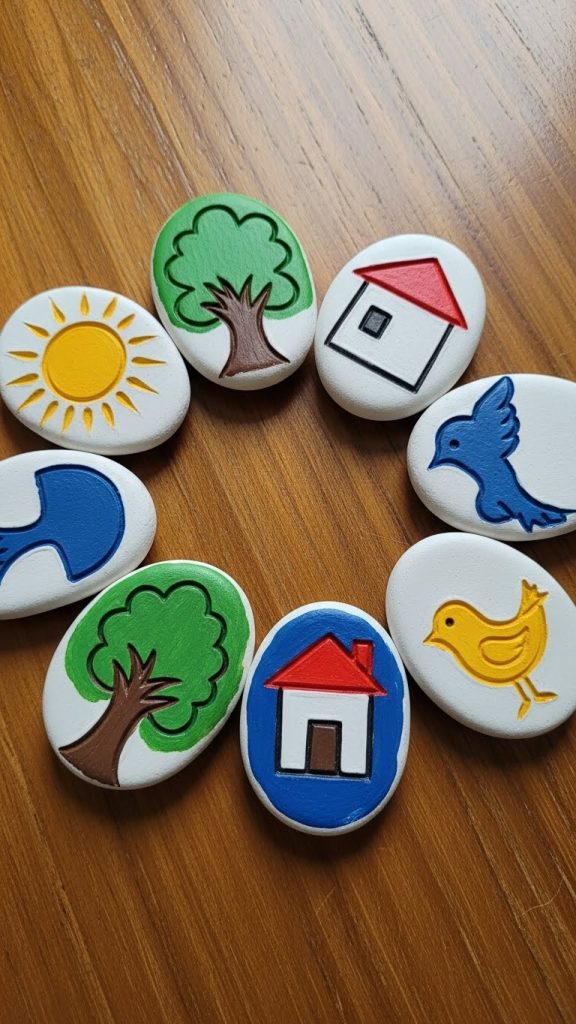
7. Story Stones
Story stones help kids create storytelling prompts using clay shapes and symbols. Begin by shaping flat oval stones out of clay. On each stone, sculpt or carve a simple picture such as a sun, tree, house, heart, or animal.
When the stones dry, paint each design with bold colors. Kids can then use the stones to make up stories. For example, if they pick a tree, a bird, and a house, they can create a tale about a bird searching for a home. This activity stimulates creativity and language development.
Story stones also work well in classrooms or homeschooling environments. Teachers can use them for writing prompts, group activities, or drama exercises. The simplicity of the craft makes it suitable for kids of all ages.
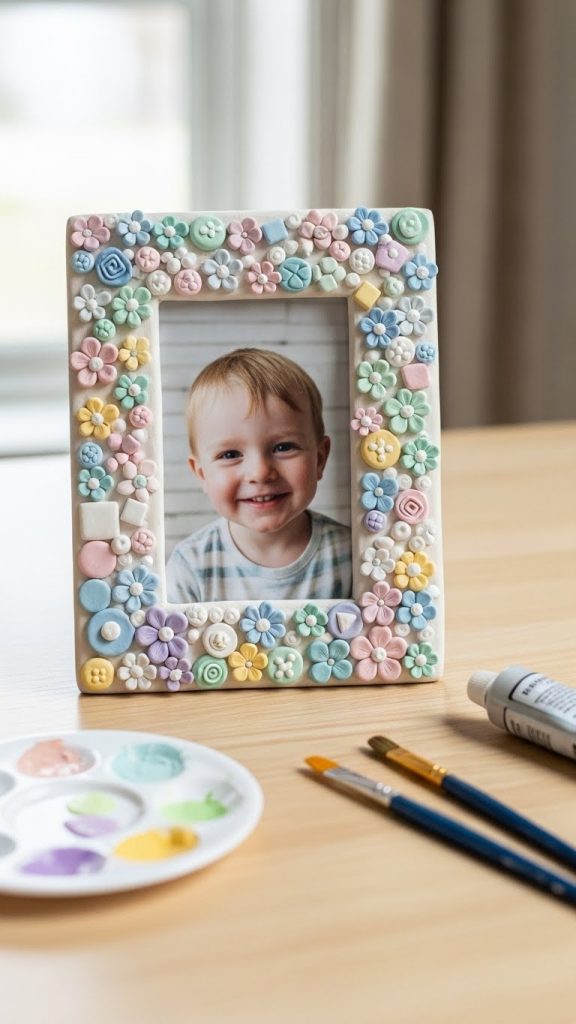
8. Clay Picture Frames
Clay picture frames give kids a chance to craft something meaningful while practicing shaping and designing. Start by cutting out a rectangular or square frame shape from rolled clay. You can create a stand by attaching a clay base at the back, or leave it flat for hanging.
Decorate the frame with small clay accents such as flowers, leaves, geometric shapes, shells, or anything the child loves. Once dry, paint the frame and seal it for durability. Add a printed photo inside, and it becomes a charming keepsake.
This project makes a heartfelt gift for mothers day, fathers day, birthdays, or family celebrations. Kids love the sense of accomplishment that comes from displaying their frame at home.
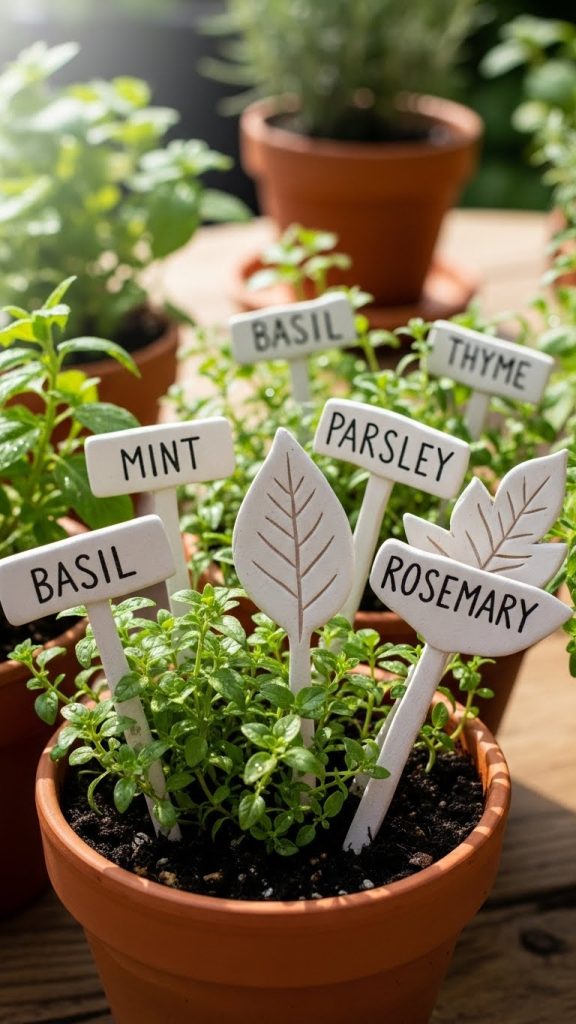
9. Air Clay Plant Markers
Plant markers are perfect for little gardeners. They help kids label herbs, flowers, or vegetable plants while adding charm to the garden. Create long, flat clay sticks or use small shapes like circles or leaves as the marker base.
Press letters into the clay or write plant names using a pointed tool. After drying, paint the markers with outdoor safe paint or seal them well. Kids can create themed marker sets, such as a herb set for basil, mint, and parsley or a floral set for marigolds, roses, and daffodils.
This craft also encourages kids to learn more about plants and gardening, turning creativity into a hands on educational experience.
10. Fairy Garden Accessories
Fairy gardens are magical miniature worlds that spark the imagination, and air dry clay is perfect for creating tiny accessories. Kids can craft items like miniature mushrooms, a tiny bench, small stepping stones, tiny houses, or little creatures.
Start with simple shapes. For example, a mushroom is just a small ball for the stem and a dome for the top. A fairy door can be shaped from a small slab with added details like wood grain or pebbles. Encourage kids to add texture using sticks, lace, or natural materials.
Once dry, paint everything in bright fairy tale colors. These tiny decorations can be placed inside flower pots, outdoor fairy gardens, or even terrariums. Children enjoy imaginative play as they arrange their miniature scenes.

Tips for Working with Air Dry Clay
To make crafting even smoother, consider these handy tips:
Keep the clay moist
Air dry clay hardens quickly when exposed to air. Keep unused clay wrapped in plastic or stored in an airtight container.
Use small amounts of water
A drop of water can help smooth cracks or attach pieces, but too much water can weaken the clay.
Let projects dry fully
Most pieces need at least twenty four hours to dry completely. Larger sculptures may require more time.
Sand rough edges
Once dry, lightly sand any rough areas before painting.
Choose the right paint
Acrylic paint works best on air dry clay because it covers well and dries quickly.
Seal for durability
A non toxic sealant helps protect painted projects and gives them a finished look.
Final Thoughts
Air dry clay crafts offer endless opportunities for creativity and exploration. Kids can express their ideas, practice fine motor skills, and gain confidence as they bring their projects to life. Whether you are crafting at home, in a classroom, or at a party, these ten ideas make crafting fun and stress free.
From animal figurines to fairy garden accessories, each project provides hands on enjoyment with results that last. Air dry clay is affordable, easy to use, and ideal for kids of all ages. Give these crafts a try and watch creativity blossom.