10 Minimalist Studio Apartment Small Space Layouts

Spread the love

Designing a minimalist studio apartment (250 to 500 sq ft) requires a shift from decorative filler to architectural efficiency. In an open-plan micro-footprint, success relies on spatial zoning, multi-functional built-ins, clean sightlines, and smart flow engineering.

Modern minimalist small-space design avoids visual clutter by pairing cohesive materials—such as light oak, matte-white cabinetry, microcement, and ribbed glass—with intentional layouts. By utilizing glass acoustic partitions, raised storage platforms, concealed fold-down systems, and dual-purpose divider consoles, a single open room can comfortably host sleeping, working, cooking, and lounging zones without feeling crowded.

Whether remodeling an urban micro-flat, furnishing a rental studio, or organizing an open-concept loft, these ten minimalist studio layouts provide floor-plan blueprints, zoning rules, and production-ready visual prompts.
Why This Idea Is Trending & Flattering

  • Visual Expansion of Floor Space: Maintaining low-profile furniture and uninterrupted floor sightlines tricks the eye into perceiving a larger space.

  • Streamlined Daily Flow: Defining zones for sleeping, working, dining, and relaxing prevents daily clutter from taking over the entire home.

  • Concealed Storage Integration: Raised platforms, custom floor-to-ceiling wardrobes, and pocketed joinery store everyday items out of sight.

  • Maximized Natural Daylight: Utilizing transparent partitions (like fluted glass, slatted oak screens, and half-height dividers) allows window light to reach every corner.

  • Low-Maintenance Living: Minimalist layouts reduce surface clutter, making cleaning, organizing, and daily upkeep quick and effortless.

Materials, Palettes & Spatial Zoning Principles

Core Minimalist Color Palette

  • Foundational Neutrals: Warm Alabaster White, Chalk White, Pale Greige, Light Birch

  • Architectural Accents: Muted Charcoal, Soft Slate, Pale Sage, Muted Taupe

  • Natural Woods & Metals: White Nordic Oak, Natural Ash, Matte Black Iron, Brushed Champagne Nickel

Fundamental Spatial Zoning Rules

  • The 36-Inch Circulation Corridor: Keep primary pathways between the entryway, kitchen, bed, and bathroom at least 32 to 36 inches wide to ensure comfortable movement.

  • Vertical Elevation Over Floor Spread: Use floor-to-ceiling storage and elevated loft/platform beds to capture vertical cubic volume instead of cluttering floor space.

  • Concealed Multi-Functionality: Choose furniture that performs dual roles (e.g., dining tables that double as work desks, or storage platforms with slide-out steps).

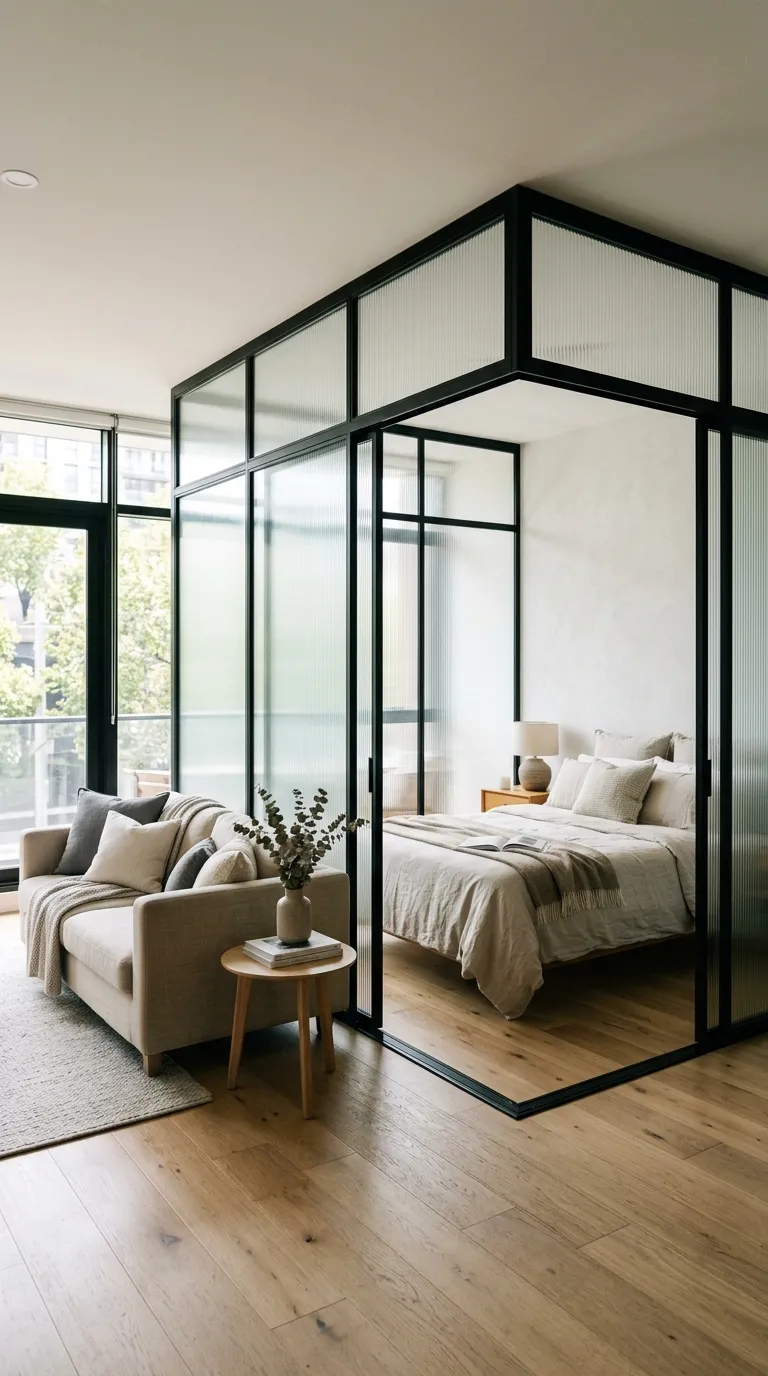
1. The Glass-Enclosed Corner Bedroom Cube

1

Layout Blueprint & Spatial Flow

The bed is positioned in a rear corner and enclosed in a minimalist matte-black steel or light-oak glass cube. The glass walls maintain visual depth while providing acoustic separation from the living and kitchen areas.

Step-by-Step Execution Guide

  • Position a queen or full-size bed flush into the quietest corner of the studio.

  • Install a ceiling-tracked sliding partition made of black aluminum and ribbed or clear tempered glass.

  • Mount a ceiling-recessed linen drapery track just inside the glass frame for optional nighttime privacy.

  • Arrange the sofa back-to-back against the exterior glass partition to establish the living room zone.

  • Keep the center of the apartment open with a low-profile coffee table and a neutral area rug.

Pro Spatial Tip

Using fluted or ribbed glass diffuses light and obscures unmade bedding while keeping the space bright and open.

2. The Raised Storage Platform & Sunken Lounge

2

Layout Blueprint & Spatial Flow

A custom 18- to 24-inch elevated wooden platform holds the mattress and built-in bedside niches. The hollow platform underneath contains deep pull-out wardrobe drawers and a slide-out desk.

Step-by-Step Execution Guide

  • Build a solid birch or oak platform along the window wall, elevated 20 inches off the subfloor.

  • Drop a mattress into a recessed well on top of the platform to keep the sleeping profile low and clean.

  • Install heavy-duty push-to-open drawer slides into the platform base facing the main room for clothes storage.

  • Integrate two low steps leading up to the platform, with each step functioning as a hinged shoe-storage trunk.

  • Position a low-slung, armless sofa directly in front of the platform to create a sunken living zone.

Pro Spatial Tip

Orienting the raised platform toward the windows provides morning light for waking while keeping daytime floor areas free for living.

3. The Central Swivel-TV Divider Console

3

Layout Blueprint & Spatial Flow

A freestanding, half-height custom storage partition anchors the center of the studio, featuring a 360-degree rotating television panel that serves both the bedroom and the living room.

Step-by-Step Execution Guide

  • Position a 48-inch tall, 60-inch wide custom cabinetry console in the middle of the room, leaving 36-inch walkways on both sides.

  • Mount an internal steel swivel bracket inside the central console opening to hold a flat-panel TV.

  • Face the bedroom toward one side of the divider and the sofa toward the other.

  • Use the lower base of the divider for hidden media wiring, books, and extra linen storage.

  • Rotate the screen toward the bed for nighttime viewing or toward the living area for daytime use.

Pro Spatial Tip

Keeping the divider at 48 inches (chest height) maintains an unbroken ceiling line, making the entire apartment feel spacious.

4. The Concealed Murphy Bed & Integrated Workstation

4

Layout Blueprint & Spatial Flow

A clean wall-bed system where a queen bed folds vertically into a wall of seamless white cabinetry. When closed, a sturdy 6-foot desk folds down automatically without disturbing desktop items.

Step-by-Step Execution Guide

  • Install a counterbalance Murphy bed mechanism framed by floor-to-ceiling matte-white wardrobe cabinets along the main wall.

  • Select a modern unit with a cantilevered drop-down desk that remains level when the bed is pulled down.

  • Position two lightweight armchairs and a nesting coffee table in front of the bed zone that can easily shift aside at night.

  • Dedicate the opposite wall to a compact galley kitchen and a small round bistro dining table.

  • Fold the bed up during the day to reveal an open, expansive home office and living space.

Pro Spatial Tip

Install push-latch cabinet hardware without external handles so the closed bed looks like an architectural paneled wall.

5. The Slatted Oak Wood Screen Sleeping Alcove

5

Layout Blueprint & Spatial Flow

A warm Japandi-inspired layout featuring a floor-to-ceiling vertical oak slat screen (acoustic felt-backed or open-slat) that softly partitions the bed from the entryway and lounge.

Step-by-Step Execution Guide

  • Frame a dedicated $8times10$-foot sleeping niche using vertical $1times2$-inch natural white-oak wood slats spaced 1.5 inches apart.

  • Anchor the slats securely into the floor and ceiling joists to form a semi-transparent screen.

  • Position the headboard against the solid back wall inside the nook, framed with hanging pendant reading lights.

  • Place a slim entryway drop console on the outer face of the slatted wall.

  • Arrange the dining and living zones in the open space beyond the screen.

Pro Spatial Tip

Vertical wood slats draw the eye upward, highlighting ceiling height while allowing air and natural light to flow through the partition.

6. The Galley Kitchen Island Corridor & Split Zones

6

Layout Blueprint & Spatial Flow

An elongated rectangular studio where a central multi-functional kitchen island acts as a cooking prep counter, dining table, work desk, and spatial divider between wet and dry zones.

Step-by-Step Execution Guide

  • Install a linear galley kitchen along one side wall.

  • Place an extended 36×84-inch quartz or butcher-block island parallel to the kitchen run, leaving a 38-inch cooking aisle.

  • Overhang the island countertop by 12 inches on the living-room side to accommodate four tucked-in barstools.

  • Use the island as the boundary: position the sleeping nook behind the island and the sofa/lounge area in front.

  • Equip the island end-cap with integrated electrical outlets for laptops and kitchen appliances.

Pro Spatial Tip

An extended island eliminates the need for a separate dining table and work desk, saving substantial floor space.

7. The Linear Wall-Run & Floating Furniture Layout

7

Layout Blueprint & Spatial Flow

All major storage, appliances, and cabinetry are consolidated along a single continuous wall, leaving the rest of the floor completely open for floating, moveable modular furniture.

Step-by-Step Execution Guide

  • Build a continuous floor-to-ceiling cabinet run along one long wall, integrating the refrigerator, kitchen pantry, wardrobe, and fold-out desk into a single facade.

  • Keep the opposite perimeter walls completely bare with light paint and discrete wall sconces.

  • Float a modular two-piece sectional sofa in the center of the room over a large neutral wool rug.

  • Place a low platform bed at the far end of the open space, anchored by a low headboard credenza.

  • Use lightweight, mobile furniture (like C-tables and poufs) that can be reconfigured on demand.

Pro Spatial Tip

Consolidating cabinetry onto a single wall simplifies mechanical pathways and leaves the living area open and uncluttered.

8. The Lofted Bunk Bed with Walk-In Closet Below

8

Layout Blueprint & Spatial Flow

Designed for studios with ceilings over 9.5 feet. A sturdy steel or timber loft structure elevates the sleeping zone, freeing the entire 50 sq ft footprint below for a walk-in closet or home office.

Step-by-Step Execution Guide

  • Construct a mezzanine loft bed elevated 68 inches off the ground using structural steel posts or heavy timber.

  • Fit the upper loft with a low-profile mattress, safety rails, and a reading light.

  • Build a full walk-in closet underneath with clothing rods, shoe shelving, and LED sensor strip lighting.

  • Build an access staircase alongside the loft where each stair tread houses a deep pull-out storage drawer.

  • Dedicate the remaining open floor area to an expansive living room and dining setup.

Pro Spatial Tip

Paint the loft support structure the exact same color as the surrounding walls to help it blend seamlessly into the room’s architecture.

9. The Bookshelf Spine Room Divider

9

Layout Blueprint & Spatial Flow

An open, backless modular shelving unit (like an open metal-and-wood bookcase) acts as a functional room divider, separating the sleeping quarters from the entertaining space while displaying curated decor.

Step-by-Step Execution Guide

  • Place a 6-foot wide, 5-foot tall open backless bookcase perpendicular to the main exterior wall.

  • Arrange the sleeping area on the private side of the shelving unit.

  • Position the living room sofa on the public side, facing away from the bed toward an opposing media wall.

  • Style the shelving with a balanced mix of books, closed storage baskets, ceramics, and small trailing plants.

  • Leave at least 40% of the shelf compartments open to maintain sightlines and airflow between zones.

Pro Spatial Tip

Use closed storage baskets on the lower shelves for personal items and keep the upper shelves open to preserve light transmission.

10. The Corner Daybed & Wraparound Window Banquette

10

Layout Blueprint & Spatial Flow

A layout for corner-window studios where a custom built-in daybed hugs the window corner, functioning as a deep lounge sofa by day and a standard bed by night, integrated with a dining banquette.

Step-by-Step Execution Guide

  • Build a continuous L-shaped low platform along two intersecting window walls.

  • Outfit one leg of the platform with a twin-XL or full mattress topped with oversized bolster cushions for daytime lounging.

  • Extend the other leg of the platform into a dining banquette bench paired with a pedestal table and two bentwood chairs.

  • Build deep storage compartments with lift-up hinged lids into the platform base beneath the cushions.

  • Keep the central floor area open for an accent lounge chair and a minimalist mobile coffee table.

Pro Spatial Tip

Positioning built-in seating along perimeter windows takes advantage of natural light and leaves the center of the apartment open.

Layout Concept Comparison

Studio Layout Concept Primary Zoning Method Key Space-Saving Feature Best Square Footage Primary Advantage
Glass Bedroom Cube Steel & glass sliding walls Acoustic separation + clear light 400 – 500 sq ft Keeps bedroom private without shrinking space
Raised Storage Platform Elevated wooden deck Deep under-bed drawers + steps 300 – 400 sq ft Massive hidden wardrobe storage
Swivel-TV Divider 48″ half-height console 360-degree rotating screen 350 – 450 sq ft One TV serves both bedroom and living room
Concealed Murphy Bed Vertical wall-bed unit Integrated drop-down work desk 250 – 350 sq ft Frees up entire daytime floor space
Slatted Oak Screen Vertical timber partition Light-filtering visual screen 300 – 400 sq ft Warm architectural texture + subtle privacy
Kitchen Island Corridor Extended central island Prep + Dining + Desk + Boundary 350 – 500 sq ft Eliminates need for separate dining/work tables
Linear Single-Wall Run Consolidated utility wall Floor-to-ceiling flush cabinets 300 – 450 sq ft Leaves center floor open for modular layouts
High Loft & Walk-in Elevated mezzanine structure Full closet/office under bed 250 – 350 sq ft (High ceiling) Doubles usable square footage in vertical space
Open Bookshelf Spine Backless modular shelving Dual-sided storage & divider 350 – 450 sq ft Zero-renovation rental-friendly partition
Corner Daybed Banquette L-shaped window platform Sofa-to-bed conversion + dining 250 – 350 sq ft Maximizes corner perimeter light & seating

4 Rules for Small Studio Apartment Success

  • Stick to the 60-30-10 Color Formula: Use 60% light neutral walls/floors (Alabaster White, Pale Greige), 30% warm natural wood tones (Oak, Ash), and 10% high-contrast accents (Matte Black, Charcoal, Sage).

  • Elevate Furniture on Slender Legs: Choose sofas, consoles, and credenzas with tapered legs that sit off the floor; seeing the floor extend beneath furniture makes rooms feel larger.

  • Use Continuous Flooring Throughout: Avoid changing floor materials between the kitchen, living, and bedroom zones; a single, unbroken floor surface visually unites the space.

  • Layer Dimmable Ambient Lighting: Avoid relying solely on a single harsh ceiling fixture; use recessed warm LED strips under cabinets, floating wall sconces, and floor lamps to define zones.

Similar Posts

  • 10 Apartment Patio Privacy Ideas

    Spread the love

    Spread the loveApartment patios and balconies offer valuable outdoor living space, but their open designs often leave residents exposed to nearby neighbors, street traffic, and upper-level windows. Transforming an exposed apartment patio into a secluded personal retreat requires strategic privacy solutions that balance screening, light diffusion, and structural accessibility. Because most apartment complexes enforce strict…

  • 10 Dream Apartment Aesthetic Cozy Ideas

    Spread the love

    Spread the loveTransforming an apartment into a cozy, aesthetic sanctuary is all about blending atmospheric warmth, personal curation, and intentional textures. Whether you are working with a compact studio or a spacious loft, the secret to a “dream apartment” aesthetic lies in warm ambient lighting, plush layered textiles, organic materials, and cozy reading nooks that…

Leave a Reply

Your email address will not be published. Required fields are marked *